Router Forums banner

Blue hawk brand

15K views 8 replies 7 participants last post by  JOAT  
#1 ·
Hey, peeps I was in the big blue box store yesterday and found a brand Blue Hawk router/table combo for $130.00. Should I be concerned about the quality/reliability? There was a Bosch table only for $139.00 and another brand I can't remember it for the same price of a $139.00. what do think about blue hawk reliable? Versatility? The ability to find a lift to fit it? Let me know your thoughts.
Thanks
 
#2 ·
Greg that is probably a house brand which means it might actually be a Ryobi or B & D or something similar. Quality will be at the low end most likely and parts availability may be an issue in a few years. Sometimes with machines like that parts can be an issue from day one. The table is not usually a big issue unless it is really flimsy or poorly designed. Building your own table isn't very hard either and a home made one may be more functional than a purchased one, besides being a lot cheaper. There are lots of posts about making your own table.
 
#3 ·
I don't have any experience with any of the items you asked about. I made my own router table...several of them. It's not rocket science. All you need is a flat surface.

Here are some pics of one of them. It is made using two pieces of mdf glued together with an oak edge band all around. I rounded the corners so I wouldn't jab my fat tummy! :surprise:

The top is Formica laminated with contact cement. A router insert plate and a router and you will be all set. A fence can be made if you feel the need.

Note: There is no need for a miter track or tracks for the fence unless you are feeling froggy!:grin:

I use clamps to hold the fence in position. The miter track will be helpful if you decide to add a featherboard.

Personally, I would skip the store bought stuff. An added benefit to making your own is experience you will gain building it.

Good luck.

Check out Steve Ramsey's video for building a top for a router table.
 

Attachments

#5 ·
Greg...I would advise spending for the best your budget will allow.

As Mike suggested, building a table top for yourself would be pretty straightforward and does not require any bells and whistles. This would allow you to spend a little more money on a better router.

As example...I couldn't get to my router table one day (lots of stuff in the way)...I put a 3 1/2" hole in the center of a piece of plywood, screwed my router to one side of it, took a notch out of a 2x4, clamped it to the plywood, stretched it across a couple of folding sawhorses and in 15 minutes I was a-routin'...wudda taken longer to dig out my other one.

You mentioned a lift in the future...all the more reason to shop a bit more...not sure how much room is available in the Blue Hawk but I seem to remember it's a small table...
 
  • Like
Reactions: MT Stringer
#6 ·
Most of the time the offbrand and relabeled "bargains" I've bought have turned out not to be bargains. All the reasons why have been listed. If you are going to only have one router, it should be a name brand, and I just don't think there is a better choice than the Bosch 1617 EVSPK kit. You can get a key that lets you use the fixed base as a lift.

On the table, the issue will be the mounting plate, to which you afix the router. I prefer an aluminum plate. If you choose to make your own table all brands have plates that will work with the Bosch. You use the router to cut the opening size and depth for the plate. On the plate, you will find a large opening with an insert you change to fit close to the size of the bit. I prefer either a twist lock insert or a magnetic insert rather than the kind that uses screws to hold it in place. Those screws are easy to lose. Larger is better than small--more support for the workpiece. 2 ft x3 ft will do. Buy the flattest ply you can find!

To cut the opening for the plate, you trace the shape of the plate after centering it on the table top. Cut the opening half an inch inside that line so you form a lip, into which you will place leveling bolts (or screws) through the bottom. You then cut the upper opening using a trim bit with a bearing. You can use four pieces of wood clamped to the top to use as a pattern. Place the pieces flush to the edges of the plate, clamp in place. Remove the plate and route the opening with the bit set about 1-2 mm (1/16th or so) higher than the thickness of the plate. Take your time! Fit the plate to make sure it fits right before you remove the four guide pieces. If it's too tight, slightly open two of the guide pieces, and using a couple of playing cards as spacers, re trim the two sides. See the diagram.

Table material: Two layers work best with a laminate on top. Upper layer of ply, second a layer of MDF. Glue up carefully, and if you can't find pre-laminated stock add the laminate (although many tables are just plain ply maybe with a polished wax coating).

The plate shown is a Woodpecker model, it is pricey and there are other types available. The twist lock really makes it easy to change bits from the top.
 

Attachments

#8 ·
As Nick pointed out you don't have to start with something complicated. I wouldn't even want to guess how many of us have done the same as him in a pinch. I have 2 tables, one is a cabinet freestanding type, because I needed the storage and the other is a purchased benchtop one. I like and regularly use both. The benchtop model is nice for small pieces and it puts them up higher where I can see better. The cabinet one is better for long and large pieces which are easier to handle at around waist level. Both have their merits and weaknesses. There really is no right or wrong and better is often job specific.
 
  • Like
Reactions: Herb Stoops
#9 · (Edited)
Yep like was said, making router tables isn't rocket science. Mine looks pretty rude and crude, especially compared to one like Mike's, but it does what I want and need it for quite nicely. As far as time to make it. I don't know. Likely about two days, counting time for the glue to set. But when I made it I was in one of my Zen woodworking moods (knew what I wanted, didn't know how to do it, grabbed a piece of wood, mind went blank), and still can't say how I made it, let alone how long it took. Cost, not counting some recycled nuts, bolts, washers, was probably -$2 - no stand, it's fixed to a shelf, and I sit to use it. It's been making me happy for somewhere over 10 years, minimum.
Make yourself happy, make your own router table. If it doesn't make you happy, no problem, tear it apart and make another. I think I am on #4 or 5 myself.

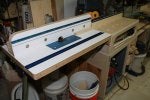
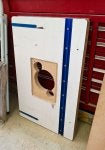
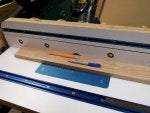
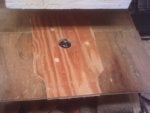
I think I have a photo stuck away. Have no clue whatsoever how I came up with the idea for the top, or router plate. I don't even remember cutting them out. Zen woodworking. I have a router plate for each of my routers. Pop one out, drop a different one in, in just seconds. If you look close you can see the top is 3 pieces, not including the router plate. No clue where I came up with that one, but it must have saved a lot of time in cutting out for the router plate, which has a slight edge under it to hold it up. Spider web of 2X4 chunks underneath makes my 1/2" plywood top warp proof, still totally flat. The fit is all very good, just wish I knew what I did to do that. That is an old B&D, 1/4 or 1/3 HP, router in it, at least 10 years old, I know because I have 4 or 5 and they are all the same, all between 10-22 years old. All work fine, except for one that needs a wire re-soldered in place, then ta da.
 

Attachments