I recently purchased a cast iron router table extension. I bought this from Marsons Equipment in Edmonton and they had it shipped in for me. I decided to get the legs as well as the fence and I am glad I did.
The installation process took about 5 hours to install. I had to drill out some additional holes in order to mount the extension. Truth be know I was a little disappointed with having to drill holes because I figured by purchasing a General product it would only require bolting it on. I was wrong and had to modify my saw.
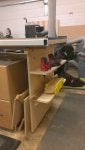
The table was dead flat and rock solid. I took the existing extension off and added it to the right side. I like the added mass to the saw as if helps reduce vibration and provides a large stable work surface. This now gives me two router tables for routing. I will start making doors for my cabinets I am building to go in on either side of a gas fire place I recently installed. Look for this post to be made soon on the build process.
The other thing I did was add an extension table to the far right side. I will make another post on this as I have documented the steps I took to build the face frame assembly area using Kreg's Trak system with auto adjust clamps.
The installation process took about 5 hours to install. I had to drill out some additional holes in order to mount the extension. Truth be know I was a little disappointed with having to drill holes because I figured by purchasing a General product it would only require bolting it on. I was wrong and had to modify my saw.
The table was dead flat and rock solid. I took the existing extension off and added it to the right side. I like the added mass to the saw as if helps reduce vibration and provides a large stable work surface. This now gives me two router tables for routing. I will start making doors for my cabinets I am building to go in on either side of a gas fire place I recently installed. Look for this post to be made soon on the build process.
The other thing I did was add an extension table to the far right side. I will make another post on this as I have documented the steps I took to build the face frame assembly area using Kreg's Trak system with auto adjust clamps.