Router Forums banner

Clear 'void filler' for tabletop

22K views 23 replies 15 participants last post by  old55  
#1 ·
Hello

I'd like some suggestions as to the best product to use for fill some voids in a dining table top. I want the voids to be filled with something clear and hard - and that will remain clear and hard for years to come. I don't want it going yellow - as I suspect Araldite might do.

I want the top surface of the table top to be completely free of voids. I feel this is important given the table's role : it will be exposed to crumbs etc - which I don't want going down into the voids.

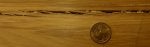
Most of the voids are small knot holes -the largest around the size of a US$1 coin. There is also one different void which we call "shake" - it's not very open, but is quite long - maybe 12" of it. I've attached a photo of it here.

I've done a test with a two part clear resin and it worked well - although it managed to trap some air under the resin (maybe we poured it in too quickly??) which gave a silvery appearance at the bottom of the void, which wasn't ideal.

As it's unlikely that I'll be able to source the same brands that you'll have access to abroad, a description of the type of product would be more helpful. Hey, there might even be a 'layer upon layer' technique with polyurethane that works?!?

Matthew
 

Attachments

#2 ·
Hi Matt,

My teacher used 2 part epoxy to fill voids.

You might try that.

For very small voids, superglue (CA glue) may work.
 
#3 ·
Hi Matt

I'm not sure Araldite will work for you. The "traditional" version dries milky white rather than clear in my experience. Can you get a clear 2-part potting compound (the sort of stuff used to pot electrical components) where you are? Failing that there are various clear hobby 2-packs used for encapsulation.

Regards

Phil
 
#4 · (Edited)
Hi Matt

I'm not sure Araldite will work for you. The "traditional" version dries milky white rather than clear in my experience. Can you get a clear 2-part potting compound (the sort of stuff used to pot electrical components) where you are? Failing that there are various clear hobby 2-packs used for encapsulation.

Regards

Phil
Same as what we in the states, call casting resin?
If so, it does dry clear and remains so. Stirring and pouring technique is the same....slow to avoid bubbles. You might consider 2 or 3 separate pours.
Also, high humidity will cause blushing. I pour in Arizona so, humidity is not a problem.
 
#5 · (Edited)
Hi Matt

Why not just recut the board and remove the bad spot, glue it backup and the bad spot is gone no filler needed.
Looks like a Oak split and it will not stop by putting in some filler. :)

Once a tree, always a tree.. :)

=====
 
#6 ·
When I worked in a mantel factory, the panels we used were veneer covered particle board. The veneer was only 1 mm thick and sometimes the finishers would go through it. We had patching compound that matched the wood veneer but they still looked patched. I realized that the reason why was that the patches had no grain pattern so I tried penciling some in with a .5mm mechanical pencil. You couldn't tell they were patched unless you really looked hard. However, the (usually dark) stain was put on with spray guns. If it had been wiped on it might have wiped the pencil lines out. You might consider trying that instead of a clear filler. And you may want to trim out that grain split, or fill over it with an inlay. I'm with Bob on that. No way to ever make that look OK.
 
#7 ·
Thanks for you input so far.

The casting resin or potting compounds - I'll look into their availability here. I need it to be very hard - otherwise it'll likely get scratched/gouged.

I'm not looking to remove/completely hide the blemishes - they're part of the charm of recycled timber. The only reason I'm looking to fill them, is so that crumbs etc don't end up down in them. I can understand why some people want a perfect top - however that was not what I set out to make - otherwise I would have used perfect timber - although that's almost impossible to get (in native wood like rimu, kauri, matai) as it's illegal to log it nowadays.
 
#9 ·
Thanks for you input so far.

The casting resin or potting compounds - I'll look into their availability here. I need it to be very hard - otherwise it'll likely get scratched/gouged.
Hardened resin will scratch. However, it's at least as scratch resistant as almost any finish you will apply to the wood.
Have you considered coloring the resin or epoxy? That can be visually interesting.
 
#11 ·
#17 ·
Update - I found a manufacturer here who makes, uses and sells a product called 'Knot Hole Filler' - it's a kind of liquid glass. I've seen examples of what it looks like when applied, and it's amazing. Hopefully I can get it to work as well - the owner of the business was very helpful - spending a good 1/2 hour with me explaining how to use it, what to watch for etc.

Will let you know how it goes.
 
#20 ·
You still need to address the split. It will still grow over time. I would you an old shipwrights trick. Find the very ends of the split then drill a hole 3/4" to 1" at this point and glue in a dowel Or you can inlet a bowtie. But the tie has to go all the way though the plank. It is called 'Stop Drilling' and is used in wood and metals.
 
#18 ·
I had to make a number of table tops for a place I worked with silver dollars, silver coins, bus tokens and a lot of other stuff laying on top of the wood.
The wood was lodgepole pine cut 2" thick and joined. (Most Lodgelpole doesn't get much larger than 18" anymore).
The coating I used was Bartop Epoxy. Bar and Table Top Epoxy Resin -- Commercial Grade or table top coating.

It worked quite well and some of the pieces were buried up to 1/2" into the epoxy.

No low spots, no air bubbles and no yellowing.

I will use it again on a counter I'm building for a friend. It doesn't do well with being chopped on, but it does seem to survive better than most of the epoxies I've used, plus, with a light sanding and a good cleaning, you can add as many more coats as you need.