Router Forums banner

Cut my first dovetail on Leigh D4R Pro help.

12K views 59 replies 6 participants last post by  Stick486  
#1 ·
I've only ever used a router maybe twice in my life and just got my new Leigh D4R Pro in the mail the other day so I figured I'd give it a shot. I cut my first through dovetail and it stunk, I took too much off and the fit was very loose. I watched the Leigh CD again and added a bit to my pins length to fix the loose issue. They seemed to fit perfectly the second time but I had a gap between my pins and tail.

The gap was because my pin was too long. I cheated and chopped off the pins (maybe (1/16 )with my miter saw but was curious what caused it? Even after cutting it with a miter saw they are still a tiny bit unflush, nothing a little sanding wouldn't fix. I would say I am pleased with my second attempt. I feel with a little help my third will be perfect.
 
#2 ·
how proud were the pins before you trimmed them????
 
#4 ·
bit set to cut too deep or the setting on the gray scale needs tweaking...
both...
use a LA plane yo trim that 1/64'' or a paring chisel...
avoid sanding to remoce material because of the different grains of wood...
 
#7 ·
That is what I figured. I like to think about what I think went wrong then ask to see if my conclusion was the right one. It was just my first test piece so I am not too worried about it for now. An orbital sander wouldn't work? I don't have any hand planers or chisels.

Your bit depth is too deep by the amount the pins are too long. Check the manual, page 8-16 on adjusting bit depth.

Rather than change bits and re-adjust, I've found it very helpful to have two routers with a bit in each.
From now unless I get comfortable with it I might set my depth a little shy of what I think it should be. I remember when making the cuts being worried it was too long. I do have another router but its a cheap Black and Decker Storm plunge router and wasn't sure if it was of good enough quality, I didn't want to risk it messing up my work.

Eric, for a guy who has only used a router a couple of times, I'd say you didn't do too badly.

Another hour or two of practice and you'll be knocking out perfect dovetails by the boatload. :smile:
I used one once when I was maybe 13-14 (over 20 years ago)and one for a few minutes last year. I am new to pretty much all of this but as long as I can follow simple instructions through online videos and articles, with the help from you guys, it is really not too difficult.

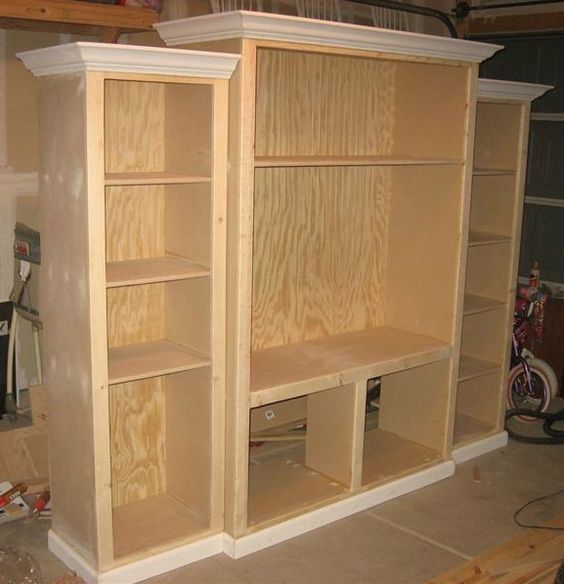
My biggest issue is I have to get some lumber. I gave almost all of mine away to my neighbor when we built a tree house for his kids last fall. I literally have only a couple pieces to practice on at the moment. I need to get busy because I'll be starting my first project as soon as my friend gets their tax return back. I am going to build something like this (below)......and I want to incorporate through and sliding dovetails.
 
#5 ·
Your bit depth is too deep by the amount the pins are too long. Check the manual, page 8-16 on adjusting bit depth.

Rather than change bits and re-adjust, I've found it very helpful to have two routers with a bit in each.
 
  • Like
Reactions: cocobolo1
#14 ·
If you begin using two routers, you will probably find that your drawer sides and ends are offset like this (exaggerated for clarity). This is because the two router bushings are not identically positioned with respect to the bit. You'll need to fiddle with the bushing position to get it right. It's sort of counter-intuitive to me. Seems I had to move the bushing opposite to the way I thought it should go to get a better fit. Anyway, it's one more thing to fiddle with and get right while you're practicing on scrap.

Then, once you have everything set up just like you want it, and you're making perfect dovetails, that's when you need to use a router for something else. That's why you buy a THIRD router, then a FOURTH and so on . . .
 

Attachments

#15 ·
I'm not ready to invest in a third or fourth router that is for sure. I'll make sure I hold onto my scrap from now on so I have plenty of wood laying around to test on. What are your opinions on instead of using biscuits or splines, using dowels to join two 1x8 pieces of wood to make a 1x16?
 
#16 ·
two routers for the jig...
one w/ a straight bit for hogging...
2nd for the DT bit...

if you set the straight really deep (over cut) you fill what will amount to small dado in the tail piece that you fill repair w/ a high contrast wood filler...
 
#18 ·
Thanks guys. In case any of you guys ebay. For another 2 hours or so if you spend $75 or more on your total purchase you get $15 off. Code is C15SPRING I added 4 items to my cart all totaled up to $85 and it worked for me. Also since I was careful to make sure they were not listed in the Industrial category I got 2% back ebay bucks, 2% back on ebates, and 2% on my double cash card. So all in all I got a igaging vertical digital 3:1 guide, a igaging digital I54 Fractions Caliper 6", a brass igaging marking 2:1 tool and a Dowl It Wellman Self Centering Dowell Guide all for less than $65 shipped.

Ebay has been having a lot of $15 for $75 or $20 off for $100 off days three in the last 10 days or so. So if you are like me and like picking up a few odds and ends when ebay has these deals let me know and I have no issue messaging anyone if and when I find out on the deals. They are normally only good for 5 hours or so.
 
#19 ·
Well I ended up buying my second Bosch 1617 Router so it would be easier to just switch routers instead of changing my bits. My issue is even though the dovetails are tighter than my first attempt I am having an offset issue. Meaning when I connect the boards together the edges do not align. They are off quite a bit maybe 1/8". I cut multiple times and the only thing I came up with is its not the set up of the jig but me using multiple routers. I am using the Bosch RA1125 Template Guides but never centered either so I am guessing that is the issue? I have never used a centering cone but did buy the RA1151. Both routers are using the same exact 7/16 template. Considering how perfect the boards lined up using one router am I correct that my issue is in the set up of the second router?

The new fingers I cut fit into the first dovetails I cut and line up correctly. However the new fingers I cut do not fit into the new tails. The tail bit is on the new router I just bought. Do you guys who use this jig ever get joints where you cannot see daylight through any of them when holding it up to light? I am hoping my expectations are too high because it seems it might take forever to get them seem less.
 
#20 ·
Yes, your issue is two routers with bushings not set up the same. See my post above with the red and yellow drawing. Always keep the same router handle in your right hand and try not to twist the router but go straight in and out. Then, if your bushing is off-center at least it will be consistent.

Loosen the bushing on one router or the other and move it slightly to left or right and try again on scrap. Keep messing with it until the edges line up.
 
#21 ·
are you using on router for the DT bit and the other for a straight bit for hogging out material???
 
#22 ·
Yes I am using one router for the tail bit (Leigh 80-8)and a separate router for the finger bit (Leigh 140-8). When I used one router when I originally made this thread my boards lined up perfectly. I changed nothing on my jig since that time nor did I ever remove the (Leigh 140-8) finger bit from my first router. The only thing that has changed in the equation is putting the tail router bit in the second router and using it. The tails fit fine (though there is a tiny gap in some of them where light can be seen through the space), they are just offset on the board edges when the tail is merged with the finger board.
 
#23 · (Edited)
what am missing here..
you are set correctly for the DT bit...
and you are set light for the straight bit...
and you are cutting out of tolerance???
 
#24 ·
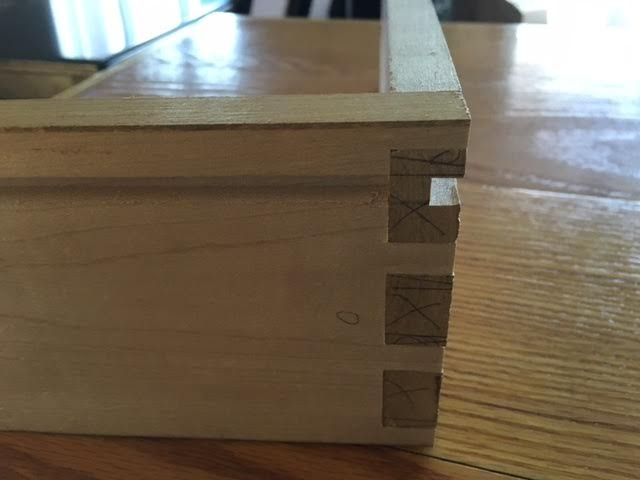
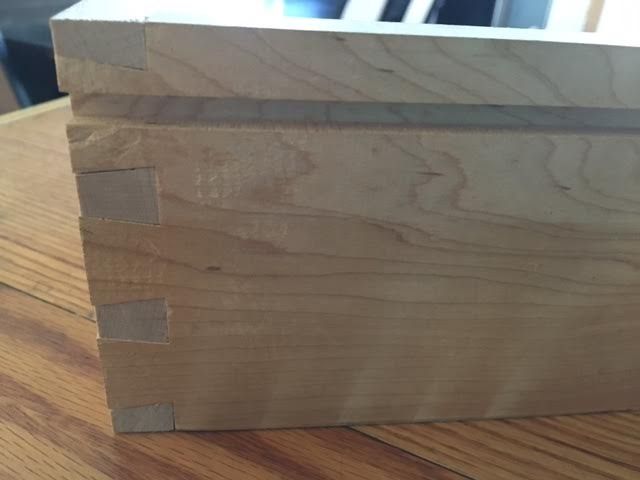
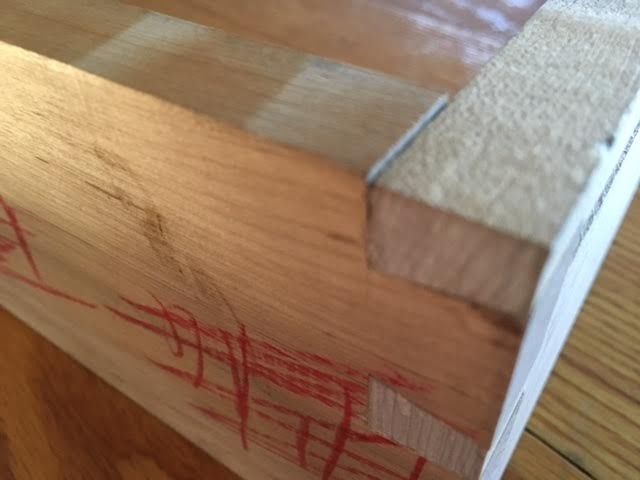
Yep. Other than using a different router nothing has changed from the first time I made my dovetail. Its acting like I need to move over the part you butt your piece up to when you clamp it but of course I cannot. Here are a few photos, its a scrap piece I have been practice on.

First photo is the tail board I first cut when I used one router for both tail and finger boards a week ago. The finger board I just cut today. They fit pretty snug and the boards are flush when locked together.


Here is a picture of the same finger board I cut last week but in the new tail board I just cut today. Nothing on the jig has changed. The only thing that changed was I used a second router for the tail board. notice the off set, its roughly 1/16 or so.

 
#27 ·
If I understand correctly, you are using ONE template guide (7/16) on two routers, so that means you are switching it from one router to the other.
If that is the case, since you bought the centering cone, you need to use it. I have the Bosch guides and centering cone and when I put the guide into my 1617 with a dovetail bit, the offset was obvious to the naked eye.

The only other possibility, although slim is that the second board wasn't butted up completely to the side stop on the jig.
 
#28 ·
No. I bought two of the templates sets. I never touched the other router after using it for my fingers when I first did them when I made this thread originally. As for not being butted up I've made multiple cuts with the same result. So the only thing it can be is the router.

I'll try and use my digital caliper and see if the templates are offset from one router to the next. I am almost certain it has to be the second router, its the only thing that has changed since I first made my dovetails.
 
#32 ·
You'd figure when you screw in the plate/templates that screwing them into already threaded holes would center it for you. When you guys make your dovetails, are your joints perfect, as in if you hold it up to light you cannot see any light in even the tiniest of gaps, or is there a slight gap allowance for expansion? I seem to get a few of them with no light and a few where I can barely fit in a piece of paper. I want to know what is acceptable when doing dovetails.

I did check out some older furniture I have with dovetails and compared to what I am doing they look terrible but who knows what type of quality they are.
 
#33 ·
too tight and there is no room for the glue..
I go for politely snug...
no real need for a mallet on assembly...
 
#35 ·
This is what I wanted to hear. I have a habit of trying to get things too perfect when it isn't needed. If that is the case I am doing just fine. However if they are mallet snug would you even need glue? Couldn't I just pop a few nails into them with a finishing nailer and call it good?

Eric...be careful with the self-centering jig...it requires the two boards you intend to join to be EXACTLY the same width...otherwise you will find a "step" when you assemble...
This is what happened when I didn't center either router. I figured same router model, same template sets, I shouldn't have to but I was wrong.
 
#34 ·
Eric...be careful with the self-centering jig...it requires the two boards you intend to join to be EXACTLY the same width...otherwise you will find a "step" when you assemble...
 
#38 ·
I guess I'll ask...

Why are two routers needed...?
 
#39 ·
one to hog w/ a straight bit and one to cut the dovetails...
I use a pair of Bosch MRC23EVS's...
and never experienced these issues...
 
#43 ·
Well I got the first router centered really well but the second one is giving me issues. Mainly just the Bosch Template/Bushings Guide. I wanted to cut some dovetails so I did it on one router. With the changes I made to the jig these are by far the best dovetails I made. The joints fit with essentially zero gap. I was lazy on my fingers and just set the depth by using the tail board I just cut. My depth on them was a tiny bit off but 1/64 maybe not even that, only issue I had is unlike the first time I cut the dovetails. Yet again I have a step/off set in the boards when combined. Its about 1/64. Is that normal/tolerable/acceptable or should they always come out perfectly flush? If its normal I think I got through dovetails down.
 
#44 ·
1/64 is about as good as I get. Just sand the edges flush after glue-up.
 
#45 ·
The 1/64 isn't just for the ends of tails and fingers. Meaning my first and last finger edges don't line up perfect with the top and bottom of the other board. My board edges when the two boards are connected are off 1/64 that is my main concern. I just want to make sure we understand each other. If that is normal I must have just got lucky with the first dovetails I ever cut because the boards lined up perfectly.
 
#51 ·
I'll have to get a picture tomorrow, if I remember. I watched the video. Looks like my joints are too tight. Is glue absolutely needed if your joints are really tight (if you use nails) on lets say something like drawers? I always make sure the board is completely butted up to the fingers and the stop every time.

Tomorrow I'll try and get the second router set up and centered better, but for now it looks like I'll be using one router until I do. I'm not building anything yet, just getting familiar playing with the toys so no big rush. I just want to have through dovetails down and fully understand them before I move on.
 
#48 ·
Yes, I was talking about the sides and front/back being offset 1/64 or so at the top and bottom edge of the drawer. This can be caused by not being firm against the side stop in the jig, or when using two routers, if the guide bushings are not aligned the same with respect to the bit. If you keep fiddling with the guide bushings, you may get it perfect. When I got to 1/64, I just started sanding. Gotta sand the ends of the pins and tails anyway, I just sand the edges too.
 
#49 ·
For you guys that use multiple routers for dovetails do you use a template kit similar to the Bosch RA1125?
Yes... the 1125..