Router Forums banner

cypress cheese boards gone as Christmas presents

4.9K views 16 replies 5 participants last post by  ggom20  
#1 ·
About one month before Christmas, I decided to make and give to my relatives and friends about 15 cheeseboards made from ends and offcuts of cypress planks that I use for my hobby furniture making.

Cypress looks very much like pine; when polished or stained it is not easy for everyone to say what is pine and what is cypress. Working with it, I found that it is much harder and heavier than pine, and its major drawback is that it splits, just like that, impossible to tell where and when it will. Sawing or routing or sanding it, its resins give an aromatic odour that stays with it for a long time.

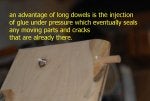
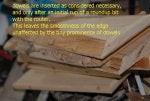
I happened to have access to big planks of cypress, and solved the problem of splitting with long dowels, 10mm diam., that go into the wood for 6 - 24 cm. A simple drill jig and a lot of practice, trial anderror, and I am finally happy withthe method and the results.

So, I figured that I could shape some plank ends and give them as cheeseboards to friends and colleagues. And then I thought, if I turn the board over and carve 3 dished areas, avbig one for nuts and two small ones for liqueur (or raki or gin), it will be even better. So I posted a thread:

http://www.routerforums.com/router-bits-types-usage/31492-what-dishing-bits-there.html

and got a lot of very interesting ideas and suggestions but followed noe for various purposes.

So I made two small pits for glasses on the back of each one and gave about 22 of those away. After the final sanding I soaked them in olive oil - no trade polishes, as they are used for putting edible stuff on them.

Here is some pictorial description and evidence:
 
#2 ·
pics re-uploaded

as they failed to upload before, 2nd attempt here
 

Attachments

#3 ·
Nicely done.
At first I was thinking 'why is he putting dowels in that far' and of course with the next picture I realized it was for the stabilization of the wood. Probably a good idea given the thickness of those boards and the possibility that they may not be fully dry.

You were certainly more industrious than me. I only managed to make and give away 4 cheese and olive boards, but now I have been given a lot more mill ends to make more.
Maybe easter gifts :confused:
 
#4 ·
Hi Gavin, thank you for your good response and comments.

One interesting bit was that I made the pits for raki glasses in a quite unorthodox way: I used a 48mm diam. cutter that goes into the drill station, and opened 48mm holes in a scrap mdf piece (16mm thick) and used the mas templates. For the actual pitting I used a rathert unusual small bit that produces a "beaded" line and travelled the router across the circle area to make an "even" bottom. Now I still have 3 pieces to give, and I am thinking of making a template about 20cm diameter, but other things have got my priority. The final sanding, very important, is done with a tool that took me many years to invent, although it is very simple, and similar things are abundant in the market, but thay all have the same flaw; a piece of plastic sponge is glued on a piece 8x15cm, and held by hand supporting a sanding paper. The new bit is this: the sponge is very soft and quite thick, and the sanding material is cloth and not paper. In the end, it takes the curve of the wood it is rubbing on, and gives the curves a mellow smooth edge, unlike those that they sell and are for straight surface sanding.
 
#5 ·
Hello dimitri!

Maybee a bit late to speak about this work,
or maybee it's time to speak about cracks in the wood
Did the big dowels worked well for stopping splits ?
do you use this since a long time ?
I' ve seen nice plain wood panels getting so bad with time,
it would be wonderfull if there was a good solution.
been looking for a good solution for a while now,
my idea was to route the back- side with a tiny dovetail- bit and then to insert a very hard-wood lock(teck or stronger) at the back.

Thanks for showing your works.
Regards
 
#6 ·
Long Dowelling Comments

Thank you, Gerard, this has been my major problem for more than 6 years now, as I have access to very nice-looking and very cheap cypress, timbered locally.

I first used a scrap left over from a ceiling board, and put some dowels through it, to make a cutting board for the dogs' bones. Well, if I have time I will photograph it to show you that it has stood very well for over 5 years now, with maximal abuse just to see what will happen: nothing happened. Cracks do appear, but they are of no functional significance. So, I started using the cypress planks and made a side table for a traditional wood-burning stove that we have. It has made it for 2 years now without any cracks, at a temperature about 40o C next to the stove.

I will not make a big story out of the dowelling technique, I went through a lot, suffice to say that I manage dowels 10mm diam x 230mm long (so I can use boards upto 400mm wide, and technically I showed above how I manage to put the dowels on planks as thin as 22mm. Yes, I have about 5- 8% failure with the drill cutting through the side of the board, but not all boards need to be seen on both sides, so I play it safe when I can.

Before commencing long dowelling, remember:
ALWAYS measure your dowel, a lot say 10mm and they are 10.3 so no way will they go in.
Glue must be water-soluble and slightly diluted, not totally thick, spread all along the hole with a narrow stick (I use a kebab skewer made of cane) and do not put glue on the dowel, only on the top cm of it.
Front of dowel always ground as a cone - even a sigle splinter will ruin te job.
If your dowel grooves are too shallow, you need to make a single deep groove; a lance-like router bit and a simple jig will make this easy.
Once glue is applied, hammer fast and steady the dowel home. The idea is that the bubble inside the tunnel will push glue outwards and cover the dowel all along, push through cracks and seal them and bring the excess at the top. Without sufficient groove(s) the bubble will not let the dowel go down so far.
Wipe all excess at once with wet sponge and leave for 24hrs to dry.

If the surface is level, you can cut the dowel 5 - 10mm shorter than the hole, and hammer it flush. If the surface is curved, leave the dowel 10mm longer and shape it accordingly. If your dowels protrude on a level surface, there is an old trick to make them flush without cutting marks: Take a straight router bit, cut a piece of ordinary paper, stand the plunge router with the tip of the bit on the paper, secure the depth gauge. Now your tip lies lower than the router base by the thickness of the paper. Rout around the dowel edge until smooth. You will not feel the thickness even with the most sensitive touch; it looks and feels flush and it is absolutely smooth.

We said a lot. Practice makes perfect. Good luck.


D
 
#7 ·
Hello!
Thanks for your quick answer !
Seems very reliable.
Took good note of every detail of your technique.
Got a long drill bit and a with column drill and a home-made square-stand it should go straight.
So I' ll be triyng it soon.

(It's season when they cut trees in the woods here, many bits of oak are leftover.)

Regards.
Gérard
 
#8 ·
Nice job Dmitri. That is nice wood but it looks like it can cause trouble as you say, probably because the grain is going in so many directions.
If you are using a plank for the top of something and the backside will not be seen, you can cut saw kerfs in the back and this may also prevent cracking, as well as cupping and warping. The saw cuts relieve the stresses in the board. I cut one kerf about every 25-30mm and 6-12mm deep depending on the thickness of the plank.
 
#9 ·
Charles, I also use another method to avoid warping: I dry the wood indoors properly spaced and weighted at the top, and leave it there for about a year. As I have said many times, an amateur can do things with wood that a professional cannot; the amateur can play with a piece of wood indefinitely, while the professional needs to finish the job in order to get paid for it. Cutting kerfs is something I have seen in many places, but I never used it - I think the more asymmetrical a piece of wood is, the more chances it has to warp. I always polish all sides the same, because if the top is polished and the bottom is left free to breathe, it will eventually absorb moisture from the air and warp.

Gerard, I will give you a hint that will let you make more effective holes and depend less on the setup: Get a drill bit at least 20 cm long. Put the plank on a vise and keep it vertical.
Look at the whole thing standing from the end: The straight line of the drill bit should look parallel to the long edge of your plank. The jig will let you start somewhere in the middle of the thickness, and will not let the tip of the bit slip if the edge is curved. One quick drilling for the first cm, to get the right starting point. Stop. Look with one eye: parallel dril bit and long edge of wood: with steady hand advance 4 - 6 cm. Stop. Keep turning clockwise (do not "unscrew") but bring the drill up, to remove the wood rinds trapped in the grooves. If you do not do this often, the rinds will jam in the grooves, the drill will not advance and it will eventually catch fire from the friction heat. Repeat until you reach the depth you want. Done. There is no vertical drill stand to advance the bit 10 - 20 cm that you need here. It needs to be done by hand.

Many thanks for your interest.

Best wishes.

D
 
#10 ·
Cutting Boards

Hi Guys
I am making more cutting boards this weekend and was going to try and put a thin piece of maple veneer between two walnut boards in a curved fashion. Do I just make the curve cuts on the band saw then sandwhich the maple between the pieces of walnut and clamp? Kind of thinking like the pic attached.
Thanks in advance!
 

Attachments

#11 ·
Hello Kao3133!
I Think your out of subject in this thread..
Anyway , just start a new one and you will got more answers !
The pict you showed has to do with templates, coping and jigs , also with cutters and ball bearings, i would suggest you to post in jigs...

Regards
 
#12 ·
Hi Kim, very nice idea this, although I must say it addsquite a bit ofextra work andif you are not into something specific, perhpas it is not worth the trouble. Nevertheless, as this is always true, woodworking allows you for cheap experiments, not much to lose.

Take a scroll saw or jig saw, cut a wavy line in the middle of your cheese board, glue a few bits of veneer and sandwich them between the two main bits of wood.Then, you don't even need clamps - many long rubberbands will do the trick. Next day you tellus if it is a thrilling success or if you need much elbow grease for sanding off the extra glue. After all, you only need 2 - 3 bits of veneer with width equal to the thickness of your cheese board.

I don't have any veneer, but a friend of mine who is a carpenter may have some odds to spare me - very worthwhile to give it a try.

Gerard, Kim's pic triggered ideas of jigs etc in your mind, please say what you thought when you saw it, perhaps another good idea may appear.

Best wishes

D
 
#13 ·
Hello!
Dimitri i must say your right, i did nor understand so well .

Kao3133 I apologise ,i did'nt see well that it was also about cutting boards.

And yes, I think it's a job for jigs ! with a router.

Mainly two ways of doing this:

First solution:
-cheaper but not always very accurate :
It uses one straight cutter and two guide bushes.
The same set and about the same method is used for making decorative inclusion of a bit of wood inside an other, could also be used for repairs.
Let say you use a 1/4" = 6.35 mm cutter.
The small guide bush could be a 1/2" = 12.7 mm
the size of the big guide will have to be 12.7+ 2x cutter diameter.
It makes 12.7+2x 6.35 = 25.4mm = 1"
Those are easy to catch and a 1/4 " is not so fragile.
They exist for 1/8 "" cutters but its a bit weak
They also exist metric depends what you can get has guide bushes.

Take a piece of material a bit more than the depht of guide bush, could be a 6mm piece of medium.Draw your design and cut it with jig saw, finnish it well ,sand it smooth.

Now put it on top of part A , well secured with good press clamps , use the shape
and big guide bush to cut into part A.You got part A.

Now move the shape on top of part B and change for the small guide bush , then cut into part B. You got part B.

They should assemble very accuratly.

Limitations

Has you can imagine the big bush is quite big like 1" or 25.4mm
And this bush has to keep in contact with the shape, then the shape should be
made with minimum radius = 1/2 diameter of big guide. there its 25.4/2 = 12.7 radius.

-Accuracy: not bad but if guide bush doesn't stay in perfect line with cutter
it leads to inaccuracies.

- when you draw ist shape it is not exactly what you will have.
Solution: make your real drawing and move the line sideway at a constant distance
of 1/2 big guide diameter- 1/2 cutter diameter.
here it makes 25.4/2 - 6.35/2 = 9.53 mm.


See my bad drawing .
And a (French) link to an other explanation:
HMDIFFUSION

Second method.

A more accurate method is to use cutters with guide bearings, but this is another
(long story) You might have a (French) look there:
Kit complet de 3 fraises carbure (queues de 8 mm) + notice détaillée pour fraisage complémentaire - HM diffusion, spécialiste : outil et machine Ã* bois - Kit complet de 3 fraises carbure (queues de 8 mm) + notice détaillée pour fraisage complÃ

and there:

HMDIFFUSION

The second method, is a bit more complex.


And when finished assembly , why not to use dimitri long dowels technique.
Could help a lot maintaining parts together!

Regards.
Gérard
 

Attachments

#14 ·
Gerard, this is quite unique for me. A stroke of genius in the method, the symbolism being "how everything twists and tangles in the French character". I find this twisted tangling in many aspects of French axpression, your films with couple relations, your curly decorations (Louis, Directoire, Baroque etc, even the complexity of french food preparation includes twisting and tangling, it is amazing, isn't it ???). The genius here is the pre-calculation of not two but three variables: the width of two bushes and of one cutter - simply magic. When I am through with what I am making this Spring, I may buy this set of cutters you showed and try all sorts of crazy things. Many many many thanks.
This Bruno Meyer guy seems very advanced to me, could you please direct me to more of his work? I can understand a bit of French but I can't search the internet in French.

Many many many thanks Gerard, you showed me a new horizon !!!

D
 
#15 ·
Hello!

Thank you for this opinion about french things, not so sure we deserve it..
We got have to learn many things from greece anyway.
(Philosophy, maths , astronomy, sciences, the golden proportion and so on ).

About Routing I say it now before any English or US would argue:
Routing is not so well known in France, here the pro uses mainly
Big shapers,or crazy-large CNC seen one at work 10m long.

So, be happy, routing is mainly describred in english!
You may start a thread asking what is THE book to keep.

My favorite book about routing is in french but translated from english!

Travaux à la défonceuse : Albert Jackson, David Day : Livres

About Bruno Meyer, he's son of a woodworker, wrote books and has
his own school:

Atelier de la Vis - stages bois

Books:
Bruno Meyer - Librairie Eyrolles

Toupie means shaper.


About method 2 with 3 cutters have a look here:

http://www.hmdiffusion.com/rftp/sat/pdf/n129.pdf
Notice you need a table router.


About Method 1

Ron Fox's Routing Tips
You can google for:
inlays

The trend tool range is adequate for these jobs, they also got
razor-cut high quality cutters:

http://www.trend-uk.com/en/UK/productsubgroup1/234/guide_bushes_and_subbases.html

I also buy trend things from here (Easier and good delivery)
Miles Tool & Machinery Centre

In fact i never bought anything from:
Bricolage et travail du bois, machines et outillages pour le bois, outils tour Ã* bois. - HM diffusion, spécialiste : outil et machine Ã* bois - Bricolage et travail du bois, machines et outillages pour le bois, outils tour Ã* bois.
They are a bit expensive.But web site is nice.

Yesterday, bought from:
Router bits, Saw blades, CNC Router Bits, Shaper Cutters & More
They had what i needed but can't tell more ,its fist time.


Sorry, I' have to go now.

Regards

Gérard.
 
#16 ·
Gerard, good morning, I did not mean anything bad, I just say I saw patterns of behaviour in decoration, films and recipes - my experience from the French culture is very limited; as for the Greeks they are all now teaching loud that political corruption in a little country can shake the whole of the EU. I am ashamed of it but can't do anything but suffer the consequences.

Hopefully I will have time to see your links and study them; I learned a lot from the Bruno Meyer techniques. Unfortunately I have sudden problems with my health, may need to have an operation, and do not know how fast this needs to be done.

My many thanks and in hope that we will enjoy many chances to exchange experiences and opinions here.

D
 
#17 ·
Hello Dimitri !

First of all : take good care of yourself.

I feel sorry you have health problems, this is a very annoying thing.

"not sure we deserve it" was a cold joke, but just a joke! :)

Maybee a bad one... My use of english language is a bit limited...
I had to use some on-line translators to get some of your words.
So maybee i misunderstanded something.

About antique greece, it deserves my total respect. Just the example of
a guy (Ératosthène)who dit estimate that our planet was round and give a good value for it's size. Is something i enjoy.

And that was long before the catholics asked Galileo to swear that the earth is flat!

About UE and greece, I think UE is made by a bunch of stupid and cupid guys...

But that's no place for politics here.


So get better and be back around soon, give us the pleasure of
reading more from you.

Regards
Gérard.