I've been doing a lot of projects lately using spent wine and bourbon barrel heads. I needed a good way to plane them as the coopers often use planks of varying thickness, not to mention the fact that wood+water=warpage.
I didn't want to drop the money (or take up the space in my garage) for a planer. Additionally, the full barrel head is ~24" in diameter, so most consumer planers wouldn't do the trick. I figured I'd just make one myself!
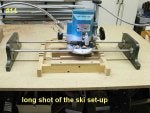
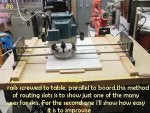
I used a piece of 3/4" MDF for the base and attached two 36" pieces of Uni-Strut 1-5/8" to either end. I then made a sled to ride over the top of the struts out of 1/2" and 3/4" MDF pieces that I glued and screwed. I used a 1.25" bottom-cutting bit (CMT 852.503.11B with the bearing removed) to cutout a channel the size of my router base. I attached to pieces of 1/2" MDF to the underside of each end to keep the sled from moving backward or forward.
To use it, I draw the router toward me, across the piece that I pin-nail to the jig, push the router back to the starting point, slide the sled over a bit, then take another pass. As always, it's best to make multiple shallow passes.
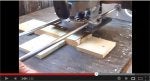
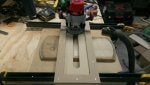
In the first pic, you can see the jig and a partially finished first pass (don't mind the "dummy marks"...I was stupid and tried to hold the router and the shopvac by myself, as my router won't work with both the dust attachment and edge guide). In the second pic, you can see the results...that's after a quick hand sanding with 120 grit, so you can tell the jig get's things pretty smooth. In both pics, you can tell that I need to clean my workshop. That's a neverending uphill battle.
All in all, I'm happy with the results!
I didn't want to drop the money (or take up the space in my garage) for a planer. Additionally, the full barrel head is ~24" in diameter, so most consumer planers wouldn't do the trick. I figured I'd just make one myself!
I used a piece of 3/4" MDF for the base and attached two 36" pieces of Uni-Strut 1-5/8" to either end. I then made a sled to ride over the top of the struts out of 1/2" and 3/4" MDF pieces that I glued and screwed. I used a 1.25" bottom-cutting bit (CMT 852.503.11B with the bearing removed) to cutout a channel the size of my router base. I attached to pieces of 1/2" MDF to the underside of each end to keep the sled from moving backward or forward.
To use it, I draw the router toward me, across the piece that I pin-nail to the jig, push the router back to the starting point, slide the sled over a bit, then take another pass. As always, it's best to make multiple shallow passes.
In the first pic, you can see the jig and a partially finished first pass (don't mind the "dummy marks"...I was stupid and tried to hold the router and the shopvac by myself, as my router won't work with both the dust attachment and edge guide). In the second pic, you can see the results...that's after a quick hand sanding with 120 grit, so you can tell the jig get's things pretty smooth. In both pics, you can tell that I need to clean my workshop. That's a neverending uphill battle.
All in all, I'm happy with the results!


") GOOD JOB BUD
GOOD JOB BUD