Router Forums banner

Flattening a Slab

20K views 48 replies 17 participants last post by  DaninVan  
#1 ·
A friend is having some trees cut down, including a red oak that's about 20" diameter. He's thinking about asking the crew to cut a 4' length at the bottom of the tree and then cut a longitudinal slab out of the center - slab would then be about 20" wide and 48" long. Discounting the problems in drying it so that it doesn't crack (another subject), we were discussing a method of flattening the faces so he could make the slab into a table top. So, mounting it to a sheet, shimming from the bottom and then using a router in a sled is one option. Has anyone thought about fixturing an electric hand planer into a sled and using that to flatten the part? Assuming that the planer could be fixture, this would give a 3-1/4" wide pass down the slab each time, and greatly reduce the time needed. The bar size isn't limited by the holes in the router base so could be made of 1/2" or 3/4" iron pipe to give minimal deflection.

What do you think?

Tom
 
#2 ·
Tom, while the hand planer might be able to do the job, I don't think it will give you the results you're looking for. You will have nothing to reference the planer against to ensure that you get a flat surface.

IMHO, the router ski jig would be the way to go on this. If you make the jig with it's own bars, and mount the router to a plate, like the one that Mike and I made here: Plywood Ski Jig you will not get any deflection.
 
#4 ·
Sorry, making a sled for my planer to make thin strips and got that on my mind - I meant a ski. Thinking pipe cross bars and a sliding fixture that clamped (lightly) on the sides of the planer above the sole plate and then some kind of shaped block that fits inside the handle to carry the weight and hold the planer in position. The planer obviously doesn't have the depth adjustment that a router would so I would have to make a series of holes in the runners and move the pipe down closer to the base of the skis.

Tom
 
#3 ·
If you can figure out a way to attach skis to a portable planer please post it. I have one and they just don't lend themselves to that idea.
 
#5 ·
Tom, the planer requires a reasonably flat surface to begin with; nice idea but I can't see it working. A ski jig does not depend on the surface for making the cut so it is the easy choice.

Infinity just sent out a sales flyer featuring the Mega dado and planer bit. This is a 2" diameter bit with both up cut and down cut carbide tips. I think this would be the perfect bit for this job. You can view it here: 1/2" Shank Mega Dado & Planer Bit 2" C.D. 1" C.H.-Carbide Router Bits | Router Bit Sets | Shaper Cutters | Saw Blades | Planer Knives | Jointer Knives | Infinity Cutting Tools
 
  • Like
Reactions: MYB506
#9 ·
Mike,

I had it in my head that setting the planer to the maximum depth of cut and adjusting the height of the carriage so that the cutter would just kiss the high spots on the slab on the first pass - this will be a "chain saw" finish with no guarantee of the initial flatness. As the planer hits the high spots, the rear shoe will touch the areas that were just planed but the front shoe may not necessarily be touching the surface, at least initially.

However, I didn't realize that larger diameter bits were available - thanks for the link to Infinity, I have it bookmarked for future reference - and that certainly makes material removal closer to that of the planer. Nice work on those skis, the wooden construction is something to keep in mind, but I have a Makita 3612 and will have to check whether I can get the larger diameter rods recommended by Harry to work in it.

Thanks for the photos of your skis, all something to keep in mind if we go forward with this project. It's all going to depend on whether the tree crew is going to be able to slice a slab like we looking at out of the tree - will find out on Monday as that's when they're scheduled to show up and start working. Still a long term project as I guess it will take the slab a while to dry out enough to be workable - that will give us enough time to build a ski.

Tom
 
#7 ·
This is my method. For the size you have in mind, ski rods less than 1/2" will cause sag. With a router ski jig, the assembly is operated by the end cheeks NOT the router handles which would cause variations in the depth of cut.
 

Attachments

#10 ·
Harry,

Thanks for the quick reply. I have skimmed your articles on skis in the past and have been very impressed both with the workmanship and the very detailed explanation that you gave on their construction and use. I'll have to go back and look at the articles a little closer. I have a Makita 3612 - bought years ago for working on solid surface countertops and not used for much else - I believe that this is the router you recommend so I'm halfway there.

Thanks,

Tom
 
#11 · (Edited)
Looking at the whole post, this is what I think...

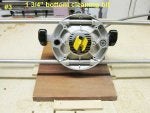
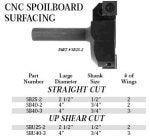
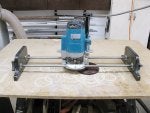
A few have led you in good directions for leveling and straightening a slab. I level slabs with a jig and router, that is like what Mike posted. The leveling of the slab has been covered well. That is not my multiple concerns.

First off, the wood is green. If not kiln dried, it will take about a year to air cure. For a green length to finish at 4' I would add at least 10% to the unfinished length. If you are going for an unfinished, live-edge that is cut across the center of red oak, you will have a nice looking slab with a taper in the width over the four feet length. On how red oak trees grow, it usually has more than a slight taper over 4 feet, if only a 20" cross-section at the base. And no big knots? (An oak actually is mature at about 200 years old.)

For a more educated guess, I go off what one of friends does-- He takes the red oak log and paints the ends with that thick white tree paint. Red oak has open end grain. You can take a piece and blow cigarette smoke through the grain! He'll let it sit for a year to cure. After the moisture content has gone down, he takes about 3-4" off each end, before milling it. Once it is milled, it will open up more grain and will have to dry more.

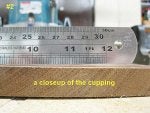
Because the slab traverses over the center core, add at least 20% to the thickness. The reason for this is that piece of stock from a center cut tends to cup across the center core. If it cups across a 4' length, you might also gt a bit of twist. The thicker it is, the less chance of cupping. That 20% may be needed to get it to your finished thickness and turn out flat. (Because of the core.)

You will see a color change of all variants across the slab. It will have a lighter area at the core at near the outsides. Those different areas of the slab are going to have different densities. (More and less hard, more or less open grained...) This will really show up more when you stain it. It will show a lot of contrast, if that is the look you are going for. You would have to prep it a bit, if you wanted a more even, consistent look to it.

Because the cut planned is across the center, it will not have that classic red oak grain pattern-- meaning, when straight across, instead of quarter-sawn, it will look like more like an edge grain, than that distinctive, somewhat wide, deep, rich, multiple wave looking grain (with those distinctive short flicks in between that) that you think of when you see furnishing made of Red Oak.

If you are not doing a slab and going for a "finished look" and the best look for the grain, this is the wrong direction. The grain of red oak looks best when quarter cut. For the best look, with strength, and resistance to warping over time on thinner stock... do a glueup of 2-1/2 to 3" wide stock while alternating the grain of alternating pieces of stock. Then it will not matter how wide you need it... and have less waste in material.

Just using a center slab out of 20" red oak log? A 20 inch red oak is worth money if sold. Just cutting a center slab of the bottom of the tree is a lot of waste... but it's free right? Taking it somewhere that has a band-saw log mill, you could have it sawn... probably in trade for the off-cuts you are not using. Or at least discounted? There would be a lot of usable lumber left in that.

Was just thinking.
 
  • Like
Reactions: Mike
#14 ·
Mike,

A lot to think about there, thanks for taking the time to put it all on paper. I knew that there would be a fair amount of drying time involved, figured that it would give me enough time to fit building a ski into my schedule.

That's good information about the location of the slab relative to the center of the tree, I think that you're saying that he would be better taking a slab a little further out? It would then obviously be a little narrower, I'd have to ask him exactly what kind of table top he was planning - but I do know that he was planning to have the bark on the edges. There are probably companies that have the portable sawmills - maybe it would be an idea to track some of them down and see if he could make a deal for swapping the offcuts for the labor to cut his slab. And they may be able to recommend the location of the slab in the log to give the best grain appearance.

Thanks for all the information, now I have to dome some homework.

Tom
 
#13 · (Edited)
Mike me? I use a Magnate 2714 Surface Planing bit. At the time, it was the widest bit I could find. It turned out to be a good bit!!! I didn't know much about them before I used it. I would recommend it to others. Before that, I was trying to use a 3/4" mortising bit and it would take forever!!! Then I had a job with a 24 foot slab bar top...

I rough the slabs out with a hand power planer first, to quickly take out any obvious twists and cupping, so I have less waste, and goes faster.

I haven't really used Infinity. I have talked to their customer service to try to ask questions... about their TS blades (not bits). I have not bought from them. (Do not read too much into that.) I would be curious to hear from others who have used their bits.

Whiteside sells very good, quality bits. I have a lot of the red Freud bits, in many profiles... which are available anywhere around here.

Edit-- If you have someone helping... To vacuum up the chips and shavings (there will be mass amounts!!!), getting the excess shavings out of the way will help you see what you are doing and extend the life of your bit (It will stay sharp longer). Otherwise, stop every once in a while to vacuum some of the shavings up. Trying to route through excess shavings will keep in heat and tend to dull your bit. If you are doing live-edge, brush off the live-edge before tooling over the edge of it. Dirt in the live-edge will dull your bits.
 
#16 · (Edited)
Infinity bits are high quality; they perform well. Infinity is a friend of the forums and has sponsored contests in the past. The Mega dado/planing bit would do a good job since it was designed to cut tenons and surface spoil boards for CNC applications. The up shear/down shear opposing cutters should provide a very smooth finish similar to the Freud Quadra-cut bits. No sanding required.
 
#18 ·
this is good to know..
thanks...
 
#21 ·
why do you guys work so hard at trying to loose your 2nd place slot????
 
#22 ·
I once saw a magazine article of a man who was doing exactly what you are describing.
He had two runners attached to a bench that were parallel and level and straight.
He built a three-sided trough with a slot in the bottom for the router bit to protrude through and was long enough to reach across the runners.
The trough was just wide enough for the router to slide through.
After shimming the slab for stability, he then took consecutive passes across the slap moving the trough down slightly less than the width of the router bit.
Once that side was done (and flat), he could just flip the slab over and flatten the other side.
If I could remember the magazine, I sure would let you have that information.
 
#27 ·
Fine Woodworking had an article about Nick Offerman (from TV's Parks and Rec) using a large sled to flatten a slab about a year ago.
 
  • Like
Reactions: williamm
#23 ·
The wood from this tree sounds valuable, any table made from it would also be valuable, I would try to find someone who has a suitable site milling saw and get it cut to manageable pieces with a site chain saw that ran on rails, this would be the best way if you don't have such a saw. N
 
#25 ·
Use the electric hand plane just like a manual plane. It will only take about 10 minutes and you will end up with a fairly flat surface and be ready to use your manual hand plane to achieve the surface you want. I have split and surfaced red oak, mesquite, cypress, and other woods without any problems. Just use the electric hand plane like it was intended and all will be well.
 
#36 ·
#29 ·
Thanks everyone for your suggestions. I found two articles in my FWW archive (must not have the recent version with the Nick Offerman article, I'll keep looking for it). FWW #206 has the article with the runners alongside the slab and the router in a trough (I cobbled together something similar years ago, and on a much smaller scale to flatten a slab cut on the diagonal from a relatively small tree that I used to make a clock as a gift), not sure if that may not be easier than building a ski - although it would take a trough over 4' long to finish a 20" wide slab as compared to moving the router along the rods on successive passes. Any comments? As an aside, I found a source for 12mm round bar in 36" lengths at a reasonable price, if building a ski is in the future.

The second article, on using a hand power planer, was from FWW #173. This is a very informative article as it addresses the potential movement of the slab as material is removed and internal stresses in the slab are relieved - it would appear that this process is as much art as not, I'm getting the feeling that it takes a bit of experience to get one to turn out reasonably well.

I contacted my friend and presented some of the potential problems that we could run into and have asked him to see if he can find someone local to him with a portable mill who could come to his house and cut the slab on site.

Thanks again,

Tom
 
#30 ·
Tom, my Makita 3612C which has been replaced with an RP2301FC, is now permanently on skis and has the illuminated base that I made some time ago. The second shot shows the illuminated base and the MUSCLECHUCK, both great additions to what was always a great router.
 

Attachments

#32 ·
Thanks Harry. Looks as if I'm going to have to go through the archives here and do some more research on router skis and their uses. From the top photo, it would appear that the router is being used as a hand-guided overarm router to put an edge profile on the blank shown on the table. Using the router/ski to surface a piece of wood, whether a slab or just flattening a warped plank, is pretty obvious, using it to route an edge profile on a blank rather than doing it on a router table is one that I hadn't considered. Is the blank held to the table top with double-sided tape or using screws.

Your method of lighting the router base is truly ingenious, this is something that I am going to have to incorporate into my track saw router set-up
I would have to replace the black UHMW base with clear Acrylic which is not a problem, my question is whether you think that the LEDs used would provide enough light across the width of the base (I think that it's about 12" square) or would I have to make the edge holes deeper to get then closer to the center hole which I would make much larger than the hole shown in the video?

Thanks,

Tom
 
#33 ·
or ... you could find someone who has a CNC table and a router. How THICK is the slab you need to level? I can handle up to 1.75". I am in Franklin, KY. 42134

https://www.youtube.com/watch?v=78ksk8hs5ik
Joe,

That is a very impressive set-up you have there, not sure that it would even fit in my shop. For the size top planned, I'm thinking that 1-3/4" would be on the thin side, and look a little out of proportion. Starting thickness is going to depend on whether he's stuck having someone freehand the slab with a chain saw or is able to find someone that can cut closer to the finished size.

Thanks for the offer though, really appreciate it.

Tom
 
#34 ·
In order to hold the small round base I tapped three panel pins part way into the rear and cut off the heads at a sharp angle, it was then a case of tapping the base into the sacrificial table, using protection of course. At the time I considered that was the safest way because of the small size.
 
#35 · (Edited)
I hope that these two links are of some help Tom. Please note that the Acrylic is 3/8" NOT 1/4" and in the circuit diagram the battery is shown connected in reverse polarity. Only the opening in the router base is lit up like daylight and the whole purpose is to see what the BIT is doing, I can se no reason why anywhere else should be illuminated Tom.
Since the shot of the lighted base, which was taken in the dark, I have painted the circumference black.
 

Attachments

#38 ·
Yes, thanks, I had looked at them both before, but apparently not close enough. I would be using 1/2" acrylic as it would be replacing the equivalent part on the track saw router set up. It appears that my center hole size would be comparable to yours, specifically so I could easily see the bit and it's relation relative to any layout marks, etc. My question was whether you thought I needed to drill the radial holes deeper to get the LEDs an equal distance from the ID hole (my distance from the outer edge being probably closer to 4-1/2" as compared to yours which I'm guessing to be around 2" or so? Also, because of the carriage design, I would probably only be able to put the lights on three of the four sides.

I see how you used to cut-off brads to hold the part to your bench top as described in your earlier reply, an idea to keep in mind for the future.

Thanks,

Tom
 
#37 ·
Nope, that's always added on after the price is quoted, and it also doesn't include Provincial sales tax (varies province to province...Alberta is sales tax free).
The difference is mostly the currency exchange rate...those two prices illustrate the difference.
My thinking right now is to just bite the bullet and buy the 1 3/4" Freud bit up here, and just not think about how much I'm overpaying. :(
The shipping is free so...
 

Attachments