In a response to my recent post Swamp Shakedown DaninVan said:
Here's the technique:
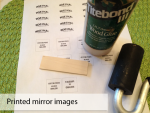
1. Print your artwork as a mirror image on a laser printer.
2. Apply glue to the face of the reversed image.
3. Lay the glued surface facedown on your wood substrate so the image is against the wood.
4. Burnish it down with a roller or stiff card for a good bond.
5. Let it dry OVERNIGHT. (When you get impatient the results aren't as good)
6. Now you can apply a light film of water (I used my finger) and begin rubbing away the paper.
Eventually you rub away most of the paper and the image is left on the wood. That's how I made the big sign on the shack and the labels on the boxes. I have attached photos that demonstrates how it works.
The final photos are of a test that didn't come out very well because I purposely chose a rough piece of old plywood I found in the wood stack and only brushed off the surface dirt. Then, because I was impatient, I only waited a few hours before trying to remove the paper. The transfer worked but had holes in several places.
Experiment with this. It's a neat way to create (or recreate) vintage looking signs and art.
Actually, I don't have the handpainting talent either so I cheated. But rather than use decals I just used regular wood glue. (Titebond III)
Here's the technique:
1. Print your artwork as a mirror image on a laser printer.
2. Apply glue to the face of the reversed image.
3. Lay the glued surface facedown on your wood substrate so the image is against the wood.
4. Burnish it down with a roller or stiff card for a good bond.
5. Let it dry OVERNIGHT. (When you get impatient the results aren't as good)
6. Now you can apply a light film of water (I used my finger) and begin rubbing away the paper.
Eventually you rub away most of the paper and the image is left on the wood. That's how I made the big sign on the shack and the labels on the boxes. I have attached photos that demonstrates how it works.
The final photos are of a test that didn't come out very well because I purposely chose a rough piece of old plywood I found in the wood stack and only brushed off the surface dirt. Then, because I was impatient, I only waited a few hours before trying to remove the paper. The transfer worked but had holes in several places.
Experiment with this. It's a neat way to create (or recreate) vintage looking signs and art.