Router Forums banner

Homemade Pin Router

56K views 46 replies 32 participants last post by  DesertRatTom  
#1 ·
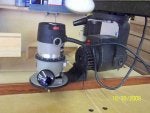
I have been wanting a pin router for some time but was not satisfied with what was out there. Meaning I could not afford it or it's purpose for what I wanted it to do was limited.

So I created this one,
The features are;
*Mechanical control of lowering router with foot control.
*I can raise the carriage in the back up to 12" off the table and still have the same foot control.
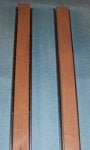
*I have a slide table for rabbits dado's or cutting tenons.
*The head can angle left or right up to 45 degree's for cross cutting at angles or routing into an angled cut.
* It has a 1/4" pin in it that is adjustable for height and has 1/2" and 3/4" bushings for larger bits.
*It has a stop feature for depth and one to hold it for depth.
*It has a moving measurement rule to set and adjust depths.
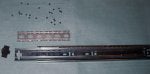
*The down movement of the router is run on modified drawer guides encased to help prevent sawdust from entering the bearings.
*The foot control is tied to a floating choke cable. This gives the unit the ability to work mechanically and still have adjustments for height. The foot control gives 5" of vertical movement.

I am really pleased with it and am discovering different ways to use it. I am making a jig to be able to cut and rout circles too.

I will let you know how things go with it.
 

Attachments

#6 ·
Way to go, Mark! I, too, would be concerned about the rigidity of the slides you've chosen especially if heavy cuts were made, but nevertheless it is an excellent and ingenious solution you'e arrived at. My own experience of using industrial cast-iron pin routers is that they generally have a much deeper swan neck and so can handle larger pieces, but I concede that it is difficult to see how that could be achieved in timber

Have you thought of building some kind of safety guard for it?
From my own commercial experience I'd say that industrial overhead routers are one of the most difficult machines to guard adequately, fortunately they are normally used in conjunction with a workholding jig and template rather than freehand and it is the design of the jig which allows for same use. Almost all the conventional guards I've used or seen either limit visibility of impede easy working

Phil
 
#3 ·
Mark,
A fine job, it looks like you'll have an endless supply of new ways to enjoy it.
Sometimes the ingenuity of the members on this forum just amazes me.
 
#4 ·
I am really pleased with it and am discovering different ways to use it. I am making a jig to be able to cut and rout circles too.
Hi Mark:

You have achieved something rather difficult with the router -- the ability to use it at an angle. Nicely done. With your permission, I'll include it in the pin router section of my notes. I'd love to see some of the things you make with the angled router. Please also note that when you now combine bits cutting at an angle you open up a tremendous range of new mouldings and shapes -- add to that your circle cutting jig and now you have some very interesting options, only duplicated by a pivot frame.

Ron
 
#5 ·
MArk, it looks fantastic! Well done.

Actually the bits I liked best are the twist-handles for the locking bolts! A really nice touch.

I am interested that you should use drawer slides for your apparatus, do they give sufficient support? I am thinking that they would be slightly loose and would chatter? I have used the carriages from very old electronic printers which have aluminium (?) castings running on ground steel rods and are particularly good if you find (literally in some cases) the right ones.

I am about to embark on a router lathe with an oscillating facility, posts will follow as it progresses. I like making pretty things, but most of my clients just want a nicer wardrobe.

As it seems with every one else, do let us see what you can do with it :) Gemma xx
 
#7 ·
Thanks everyone!
To answer a couple questions;
Yes safety is always a concern but like Phil P explained it is hard to put safety devices on this. I do wear a face mask and anything I run through it is either attached to a jig or a sacrifice piece of wood to keep my hands away from danger.

Using Drawer slides was a last resort until I figured out a way to keep them tight. Everything else I tried was to sloppy or so tight it wouldn't move very well.

I included some pictures, I am not sure if you can understand what I did but here goes.
I started with 16" full extension guides. There are 3 tracks on the full extension which created to much play so I removed the smallest inner one and its bearings.
These 2 tracks are fairly tight but to tighten them a little more and keep them tight I tightly fitted a piece of hardwood into the inner track and fastened them with screws through the back.
Then when I mount them in the carriage on the machine the outer tracks are pinned between 2 pieces of wood so they can't flex at all. This tightened everything up and there is no play at all.
I am not sure if this makes sense but it works.
 

Attachments

#10 ·
Super job! I have a Shop Smith Pin Router which I prefer to simply call it an "Overhead Router." I do little if any actual Pin Routing on my unit, I prefer it to simply replace my Table Router for most jobs. I often wonder why these Pint Routers are not more popular.
In any event, you did a super job on this project.
 
#12 ·
I have a Shop Fox and love it. It seems yours will have even more versatility and will be like having several different sets of router bits.

I've made a jig which makes medallions up to thirty inches in diameter, such as you might use as a backing for a ceiling light. It's great for reproducing individual lettering using the pin guide. I haven't installed a fence yet because my table unit handles most of what I need, but there may come a time I need to rout from the top.

Great job!
 
#13 ·
Hi Mark

Very Nice job on the Pin Router setup here's just one more way to make one without all the work :)


=======
 

Attachments

#14 ·
I too have been looking for a pin router solution.
Are you considering publishing your plans when all the kinks are worked out?
I could probably figure out the parts and the build sequence from your photos, but detailed plans and instructions would be preferred. And, of course, you deserve some compensation for your ingenuity.
 
#15 ·
One way to provide a safety shield is to attach a piece of clear polycarbonate (Lexan) to the router clamp. You may need to redesign the clamp to have a flat rather than curved face to make mounting easier. The thin poly (0.030") should be flexible enough to follow the curve, but I would recommend at least 1/16". Most suppliers only sell full 4'x8' sheets, but here is one source I found that will cut to order at a reasonable price: Interstate Plastics dot com (do an Internet search for more info).
 
#17 ·
Great Job with the pin router

The features on the pin router are great.

I enjoy seeing was various woodworkers designs. I have been following Matthias Wandel and his home made woodworking machines at woodgears.ca. He comes up with some vary interesting devices with detailed plans including a home made bandsaw.

Courtney1949

Devices at woodgears.ca
3-D router pantograph
Multi slot mortising machine
Making dovetail joints with the pantorouter
The Pantorouter
Router lift
 
#22 ·
Hi Rick

Thanks, yes it's just some big flat washers welded up, little bit of some 1/4" thick scrap stock out of the box and about hour of your time and you have a pin router.

The RAS saw can be put in any angle for the hard to do router jobs or just used it as a pin router.

I have many shots of the RAS saw doing it's thing as a pin router in my uploads.


======
 
#21 ·
I like the idea of using a RA saw too. And previously I have used something like that.

The only down fall with it is (and this is why I developed this machine). When you are lowering the router onto your workpiece you have to take one hand off to crank the router into your work and out of your work. When pin routing I like to keep both hands on the workpiece to avoid any slip-ups. The foot pedal makes a big difference and you have greater control.

And while you can angle the RA saw you will not be able to plunge in at that angle if you wanted too.
 
#23 ·
Hi Mark

" will not be able to plunge in at that angle if you wanted too "= I do when I have a plunge router mounted in place.

" one hand off " = no need to put my hand on the router, it's locked in place, all done with the controls on the RAS..... :)

=======
 
#25 ·
Mark,
Your design is really great. I used drawer slides like you did when I built my guitar binding router machine, in the same way you did and it works great. As to the comment about the rigidity issue. The comment is correct but also as the person said as long as you don't take to deep a cut, it is will be fine, I say to that that unless the cut can only be made in one deep cut, as with say a dove tail for an acoustic guitar neck, most routing should be done in several as shallow passes to ensure accurate routing. Using this methodology I think design is just fine. I would like to throw out there though, that a two rail linear bearing system say 25 mm or so would solve most of these rigidity problems and if that is not enough then machined ways. Linear bearings can be had off ebay at a reasonable cost, but machined ways would drive the cost to the point you best buy a commercially built one. I now I am new to this forum, just some thoughts hope they help. Mark in no way am I bad mouthing your design, it is excellent, I wish I had the bad boy in my shop.