Router Forums banner

Ideas to finish table pedestals

3.1K views 19 replies 8 participants last post by  ChrisCairns  
#1 ·
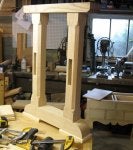
For an absolute amateur, I was well pleased to tap the three pieces together for the two pedestals for dining table and to see they are much better than I had imagined. The words measure twice, cut once is the best advice I ever listened to.


Grateful for any ideas on how to use the router to soften the edges and showcase the wood.

thanks to one and all
 

Attachments

#3 ·
My gosh, Chris. How big is that table going to be.

Nice job on the legs......
 
#4 ·
And that's just the first two legs. :laugh:
 
#7 ·
Here is a pic of the table top. This is the second attempt at laminating or gluing it together. My first attempt used the sash clamps incorrectly and I didn't spend enough time ensuring the edges fit together. Result was gaps and the top was going to need a lot of planing. So it was ripped apart to start again.

This time I spent hours with planer and then glued up two at a a time. Today, I will glue up the middle and will use three 10mm dowels to ensure top edges are flush as there is a bow in one of the pieces.

Note the Triton Mark 3. A great pick up from Gumtree for only $40. Just need a proper workshop now. Perhaps a work bench as next project?
 

Attachments

#8 ·
Table top

Just having a cuppa after setting my table top. Used three dowels and it came together well. I learned the hard way that you need to set everything up so that when you apply the glue, you can quickly get it all together before the glue starts to harden.

Will try these two edging bits on some scrap later...
 

Attachments

#11 ·
Just having a cuppa after setting my table top. Used three dowels and it came together well. I learned the hard way that you need to set everything up so that when you apply the glue, you can quickly get it all together before the glue starts to harden.

Will try these two edging bits on some scrap later...
Both good choices Chris. Another alternative is the stopped cove for the uprights and the bottom edge of the cross members. I use this profile often. The picture is from a junction in some wainscotting I made. I just eased the edges that I didn't rout with a sanding sponge.
 

Attachments

#9 ·
Great result, Chris.

$40 for a mkIII......bargain.
 
#10 · (Edited)
Chris, I do not want to rain on your parade but it appears you did not alternate the grain when you glued up your boards. This helps prevent warping. The two on the left are curving up and the two on the right are curving down. Your wood will naturally try to move into an "S" shape. I will keep my fingers crossed for you. Next time alternate them and you will get better results since they pull against each other and tend to stay flatter.

My vote would be for the chamfering bit on the right for a trestle style table.
 
#12 ·
Yes, I realized this later Mike. I chose because of look and also how well edges met. I now know I should have used the router earlier. I think the rounded edge for table, with the 45 bit for the base. Will do the bases first.

Am part way through cleaning up one end. I know the bit broke out at the end, but should be able to clean this up later. One bit of advice I am following is a small bit at a time...
 

Attachments

#13 · (Edited)
Chris, to help reduce tear out rout across the grain, with the grain, across the grain and with the grain around your wood. This will allow the cut with the grain to help remove any tear out. Remember clockwise on the outside diameter, counter clockwise on an inside diameter for table mounted routing, reverse this for free hand routing which is shown in this image looking down at the work. Note: this image can be confusing since it only shows bit location and not the router.
 

Attachments

#14 · (Edited)
Chris
To help stop the warping you might consider bread boarding the ends of the table also gives a nice finished look . My suggestion on the legs round over on base stop chamfers on outside edge of uprights a put a lambs tongue on both ends
 
#17 ·
Chris
Bread boarding is the technique of using a board a cross the grain ,cut a tongue across the table top then cut a groove on a board with the grain and attach to table top, here is a picture of a lamb tongue on a leg
 

Attachments

#19 ·
Thank you, it seems I have a lot to learn still.

I spent some hours with the planer, belt sander and ros before taking it very slowly with the router. Here is the result to date. Lamb tongues look tricky... and I still don't know what to do with those sharp edges on the ends of the bases. The top is fine I think as I need the width to support all the boards on the table top.
 

Attachments