Router Forums banner

Location of slots on router table

20K views 33 replies 16 participants last post by  DesertRatTom  
#1 ·
Good afternoon-
I am building a roter table and want to add both a miter slot and a t-track slot. I'm looking for recommendations on how far from the front edge to put each of these as well which one goes where. Thanks for any help
 
#3 ·
I prefer my router offset on the table. Mine is centered lengthways but I have seen tables that are offset both ways. The advantage of the offset location is that if you are working with small pieces you can put your fence on the wide side of the table. If you are working with large pieces you can put the fence on the narrow side which will give you more supporting surface. If you put the router in the center it will be the same from every direction, meaning that you have wasted space behind your fence that isn't used.
 
#4 ·
Hi Joe, I took my cue from the commercially available jigs that use a miter slot. For instance, the Rockler box joint jig reqires the close edge to be 4.5 to 6.25" from the bit centerline. Likely anywhere in that range will work. :)
 
#5 ·
I recently made a new top for my router table and put a miter track accross the front at 6" centre to the bit centre. So far it's worked with any and all jigs and finger boards I have including the Rockler finger joint jig and even some cheap plastic finger boads I had kicking around, once I added rockler miter ( expansion ) grips to them. I also put T track on the side to suit and old back guide I have had for years that has surviced three different table tops.

I never realized how much I would use the miter slot until this time around.

Have fun !
 
#6 ·
Joe, as you can see nothing is set in stone when it comes to placement. There are also a large number of people who prefer not having any slots in their table tops and I am one of them. When you use slots you limit your positioning... you are tied to the slot locations. With the Router Workshop method you clamp your fence and accessories in any position quick and easy. Both methods work; just food for thought.
 
#8 ·
Slots do not really "limit" anything! Clamps still work fine with a slot or 2 or 3. The slots just give you other options!

As for slots weakening the table top... if it is made of MDF without adequate support it will warp eventually, slots or no.

It really comes down to a matter of personal preference. For me, I like having the slots!
 
#7 · (Edited)
mike, suppose you want to use a 3rd party jig that requires a miter slot.

i would think there are quite a few of them out there.

how do you handle that?

i am asking because i am still trying to decide on the desing of my next router table as well. i was originally thinking i wanted 2 t-tracks and a miter, but now i'm not so sure. after all, you and bobj3, 2 people who i consider real experts prefer your tables without them, and to me, that carries an awful lot of weight.
 
#9 ·
Chris, ask yourself what is the reason behind miter slots? Miter slots were developed for table saws because saws have a flat blade. Saw set up includes alignment between the flat blade and the miter slot(and fence) because if they are not perfectly parallel you get a pinch or bind which leads to catastrophic problems. Miter slots are also useful for making cross cuts and angle cuts in relation to flat surfaces like a saw blade or a disk sander. Router tables do not have flat cutters, they use round cutters so this alignment is not required. A router table uses a fence or a guide bushing to set the distance between the bit and the edge of your material... that is all that is needed and they can be at any angle with no effect on the cut. This includes elaborate micro adjustable jigs like the Incra; it does not need to be square to the edge of the table and it will still work exactly the way it is intended to. There is no valid reason to have a miter slot on a router table. A drill press does not have miter slots because it also uses round tooling. Some person who wanted to include an extra feature so they could charge more money included a miter slot on a router table and the rest is history. If you are more comfortable using a miter slot on a router table then go for it. Please let me know when you find an actual need for one.
 
#10 ·
I have both tracks on my table. The miter track is on the table and the t track is on the fence. I use them mostly to hold feather boards. Without a feather board it is impossible to hold thin pieces of wood down or close to the cutter. I ruined many pieces of wood before I realized this. If you are putting an edge on a foot long board 5" wide then you don't need anything but if you are putting the edge on an 8 foot board 3/4 wide then be prepared for it to move around. A feather board holding it down and another holding it close to the fence very near the bit will result in a perfect edge. I used the miter track on the table because it allowed me to use a miter gauge as well as a feather board. I placed the miter track about 6" from the bit however I now wished I had put it a little closer because as mentioned the Rockler box joint requires it to be a little closer. I don't have one but you never know.
Here is a picture of my top.
http://www.routerforums.com/attachm...s/table-mounted-routing/54069d1344603348-my-router-table-coming-along-fence.jpg
 
#11 · (Edited)
A drill press is also mostly(I know there are exceptions) drilling a non moving work piece! And many drill press tables, both commercial and homemade, DO have T-slots! They are not essential either, but do make clamping fences and stop blocks more convenient. As small shop operator, its much easier to loosen a knob to move a fence than to dedicate several clamps to my drill press, several more to my router table, etc. Who EVER has enough clamps!!

On the router table, I often run parts that are 6 to 8 feet long. I always use miter slot mounted feather boards when doing so. Is it the only way? No! but it is the most convenient to me! I also use a miter gage with an auxiliary fence to do the cope cuts on rail/style panels. No coping sled needed. no raising the bit an extra 3/8".

No the slot does not have to be parallel to an edge, but it would look funny at 38.6 degrees!

Bob and Rick also used several jigs that had aligning pins that fit into holes in the table/mounting plate. Talk about limiting! Their ways do indeed make many jobs easier. But many of those jigs were rather expensive, and few, if any are available now.

There is usually no wrong way or right way as long as work pieces are held securely
enough to safely accomplish the task at hand. Convenience is a legit reason in my book!
 
#12 ·
Feather boards? Clamp them in place... in any position. This is not about right or wrong, just altenative methods for consideration. Everyone has reasons for their choices and you should work with what ever makes you most comfortable.

Duane, positioning pins are VERY limiting. That is their purpose: quick and easy set up. I think the price of a jig is relative to how useful it is. Of course the Router Workshop jigs are no longer available, they stopped building them. This did not stop all the other companies from copying their designs. MLCS has copied the box joint jigs, the EZ link system and the coping sled; others have too. Why? Because they work so well.

I have tried both methods and for me "Simple is better." Please don't take this as "You must or should do it this way." I am only sharing options for consideration and my reasons for choosing them. Everyone should work in their comfort zone with the methods that make the most sense to them. I understand your reasons and why they work best for you. This is where the forums excell; we all benefit by increasing our options.

This is the first fence I built and I still use it from time to time.
 

Attachments

#13 · (Edited)
mike, i understand your point. but your response didn't really address the question i asked about using jigs that are designed for a table has a miter slot.

do you rig something up to simulate a miter slot, or do you just decide to reject that jig because of its need for a miter slot?

i just made a new drill press top, and i put 4 t-tracks in it for hold downs and fence positioning. i am confident that it will make my life in the shop much better. there is no miter track on that. i didn't see a point.
 
#14 ·
I used my miter slot just a few minutes ago. I need to set up a stop block on each end of the table so I could make a couple of shallow grooves for a pencil rest on top of a podium.

Well, the stop blocks needed to be off the table about three inches on each end. So I clamped my miter bar from my table saw on one end and the miter bar from the band saw on the other end. I did have to clamp a small piece of wood to both miter bars to actually act as the stop but they worked prefect. I now have two shallow grooves in the middle of the board. Since it was 2 3/4 inches wide. I simply made blind plunges on each end made the groove, then turned the board around and repeated the task. The result was two even grooves of equal distance in the center part of the board.

All thanks to the miter bar slot I installed on the table when I built it. Note: It is the Rockler combo T-track/miter slot bar. Works good for me.

Hope this helps.
Mike
 
#15 ·
Chris, you will have to forgive me on missing that. My head is swimming with information overload from phone calls today. I am drawing a blank on jigs that require a miter slot in a router table? I do have a simple sled for trimming operations that guides off the table edge. I will get a photo of it today and post it.
 
#21 ·
Here are a few pics of my set up. I recreated it today for the pics. Thank goodness for the miter slot. It got me out of a jam. When I get a few spare moments, I think I will cobble up a couple of stop block jigs using the slot to make them adjustable.

As I described earlier, the stop blocks needed to be about 2 3/4 inches off the ends of my router table so this is what I came up with.

The last pic shows the result, two pencil slots 12 inches long located in the middle of the board which is 23 1/2 inches long.
Mike
 

Attachments

#19 · (Edited)
Duane- Cast in t-slots in drill press tables and t-slots in OEM drill press tables... I use to mount vises, cross slide vises and hold down clamps. Some t-slots in OEM woodworking tables are used for mounting a fence. What I don't see a need for on a drill press table is a miter slot.

Mike- Made the TS explanation over-complicated. Once the saw is adjusted (which the miter slot is a reference) then the blade is just another cutting edge. If ascew, then just a wider cutting edge (cove). Having said- TS, bandsaws, shapers and router tables... manufactured... miter slots... built in feature.

Why? It's a precision reference. So what if its a bit, shaper cutter or blade. All the same - a cutting edge. The cutting edge doesn't move to the work, the work moves to the cutting edge. LOL. In a miter slot, you can use a miter bar, attached to a jig, sled, miter fence, guide, etc... Which helps the user control, support and move the work past the cutting edge.

Miter Slot versus Edge Guide on a jig or sled... Edge, you hold the sled or jig against the edge of the table, so if you don't keep it against the edge... When I use these, I feel like I should have another appendage. Miter Slot holds the same from getting further, closer, turning... And doesn't take me three hands to control the work.

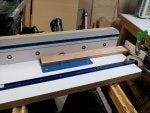
Miter slotted attachments that I use on my router tables- box joint jig, dovetail jig, spline joint jig, rail fence, router sled, adjustable angle sled, miter sled, miter fence, feather boards.

I keep coming up with new ways to use my miter slots. Yet for router fences and attachments on a fence- I have many clamps.
 
#20 ·
Duane- Cast in t-slots in drill press tables and t-slots in OEM drill press tables... I use to mount vises, cross slide vises and hold down clamps. Some t-slots in OEM woodworking tables are used for mounting a fence. What I don't see a need for on a drill press table is a miter slot.
I agree, Mike, a miter slot would not be useful on a drill press. I am building a woodworking table for my DP that will t-slots for the fence and a t-slot in the fence for stop blocks.

I am going to do a production run of some small parts today, that are much easier in my opinion, with a miter gauge and stop block on the router table. I will post pictures later!
 
#22 · (Edited)
A picture really is worth a thousand words Mike. I was having trouble visualizing what you meant when you said the stop blocks had to be 3" off the table... I was thinking you meant above it. Smart thinking on your set up. I use the "Keep it simple" method of placing tape on the fence and marking start/stop locations on it as you see in the first two photos. For non critical dimensions I just eyeball the distance like with this slot in the rail for the plywood ski jig. If you look real close you will see pencil marks on the fence for the start/stop locations that were just a rough guess... no measuring. The marks are for consistent results on multiple pieces. Pencil marks just wipe off with a damp rag.
 

Attachments

#24 ·
Got to thinking about it and thought I would post this pic of another clamping problem solved using the slots. That's a quick n' dirty jig for reducing the size of dowels. I needed a piece 9/32" by about 2" so I just turned down a piece of 3/8" dowel I had on hand.:)
 

Attachments

#25 ·
Joe, By now you will have seen a variety of opinions about the value and location of T track and mitre slots on the router table. Being a belts and braces type guy, I prefer to have both available, even if I don't use them often. My idea of a good placement is for them to be about 1in outside the router insert opening to ensure that there is still plenty of support around the insert, but have them close enough to be usefull.

Kreg make a side by side combo mitre and T track extrusion, which I suspect is the most compact way to get both into a usefull position on the table.

But, in support of Mike and other Oak Park devotees, there is nothing wrong with clamping things in place when needed either.
 
#26 ·
This is the forums at it's best. Looking at any given task and viewing it through another persons eyes; learning why they made the choices they did. The more information you have, the happier you will be with your decisions. No wrong way, they all work.