Router Forums banner

Making MFT-style Bench Top

1 reading
23K views 28 replies 9 participants last post by  roofner  
#1 ·
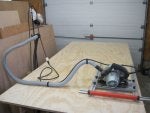
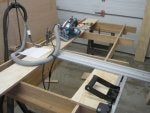
My next "Big" shop project is a bench for cutting panels to size, using my EZbridge and track Wooden Clamps,Wood clamps,Panel saw, Clamps, Saw, Circular saw, Track saw,Routers. I have been intrigued with the whole Festool/MFT concept of using the dog holes to square up parts on the top - using the dogs, it should be easy to set both the track and the fence square to each other, as demonstrated on various Festool videos where they use the dog holes to square the track and a fence before cutting parts to size. I have looked at using two MFT tops https://www.amazon.com/Festool-495544-Replacement-Perforated-Multifunction/dp/B003KN3VZK side-by-side to give me the size I need.

Then I see that Lee Valley is now selling the "kit" for laying out and drilling these holes, accurately, in your top of choice.

Parf Guide Drilling System - Lee Valley Tools

The cost seemed a little high until I compared it with the cost of two of the replacement MFT tops ($169 versus $270), and I'd have the advantage of getting the top exactly the size I want. This project is getting close to the top of my list so I'm going to look a little closer at the system before making a decision, maybe watch the video a couple more times.

Anyone using the MFT tops and have any comments, likes/dislikes of the system?
 
#2 ·
I drilled my own holes. I was very careful when I made my template, including the 3/4 inch holes used to register the template for the next row. I used 3/4 inch oak dowels and they fit really snug.

Regardless how meticulous I was, the holes still got off a little bit by the time I had drilled 6-7 rows. That may have been when I drilled the holes for the template on the drill press. Any little variation, and Krapola! :surprise:

So, I won't be using the holes to break down sheet goods. :frown: But the holes are working great for everything else.
 
#3 ·
The table I have in mind will be strictly for cutting panels to size, so will only have enough holes as needed to locate the track and part (fence). I would use the vertical holes to align the track to the horizontal holes (fence). The track will be fitted to a bridge which pivots up to allow the material to slide underneath and then down to clamp the part for cutting. It looks as if this would be more easily adjusted than my original plan to have a fence located by t-tracks that I would have to square to the track. Mr. Parfitt, the designer of the system, has a couple of very good videos showing step-by-step how to lay out the top and drill the holes. Think I'm going to give it a try, can always go to Plan "B" if it doesn't work out.
 

Attachments

#7 ·
I have a sled, and use it for panels up to the capacity of my TS, it becomes a problem for wider panels, and also cutting pieces off an 8' rip. My table will be similar to the photo, but larger as I would be looking at cutting kitchen cabinet lowers and it's much easier to have the panel sit still and move the saw.
 
#6 · (Edited)
I echo Mike's comments about how easy it is to get slightly off when cutting the holes with a template. The very small error in the template will compound as you move it from one hole to the next. If you will be using it for cutting guides, get it CNC made, not by hand. If you must do it by hand then make layout lines on the table with a mechanical pencil and don't use a template like this one.
Now if you will be using it for a work surface for clamping and such, make some of these modified bar clamps. They are easy to do with the most inexpensive welder and very little experience. Remove the head (these just pounded out) and weld on some 3/8" rod. Grind down the corner and you're done.
 

Attachments

#8 ·
I have watched the "How-To" videos showing the use of the drilling guides several times
and think that it should be possible to get the holes accurate enough to use with the proper care - the steel layout rules are CNC machined for accuracy. I had originally looked at making my top out of two of the MFT replacements side-by-side which would give me a top that's 36" deep x 42" wide which is close to my 36" x 48" size - this assuming that the hole pattern would transfer from piece to piece - i.e. the holes are parallel to the edges as well as being in the required pattern. But the drilling system kit is tempting as it's cheaper than the two replacement tops, plus it would be available to make other tops in the future.

But, your comments made me look at yet another option. If you watch the video, he's using the top in the same manner that I would, and so does not need the hole pattern over the complete top. With that in mind, the other option would be to buy one of the replacement tops and set it in a frame that has space to put undrilled panels (say 12" wide) on either side. The MFT top would give me the holes needed to square my track and fence to each other, and the side panels would give me the total area to support the work in process. The right side panel would also be easily replaceable when the saw kerf got sloppy - but you can flip it 3 times and get more use out of it too.

Thanks for the comments, an advantage of the knowledge available on this forum providing different ideas and methods of doing a project.

I'm going to think about it a little more, but this seems like the way to go - although I would have liked to give the drilling jig system a try.
 
#11 ·
I was really impressed by the whole system, particularly that you can use the layout rules to check accuracy while you're working. But a very well-thought out system - and apparently the manufacturer was having a hard time keeping up with the demand when they were first introduced.

I took a look at the MFT tops, there are two available and it turns out that the dimensions of the one I was looking at were the package sizes. The other (larger) top is 43-3/8" long x 28-1/4" so I would wind up cutting off the one edge to wind up with my 36" depth, and adding a 10" panel on the right to make up the 48" length - I'd have to lay it out to see if a narrower panel on each side would work better. Guess I have to redo the Sketchup layout to this new idea.
 
#10 ·
Well now this is interesting.

If you just want an MFT top you can get them on ebay. They are cheap, I bought one and it is fine - it is CNC machined.

You can also make your own with the Parf guide system as mentioned above; that works fine too. (Lee Valley supply these in the US)

To achieve square first time cuts from a large panel you can use the GRS-16 PE from TSOProducts.com at Fort Myers in the U.S. I like

this having just imported mine. It simply clips to the Festool or Makita track and away you go. ( Anyone else got one ?)
 
  • Like
Reactions: tomp913
#13 ·
Well now this is interesting.

To achieve square first time cuts from a large panel you can use the GRS-16 PE from TSOProducts.com at Fort Myers in the U.S. I like

this having just imported mine. It simply clips to the Festool or Makita track and away you go. ( Anyone else got one ?)
Rodger,

I've seen that square elsewhere, but I don't have a Festool saw or track, just looking at using their table. I have the EZ track and various components, one of which is an attachment for the track which sets the track at 90°. It's what I'm using now, and works well, but I need to have the cutting grid set up which means moving the bike outside, a PITA to make one cut. The table I'll be making is actually replacing, to some extent, my radial arm saw but will have around 30" of cross-cut capacity and a fence with an adjustable stop so I can easily cut multiples. I'll use the track saw to rip sheets to width (and maybe rough length) and then take the strips over to the table to get length. The track also allows me to attach a router so I can cut rabbets and dados on the table, guided by the track, and located by the fence stop if I'm making multiple parts.
 

Attachments

#14 ·
Just another two cents from me. :surprise::grin:

I also don't have room to break down full sheets of plywood like mentioned for cabinet bases. So here is what I do...

When I buy the plywood for cabinets, I ask the guys to rip them in half giving me 2x8 foot pieces. I have done this at Home Depot and the hardwood dealer I buy from. Never had any problems.

When I get home, I drag a piece on to the work table, slip a piece of foam sheathing under it, and cross cut the pieces with my cheap track saw. 34 1/2 for the bottoms, and what ever is needed for the uppers; some 30, some 39, or whatever is called for.

Then with all the sheets broke down, I set my saw at 23 1/4 and rip the base pieces to width. Reset the saw for 11 1/4 and rip the other pieces which result in two pieces for the upper cabinets.

That's not exactly production work, but I have been getting by. Heck, I get tired and take a break, so speed is not of the essence! :grin:
 
#15 ·
Very interesting thread. I currently use a torsion box I built, that I put on top of two saw horses. I then put thin particle board on top. I have a Gorilla Gripper for hauling the plywood around, after getting a hernia without it (the Gripper is worth it... a hernia is no fun).

But I like the idea of getting square cuts using the dogs. The Parf jig is really impressive. The table in Tom's video looks small. Do you think it's practical to build a table so large to allow breaking down 4'x8' sheets?
 
#16 ·
@furboo

My plan is to make the table 48" wide x 36" deep, I think that's enough to cut kitchen base cabinet ends - it's essentially an oversize radial arm saw but using a track saw. My plan is to continue ripping the 4x8 sheets to the required width using my cutting grid - I can slide the sheets directly out of the truck onto the grid without lifting them. I presently cut the "strips" to length using the squaring attachment shown in a previous post with my track - I made a stop for that attachment which allows me to cut duplicate lengths. The thought is that the table will be more convenient - I won't need to clear the open space and set up the grid for just a couple of cuts. To add to the versatility, I have a sliding carriage with a router installed that fits the track and can be used to cut rabbets and dadoes in the panels. A larger table might be nice, but I just don't have the space - the combination of the grid (primarily for ripping to width) and the table (cross-cutting to length) will allow me to get maximum use of the available space.

One thought - in order to rip an 8' length off the sheet, you would need a track 9"+ long - and a way to set the track parallel to the edge of the sheet and locate it the required distance from the edge. I've done that on my grid using two lengths of track connected and measuring/marking both ends of the sheet. The guide I use now with my track saw locates on the edge of the sheet and slides along the edge while making the cut. No long track, plus you can keep cutting identical width strips without measuring each one. The one advantage to having a longer top would be the support it provides for the offcut (particularly if your cutting down 8' lengths) - but you can set up a stand to support the outer end. A wider (deeper top isn't too practical as you would be "reaching" to complete the cut at some point - if I need a 4' wide piece, I set my grid on the floor and clamp a track in place. This way I can keep a nice steady feed across sheet and not affect the quality of the cut.
 

Attachments

#20 ·
At $100 it would be a no-brainer, but I can't see that happening. Look at the parts & pieces, add up the costs and remember that it's imported.

If I had room for a larger table, I'd look at it a little more seriously, but it's looking like building my table around the larger MFT top is going to give me what I need. Now, if I could buy just the hole boring jig and bit so I could extend the hole pattern on the MFT onto the add-on side panels...............
 
#24 ·
The size of the finished holes seems to be critical - a clearance with the bench dogs used would translate into a loss of accuracy. There is some discussion on Festool forums about hole size versus OD of the various brand of dogs that are used with the MFT tops. Festool apparently changed the size of the holes from earlier versions of the MFT and there is concern about the fit of the dog to the hole - they're talking about differences of 0.1 mm (.001"). Using the MFT as a template would work, if the bit used was the correct diameter - the bit sold with the Parf drilling system can be assumed to be the correct size, and I'm sure that a replacement could be purchased from Lee Valley. If doing that, I assume that it would be just as easy to by the drilling system and start from scratch.

Mike (@MT Stringer) posted on another thread that he had found a local company to make him a top for a very reasonable price, cheaper than buying a replacement MFT top in fact. I did a quick search and found a company that looks good fairly close, and will give them a phone call in the morning. One thing that I would need to check then is the availability of the correct grade of MDF - Mr. Parfitt mentions "Medite" (water-resistant) as his grade of choice because it's easier to find than "CNC grade". Apparently what's being sold at Lowes or Home Depot doesn't meet either spec. Thinking though that the NC shop may have material in stock and I could buy from them - I'll have to check that too.
 
#25 ·
@tomp913 Medite is sometimes called sign board, because it's often used to make outdoor signs. I believe it's MDF whose surface has been treated so that it can be used for exterior applications. You can also use water-based paint or poly on it (don't try that with regular MDF).

I used Medite to make lawn reindeers that have stood up to 3 Christmas seasons so far...they're still out on my lawn from last Christmas 0:) I can get Medite at my local lumberyard (Alpine Builders Supply, Santa Fe, NM ... awesome local yard), whereas my local Lowes and Home Depot don't carry it.
 
#26 ·
Tom your right you would have to have a 20 mm bit not 3/4 inch. The equivalent to 3/4 is .75 inch convert 20 mm you would divide 2 cm by 2,54 cm .787 inches subtract .787 from .75= .037 inch a little more than 1/32 of an inch. If you want the accuracy of mft top you would have to use the parf dogs very expensive about $40 for 2 short and 2 long dogs. But if your going to use just for clamps 3/4
dowels as dogs. The idea about parfs they accurately machined.