Router Forums banner

making wooden toys

6.4K views 28 replies 10 participants last post by  Barry747  
#1 ·
I use a hole saw to cut out wheels and then a router to round over edges, I wonder if there is a better way,
 
#2 ·
G'day Laurie.

That is probably the way I would do it...

However, what jig do you use to secure the wheels while routing?
 
#3 ·
Laurie,
Without knowledge of your typical wheel diameters it is really impossible to answer your question. Certainly round-overs can be done quite nicely with a router, but my first questions to you are: How are you holding the wheels? Are you doing this on a router table, or are you using a hand-held router? Hole saws come in a variety of sizes, but when coupled with the info that you're making "Toy Wheels", I am not confident telling you it is safe. Personally, if I were making small wheels 25mm-100mm, I would lean more toward a slower moving tool such as a drum sander. There are sanding drums that can easily be chucked into hand-held drills for this type of work. ABOVE ALL, PLEASE BE SAFE!..and HAVE A HAPPY NEW YEAR!
 
#7 ·
Hi Laurie if Ya have a drill press Ya can get a circle cutter for about $30.00 or less and this would be alot safer or cut them on a scroll saw depending on how big a wheel You are making....Happy New Year and good luck
 
#9 ·
Laurie, What diameter are your wheels? Fractional or metric, I speak them both. When you said "bench press" are you making reference to a bench-mounted drill press? If the answer is yes, then you can use a drum-style sander (available in a wide variety of diameters) and sand the edges smooth in this manner. It won't be quite as consistent as a routered-round-over, but you'll still be able to count to 10. Since the holesaw is going to leave a pilot hole, you will have a place where you can insert a small diameter carriage bolt and attach it - along with several at a time on a board that you'll then be able to sand the wheels from. If I were doing that project in high volume, I would glue (or use double-sided tape) to attach some coarse sandpaper onto a board and have bolt holes that would coordinate with the holes in the wheels. You might even find it helpful to make something that would incorporate a toggle clamp or two.
 
#11 ·
Another way would be to use a plunge round over bit and a circle jig.

Cut the wheels and round over in one operation.
 
#14 ·
Lawrence,

I don't know what tools you have available to you. I have made many wheels over the years, and to do mine, I use three tools. The band saw, the mini lathe and the drill press.

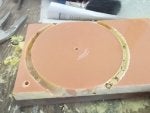
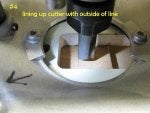
For the outside diameter of the wheel, hole saws are fine to a point. But if the wheel uses an axle smaller than 1/4", you're kinda screwed. The wood often burns terribly if the wheel is very thick, or made of a hardwood. You are limited to the diameters of the wheel by what size hole saws are available, and it it very expensive to make several sizes. So to avoid ALL of these issues, I made a circle cutting jig for the band saw. Very easy to make and costs zero dollars. You can Google "circle cutting jigs" and see how to do it. There are a few advantages to using a jig. You can cut a wheel as small as 1/2" or so, or you can cut one as large as your saw allows. The wheel will come out perfectly round, and with no burn marks. And finally, there is no hole in the center, so you can drill a hole for the axle any size you want.

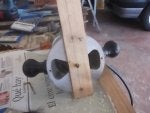
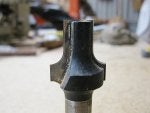
After the wheel is cut to size, I move to the lathe, and mount the wheel on a screw chuck. I can then either sand the edges over, or I can use a gouge to round over and shape the edges. For treaded tires, I made a cutter out of spring steel with the same profile as the factory made wheel, and cut the face of the wheel. I then use a parting tool to cut treads in the tire. Again, the screw chuck and the profile cutter cost me nothing.

After this, I go to the drill press, and use a Forstner bit to drill part way through, making the hub of the wheel. I then drill my hole to the size that I need for the axle.

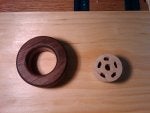
The two attached photos are 2-3/4" wheels that are used on trucks. The one on the left is the store bought wheel (about $2.00 each), and the one on the right is one that I made using scrap wood (cost nothing). So you can see, that not only do I get a very good looking wheel, I have practically nothing (other than a little time) in them. And when you are building a semi truck and trailer that takes 18 or 19 wheels, it can get expensive to buy them.

Hope this helps. If you need any other help, don't hesitate to ask.

Jim

Image


Image
 
#15 ·
Hope this comes thru OK. I have always thought these were really neat. Just the thing if you're pumping out small wheels by the dozen.
Lee Valley Tools - Important Announcement

No, I don't have one. Was going to get one to use for chess piece bases. Then figured out how to make a master for routing octagon bases. Haven't made one of those yet, but know how, and will when my leg stops giving me so much problem.
 
#21 ·
Phenolic disc.

Hi, guys!!!

I am doing a phenolic insert ring for a homemade insert plate. I need at least two 100mm disc so I routed one of them a little bigger than 100mm but now I am trying to find a way to get the accurate dimension. I am thinking about the lathe, router with skies or drum sanders. Any suggestion will be welcome.

Best regards!!!
 

Attachments

#23 ·
Lawrence..

I Googled "circle cutting jig for bandsaw" and the first one that came up, was this one:
Bandsaw circle cutting jig - YouTube

After watching this, I think I am going to revamp my jig. I never thought about a pop rivet as a pivot point, but I think it would be great. Just remember. Drill your holes 1/2 the distance from the blade to the pivot point, for the diameter that you want. For example, if you want a 2" diameter wheel, set your pivot point at 1".
 
#25 ·
For simple wheels make yourself a router circle jig based on mine, the beauty being that it has stepless adjustment. In use draw a circle using a compass and set the edge of the bit to the inside of the line for a hole and to the outside if it's the disk that's wanted.
For the wheels an extended roundover bit could be used which will rout the wheel complete with a roundover in one operation. If some fancywork is required this could be routed first using a face cutter as shown, but many profiles are available. I've included a pdf showing the making of my latest circle jig.
 

Attachments

#26 ·
Harry where do i start, you are clearly organised and multi skilled,metal work is not part of my interest but clearly there is a place for it in some forms woodwork, i thank you for your suggestion.Cheers Laurie.
 
#27 ·
A simple option

Laurie, I'm still catching up on the Router Forums due to the holidays and just saw your question. I'm making wheels for toy cars for my grandkids. I don't have a lathe but I do have a drill press and a router. I've attached pictures of the prototype car and the router jig that i made to round over the wheels.

I cut the 2" walnut wheels with a hole saw. I then round over the edges with a 1/8" round over bit in my table mounted router. The jig was cut from 3/4" scrap plywood. The "V" shape prevents me from pushing the wheel too far or hard and, along with the plastic overhead guard, it keeps my hands from getting too close to the bit. I have the utmost respect for all tools and,along with a bit of fear, I've managed to keep all of my fingers...so far.

I took my wheels one step further by drilling out the center with a forstner bit and inserting a rim made from maple. After cutting with a 1" hole saw i made the slots by drilling 1/8" holes around the rim and then connecting them with a scroll saw.

The wheels are finished with Danish Oil as is the car. The rest of the car is finished with 4 coats of gloss poly, except for the wheels, since cars are shiny and grandkids can be brutal on toys. I'm making 8 of them and I'm hoping that some will survive for future generations.
 

Attachments