Router Forums banner

Maloof Inspired rocking chair build

1 reading
57K views 281 replies 22 participants last post by  TwoSkies57  
#1 ·
Sometimes you just want to challenge yourself. Such is the case with my latest project. A Maloof inspired rocking chair. This has been on my "bucket" list for sometime and I finally got a good reason to build one. This will be for a friends son's wedding gift in the spring.

As with just about all my projects, I did a great deal of research. A Maloof rocker was a given, but just who's plans was I going to use? In the end it came down to
A Charles Brock interpretation:
MALOOF INSPIRED ROCKER Instructional DVD, Book and Rocker Patterns - Home
Between the plans, a step by step book and a couple of DVD's I should have all my bases covered as far as the basic construction of the rocker goes. Cost of the plans was about 90 bucks. Not cheap, but considering what all I got, I figure it to be a fair price to pay. I ordered em up and they arrived quickly. First thing I did was open up the paper template guides that came with the purchase. Really kinda rough was my first impression. I guess I was thinking more along the lines of blueprints. This is however a "sculptured" chair. Just about everything gets shaped to some extent. The templates are just a guide, cut em close and go from there. Read over the book and viewed the rocker DVD. All good stuff. Well written, well explained. So should be easy enough, as easy enough goes *L* to follow along with. The 2nd DVD is on shaping the rocker. That part I am really looking forward to. This is where you kinda add your own twist to the project if you like. A couple areas of the construction allow you to do that to some extent, but I"m not sure I wanna fiddle around too much. Especially considering what I paid for the lumber to do this project. 65bf of 10/4 figured cherry. I wanted some really NICE wood for this project. This one is special for a couple of reasons and wood choice was important. When I have to have the right wood for a project, I go to one place: Horizon Wood Products in Kersey Pa.. These boys are a good 3 hr drive away, but I have never been disappointed in anything I've gotten from there. Great guys to deal with. Outstanding facility that is just immaculate. I could walk around this place all day. The wood is just incredible. You'd have to see it to believe it. Pricing is a bit on the high side, however I've never had reason to complain.
Horizon Evolutions: Unique American Hardwood For Sale
After a couple of emails regarding the last chess table I posted, I thought maybe Ill give step by step photo shoot a try. So bear with me. If there is interest I'll keep it going throughout the entire project, if not, I'll let it fade away and just hit ya up with the end result.
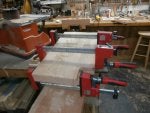
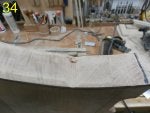
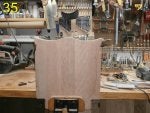
Here are a few pictures of the rough cut 10/4 after getting it home. I let it sit a few days to acclimate before I began carving it up. 4 boards, 8-9' long, 10-14"s wide. The last couple pics give you an idea of what you can expect when you go out and buy lumber like this. It may look like alot of wood when you get started, but once you start breaking it down, cutting away checks and sap wood..squaring it up, its amazing sometimes what you got left.
 

Attachments

#2 ·
Bill, after seeing the chess table, I am sure the rocker will become a family heirloom in very short time.....
 
#6 ·
Thanks James... this one ought to be alot of fun...and one heck of a challenge:) as for "very short time..." I dunno...with the holidays coming up, I've got several other irons in the fire sort-to-speak..I guess the good news is that the sawdust will be flying around here for at least the next several months... :)
 
#3 ·
Please keep the posts coming. I'm sure you will attract a large following. I was surprised to see the wood came with bark and I noted quite a curve in one of the pieces. When I buy raw wood it is roughly squared up so it's easier to figure how much is needed and the cost. Is it common to buy wood this rough in your area or is this unique to that mill? Do they factor out the curves in pricing?
I have the same model table saw as you. I quite like it.
 
#7 ·
Dennis... good catch on the live edge wood. A good deal of the wood sold up at Horizon is sold live edge. Actually, originally this is what I wanted. My original plan was to use the sapwood on the outside edges of the armrests and headrest, then on both outter edges of the seat. Unfortunately once I started to mill things up, I began to find a good deal of hair line checks in the sapwood. So as it stands right now, I may go with a glueup between halfs with either a maple or walnut to give the rocker a little more flare.
As for the curves, Sometimes ya gotta go with what they got *L*. All four boards had a good curve to em. All four boards were consecutive from the same tree. All of this was factored into the price of the wood when I came to terms with the seller.
There is good and bad to buying wood like this, you can save a bit on bf costs because the mill has spent less time milling the wood square...the bad is you can run into alot of 'hidden' defects if you don't do a proper inspection of the wood. These boards have a very minimal amount of pitch, pith isn't a issue and not a knot to be found. Figure is consistent throughout the set. A good size check on one end *pictured*..and a few checks in the edges that run only a few inches, found one that ran a little under 6"s and I'll be able to work around that.
This mill offers both live edge and milled 4S.. just depends on what you want. Live edge has become quite a popular medium to work with of late. When pricing out the boards, they take into account any defects that might appear, checks, knots, pith etc. and make allowences. Typically milled 4S is the norm. Thats what I go with,, this project was a exception.

The old craftsman hybrid...:) she's been a solid performer over the years. and I do put it to the test quite often. This 10/4 cherry pushes its limits...I"ve done 12/4 maple and thought I was going to burn her up *L*...ya gotta know you limits I suppose..but all in all, for the money, a great saw.
 
#8 ·
Hey Charles,,, its out there, you just gotta be willing to go after it..this was a good 6+ hour drive round trip.....nice thing was the wife and I both enjoy the fall and love to go and see the leaves changing. I talked her into taking the day off and go with me....so everything kinda worked out just fine...a beautiful drive into central Pa., picked up some great wood and got to see more of the mill and a fine diner to end the day... everybody was happy, happy, happy :)
 
#9 ·
I'll be looking forward to your comments Neville!!! Yes, Maloof set a very high bar during his career. He created some absolutely stunning designs to say least. He was one of those guys who I would have loved to just grab a chair and sit in the back of the room and watch him work.
 
#13 ·
Let the fun begin :)

Made some time to get to rippin. Gave the boards a good hard looking over, decided what I wanted to cut from which board and began taking em apart. First was getting the right lengths of roughcut sawn. This was accomplished with a good ole fashioned crappy handsaw. *LOL* I must say however, that since pretty at this point wasn't a real concern, the old Stanley 20" or something multipurpose handyman clearance bin ain't nuttin to brag about handsaw done a fine job!! From there I took the pieces to jointer just to get a straight edge reference on one side. Since the boards were all relatively flat <<and I use the term loosely here>> I felt it was ok to take the wood to the tablesaw and rip the other edge, again just to start getting things in the ball park. At this point I have two relatively parallel sides. Again, just ball parking it to get a reference and to have a better idea as to just how much wood I'd have to work with and from where on the piece I would layout the components to the rocker. Here I'm looking for consistency between parts. I want the arm rests to look similar and close to the headrest. I want the splines to run a consistent grain and figure pattern from one side to the other...Back legs grain runout is a concern and the 5 boards for the seat I'd like to pop a little as well.. I firmly believe that you can make or break just about any project by taking your time to select what wood is gonna go where.
I had mentioned they were relatively flat, but there was still a little rocking when laid down on the tablesaw. So now it's time to go old school. Vised up the wood and got out the old #4 Stanley and LeeValley LA #3. The Stanley is one of the new versions (4 years old new version) and didn't work for crap'ola. Seems someone hadn't sharpened the iron in a while. DUH!!! Fortunately the LA #3 was sharp and ready for action. I won't be telling any hand tool guys anything new here, but for you folks on the fence about using hand planes, after some practice, patience and paying attention to what your doing and learning how to properly tune a hand plane, these things just fly thru the wood. A good plane, winding sticks and a straight edge and your in business!! I bet I"m not spending 5 minutes a side getting things close enough to run thru the planer. Yes, planer, I'm not a true neanderthal yet :) I can't join the club until I get a couple good handsaws *L*. Some of the boards are to wide to run over my 6" jointer so into the planer they went. I like to cross-hatch the boards with a carpenters pencil to get an idea of where the equipment is taking off the wood and to let me know when its a done deal.
From there into the drum sander to give me a better idea of grain and figure. Fact is I got an excellent idea of grain and figure after using the hand plane..Running 80 grit in the drum sander for now, does not give you much of an idea. Kinda close, but no cigar.
Wood is cut for now oversized all the way around. I'll let it sit for a few days to settle in and then make final cuts to size...
 

Attachments

#14 ·
Seat assembly

Its been a good week in the shop. As most seem to be :)

I set about getting the seat to the rocker assembled. Not necessarily a difficult part of the project, but one that requires accuracy. Since the seat is pretty much the anchor for the entire rocker, everything has to be well thought out and executed. One of the great aspects of this project is that much of it can be customized as you go. Not missing an opportunity to 'change' things I decided that the seat would be a bit too wide for the intended recipient. Instead of a designed 20" width, I went with 19 1/2". May not seem like much, and perhaps it isn't, but thats what I went with. Placement of the spindles and the width of the headrest are all affected by this change. Again, not by much, but enough that it has to be kept in mind thoughout the build.

Seat blanks were cut and trued 4square and just oversized by 1/4". I let them sit a few days to acclimate prior to final cuts. 3 of the 5 seat planks required that a 3* bevel be sawn into the side. Two of the 3 on one side, and the middle required a bevel on both sides. The options here were to leave the seat square and flat, or include a bevel of anywhere between 0 and 5*'s. I went with the recommended 3* bevel. I thought it just added a nice sweep to the shape of the seat. Blanks were all cut down to just over the suggested width. Leaving around a 1/16" extra. Cutting thick cherry like this tends to want to burn. Leaving a bit extra prior to final passes leaves enough to make the final pass with little or no burning.
Tablesaw was setup to 3*'s and test cuts were made to insure everything was dead on. The rest is easy peezy...
 

Attachments

#15 ·
Once all of the seat blanks were cut to size and bevels cut next step was to cut biscuit slots. Here again, you've several options. Biscuits, dowels, Festool tenon's. I went with biscuits. I would have like to have gone with Festool tenons, but,, one of those rigs is a long ways down the road. Dowels would have worked, but I've always found that dowels need to be dead on. Not much in the way of wiggle room. So, I concluded for me, biscuits was the way to go.
Since, I seldom use biscuits, I found most of what I had onhand were already a bit swollen so I went to the local big box store and picked up a jar of #20's for about 8 bucks.
The seat is 22"S deep so I figured that 5 biscuits per side would due just fine. Position of the biscuits was laid out taking into consideration that the seat would be "shaped" later on. I went with leaving a good 5"s prior to the first biscuit from the front of the rocker. All biscuits are placed at 1/2" from the bottom, again, taking into consideration the shaping of the rocker later on.
The inside of boards 1, 2, 4 and 5 were biscuited at 90*, nice, simple and straight forward. The outside edge of boards 2 and 4 as well as both sides of board 3 were biscuited at 3*'s. This is where having a test board handy and making several test cuts were required to zero in placement of the cut. This turned out to be a bit more difficult than I had anticipated. Using a Dewalt biscuit jointer I took my time and got em where I wanted em. I screwed up in the placement of the biscuit on the back of boards 2 and 4. I failed to raise the biscuit joint to compensate for the cutting out of the rear seat tenons. I ended up cutting, shaping and fitting 2 inserts. Glued em up and placed in the improperly located holes. Let em dry and sanded. Not a big deal, just annoying. But hey, it happens to all of us...:)
 

Attachments

#17 ·
I screwed up in the placement of the biscuit on the back of boards 2 and 4. I failed to raise the biscuit joint to compensate for the cutting out of the rear seat tenons. I ended up cutting, shaping and fitting 2 inserts. Glued em up and placed in the improperly located holes. Let em dry and sanded. Not a big deal, just annoying. But hey, it happens to all of us...:)
And that's why the first one is always a bit of an adventure into the unknown. It's hard to focus on the job at hand and look forward at the same time. Too often one or the other suffers.
 
#16 ·
Seat tenons

Now here is where some of the most enjoyable work starts. I do enjoy joinery work. When doing joinery work, I attempt to get things as close as I possibly can.

Since keeping everything symmetrical is vital in just about any seat construction, I took extra care when measuring out placement of the tenons. Using a scalpel to mark my lines and a micrometer to take measurements. Some folks don't believe in going to those extremes feeling it doesn't make much difference, and they end up with good results. This is the way i go about it to get good results. SO it doesn't matter how ya go about it, just so you get the results you're happy with. If your not happy with the results, perhaps its time to try something else.

Once the lines were laid out, primary cuts were made using one of my TS sleds. Test cuts again made to insure everything was cutting square. Once confirmed square, I cut out the corner blocks for the front tenons and then the dado for the back tenons. Then off to the router table to create the actual tenons.
It is at this point it was made perfectly clear that the seat to leg joint (rabbet and roundover) had to match perfectly. The recommended bits of choice are a matched set of Whiteside bits. Which I broke down and purchased. Figuring that they will come in handy again and again. Highland Woodworking has a set of bits designed specifically for this build:

Rabbet and roundover set:
Whiteside Rabbet Roundover Router Bit Set

Rabbet, roundover and 2" spiral downcut set:
Whiteside Rabbet Roundover Router Bit Set

I went with the later, thinking that the 2" spiral downcut will help make cutting out the templates much smoother and cleaner. A time saver, thus a good investment.

In the video supplied with the plans for this rocker, Charles Brock free hand routes the tenons, I used the table. A little touchy introducing the wood to the bit in a few places, but if you take you time, it all goes rather well. The end results were 4 very nice looking joints. Using new bits sure didn't hurt, with practically tear out free cuts.

After the tenons were cut, it was time for gluing up the seat. Here I decided to glue up boards 1 and 2 then boards 4 and 5 seperately. Let dry overnight, then gluded board 3 to 1 and 2.. dry over night, then glued boards 1,2 and 3 to 4 and 5. Doing it this way gave me a little extra time to make any adjustments necessary to the glue ups. Titebond III is my glue of choice for just about all projects.I've played with Weldbond, but find the open time window just a little to tight.
 

Attachments

#19 ·
I keep thinking I should be making notes or keeping journal. But I would either forget to read it or forget where I put it.
 
#21 ·
I've considered a journal from time to time, but hell, I have a hard time putting together these write ups in here.. I just hope I"m getting the general idea across...
 
#22 ·
It is indeed John.... He had a very unique eye when it came to wood working. While this rocker seems to have been the 'one' piece of work that he's become widely known for, much of his work is along the same vein. Much like Greene and Greene...

any comments along the way would be well recieved...
 
#24 ·
Hey Dennis...

The 'sweep" as I called it, gives something of a head start for dishing out the actual seating area. Both outer boards are the 'high' parts of the seat, the middle, the lowest.
The seating area will slope from front to back within the seating area. There will be a small pommel about 6-8"s long at the center tapering down to flush with the back portion of the shaped seating area. I'm looking to maintain at least a 1" thickness throughout the entire seating area with the exception of the very front edges. The front portion of the seat will be sculpted out for the first 4 or 5 inches, leaving the remainder of the bottom pretty much untouched except for the edges. The topside will have a slight taper as I've mentioned from front to back. The trick will be "balancing" each half of the seat attempting to create an inviting, comfortable look. My wife and my daughter both have made comments about the pommel not looking so "comfortable"..:)
I've been busy looking at various techniques for hollowing out the top portion of the seat...
 

Attachments

#25 ·
Thanks so much for going to the trouble of setting up that shot. Now I get it. I was focusing on the top too much, but looking at both top and bottom it makes sense. I've followed a number of Maloof builds over the years and yours is the best.
 
#33 · (Edited)
No. Just what I've seen in ads. The Lancelot can be sharpened if needed if you know how to file saw chain. The other one wouldn't need to be very often. I ran chainsaw for 30 years and I know how fast one of those can get away from you so I'd imagine these two can too.

How were you planning on doing it?
 
#34 ·
Now thats the million dollar question Charles. Right now, I'm really not sure which way I want to go. I"m leaning towards the Charles Neil dado method, followed up with the Lancelot grinding wheels. Then sanding pads on the grinder. OR just go with the Lancelot grinding wheels and pad sanding. My only real concern is the "OPS" factor. The chainsaw wheel removes material quickly, but I"m thinking its one of those things that takes a bit of practice. I suppose no matter which method I decide upon, there will be a learning curve. Besides all of that, I'm going to have to do this outside. Just wayyyyyyyyyyyyyyy to much dust. Lastly I've got to decide on a design for the seat...The stock design is kinda too straight for my liking. I like to add a bit of a curve to both the inside and outside of the seat.
So while I'm making up my mind, I"m going to move ahead and get started on the front legs this weekend.
I also picked up a full size lathe last weekend and Im chaffing at the bit to play around with it a bit. :)
 
#35 ·
I've always suspected that there is a learning curve to the Lancelot. The one James linked doesn't look as aggressive and looks to be more controllable. I think either one will be about as bad as running a chainsaw indoors. The old school method is a type of spokeshave isn't it?

If you plan on using your skew practice on some scrap first. I still fight with mine. Practice is everything which is part of my problem.
 
#37 ·
I belong to another forum and there have been some similar build threads. I checked back and two tools may be of interest to you. One is an Auriou rasp for arms and similar applications. The second for is for the seat and is a Kutzall sanding disk. Not a recommendation but just passing along some info.
 
#38 · (Edited)
Dennis...Thanks for taking the time to do a little looking. :)

I already have several Auriou rasps. I pick em up about one a year and boy, they are just head and shoulders above your standard machine cut rasps. Just incredible. They are pricey to say the least, but you get what you pay for as they say. Brock recommends a min. of 3 different rasps as part of this build. One being the new combi rasp #5/#9. These rasps do little that alot of sanding wouldn't accomplish by itself. What they do offer is a level of 'control' that sanding doesnt.

The Kutzall disc is interesting!!! If only for the pricing. Definitely the least expensive of the discs so far. Have you used one? Looking at it this morning, I wonder how well it discharges the debris it creates. Would it be prone to clogging?..I dunno..

What i am finding interesting about this particular project is that it is not to terribly demanding "skill set" wise, but it is one that requires a good bit of investment both in materials and in equipment. Material costs can vary greatly depending on choices one makes. I could have easily cut my material costs in half by going with another wood choice. AS far as tools go, I just can't imagine the 'weekend hobbyist' having everything needed in his/her shop. The good news is that for the most part, just about all of the recommended equipment can be supplemented by much less expensive tools and or techniques that will give you the same end results.

If one is willing to trade time and elbow grease in exchange for savings on out of pocket expenses, this rocker can be built by just about anyone.
 
#40 ·
Once again, thanks for the input Dennis.

I think I"m gonna head on down to Rocklers, about a hour away and see what they might have on hand. Good excuse eh? :)
 
#41 ·
Bill, if I remember correctly, if the Kutzall gets plugged up you can burn it clean with a propane torch. The burrs are carbide and the heat won't hurt them.
 
#43 ·
Just a quick little update... did a little shaping on the front portion of the seat this weekend and came across a small section of bad wood. DAMN....It looks to be a bug hole, little more than that <<Pic. 34>>,

I guess the good news is that the bad section is located in an area that will be shaped out. So I guess no harm, no foul.

On a better note, got the front prommel of the seat roughed in. <<<Pic 35>>>. This starts giving the seat a little personality. Pencil lines are just a rough idea of where I plan of digging out the seat pan or what ever its called. The place where your butt ends up *L*.....

I got a good bit of work done on the legs...I'll get that posted as soon as I can..
 

Attachments