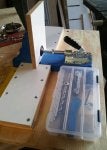
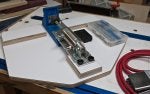
Some of you have probably seen my Pocket Hole jig set up (pics shown below). It works great. I have drilled hundreds of pocket holes with it. But, therein lies a problem. When I am drilling holes in panels such as plywood cabinet members, I have difficulty reaching around or over the panel to operate the clamp. In fact, on more than one occasion, I have scraped my arm. That is not good for a guy with thin blood.
So, in the words of Tim, The Tool Man Taylor “So I rewired it!”")
I know what you are thinking – A new model has just come out with the handle on the users side of the jig. I didn’t want to buy a new jig when I have a good one already. It just needs to be Mikeyized!
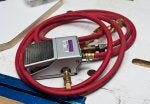
My plan is to mount an air cylinder on my current setup that is actuated pneumatically by a foot operated switch.
Since the next step up from the manual jig is the Kreg Foreman ($849), I should be able to accomplish my modification for under $100 or maybe a little more.
My next round of building cabinets for our kitchen should be a lot smoother and make me a lot more productive.
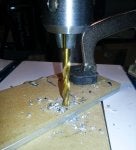
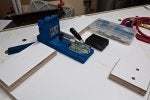
Something I had on hand is a piece of 1/4 inch aluminum plate 3 inches wide x 12 inches long. I decided to mount the cylinder on it. But first, I made an exact duplicate out of 1/4 inch mdf so I could figure out how and where to mount everything.
After removing the clamp mechanism that came with the jig, I commenced to measure and drill mounting holes in the mdf. Then I transferred the holes to the aluminum plate by simply drilling through the holes in the mdf.
I don’t have a picture, but I used the original nuts that were used to secure the clamp. I used JB Weld epoxy to permanently mount them in the sockets underneath the jig.
I countersunk the heads of the mounting screws for the front and back cylinder mounts.
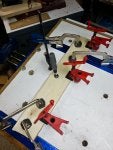
With everything fitted and working, I decided it was time for a new sled to mount the jig on. So, I recycled a piece of 3/4 inch plywood I have had since the mid 80’s. It was originally a box that pump parts had been shipped in and I salvaged it from the dumpster at work. Now it has a new life. Unfortunately, it wasn’t big enough so I added rear deck by gluing on a piece of maple. Once everything was dry, I added an edge all around and ran it through the drum sander until I had two smooth sides. I also needed new extensions for each side of the jig so longer material can be supported so I glued up two pieces of 1/2 inch Baltic birch. That turned out nice.
Final assembly and overview
Time to get this project wrapped up.
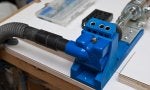
I covered the plywood deck with white Formica as well as the material supports and the rear support for the cylinder. After trimming the laminate flush with the plywood, I used a chamfer bit to bevel the edges slightly.
The original four 10-24×1 inch machine screws secure the front of the plate. Two 1/4 -20×1 inch round knobs attach the rear of the plate to the sled. If necessary, I can remove the cylinder as a unit.
And now for the good part. If something breaks, I can simply remove the four screws and the two 1/4 inch round knobs, remove the air cylinder unit and replace it with the original clamp!!!
But wait, there is more!
If I need to drill pocket holes in 2x lumber, I will have to reposition the air cylinder. To do that, I simply remove the four 10-24 machine screws which will free up the sled. Then I will need to remove the four wood screws on the bottom side of the sled which keep the rear cylinder support in place. After determining the position for the cylinder, put the screws back in the aluminum plate, and drill new screw holes on the underside of the sled so the rear support will stay put. No need to remove the two 1/4 – 20 round knobs.
I drilled a few holes and the jig is working great. I had the air compressor set at 80 psi. I think I can easily reduce it to 60 psi.
The only thing left is to get a filter for the air line. The specs call for a 40 micron filter. HF has one that should work just fine.
I hope you enjoyed reading about this build as much as I did building it.
Mike
So, in the words of Tim, The Tool Man Taylor “So I rewired it!”
I know what you are thinking – A new model has just come out with the handle on the users side of the jig. I didn’t want to buy a new jig when I have a good one already. It just needs to be Mikeyized!
My plan is to mount an air cylinder on my current setup that is actuated pneumatically by a foot operated switch.
Since the next step up from the manual jig is the Kreg Foreman ($849), I should be able to accomplish my modification for under $100 or maybe a little more.
My next round of building cabinets for our kitchen should be a lot smoother and make me a lot more productive.
Something I had on hand is a piece of 1/4 inch aluminum plate 3 inches wide x 12 inches long. I decided to mount the cylinder on it. But first, I made an exact duplicate out of 1/4 inch mdf so I could figure out how and where to mount everything.
After removing the clamp mechanism that came with the jig, I commenced to measure and drill mounting holes in the mdf. Then I transferred the holes to the aluminum plate by simply drilling through the holes in the mdf.
I don’t have a picture, but I used the original nuts that were used to secure the clamp. I used JB Weld epoxy to permanently mount them in the sockets underneath the jig.
I countersunk the heads of the mounting screws for the front and back cylinder mounts.
With everything fitted and working, I decided it was time for a new sled to mount the jig on. So, I recycled a piece of 3/4 inch plywood I have had since the mid 80’s. It was originally a box that pump parts had been shipped in and I salvaged it from the dumpster at work. Now it has a new life. Unfortunately, it wasn’t big enough so I added rear deck by gluing on a piece of maple. Once everything was dry, I added an edge all around and ran it through the drum sander until I had two smooth sides. I also needed new extensions for each side of the jig so longer material can be supported so I glued up two pieces of 1/2 inch Baltic birch. That turned out nice.
Final assembly and overview
Time to get this project wrapped up.
I covered the plywood deck with white Formica as well as the material supports and the rear support for the cylinder. After trimming the laminate flush with the plywood, I used a chamfer bit to bevel the edges slightly.
The original four 10-24×1 inch machine screws secure the front of the plate. Two 1/4 -20×1 inch round knobs attach the rear of the plate to the sled. If necessary, I can remove the cylinder as a unit.
And now for the good part. If something breaks, I can simply remove the four screws and the two 1/4 inch round knobs, remove the air cylinder unit and replace it with the original clamp!!!
But wait, there is more!
If I need to drill pocket holes in 2x lumber, I will have to reposition the air cylinder. To do that, I simply remove the four 10-24 machine screws which will free up the sled. Then I will need to remove the four wood screws on the bottom side of the sled which keep the rear cylinder support in place. After determining the position for the cylinder, put the screws back in the aluminum plate, and drill new screw holes on the underside of the sled so the rear support will stay put. No need to remove the two 1/4 – 20 round knobs.
I drilled a few holes and the jig is working great. I had the air compressor set at 80 psi. I think I can easily reduce it to 60 psi.
The only thing left is to get a filter for the air line. The specs call for a 40 micron filter. HF has one that should work just fine.
I hope you enjoyed reading about this build as much as I did building it.
Mike