Router Forums banner

Porter and Cable Template Guide for Old Bosch GOF 1300 ACE or Hitachi M12V Routers

4.6K views 32 replies 8 participants last post by  jw2170  
#1 · (Edited)
Hello All,

Greetings from Queensland - Australia.

I recently bought a Porter and Cable Dovetail Jig 4216 which comes with four different sized threaded template guides. None of these template guides fit either of my two routers. Does anyone know if the Bosch part number RA1100 does actually fit the old Bosch GOF 1300 ACE router?

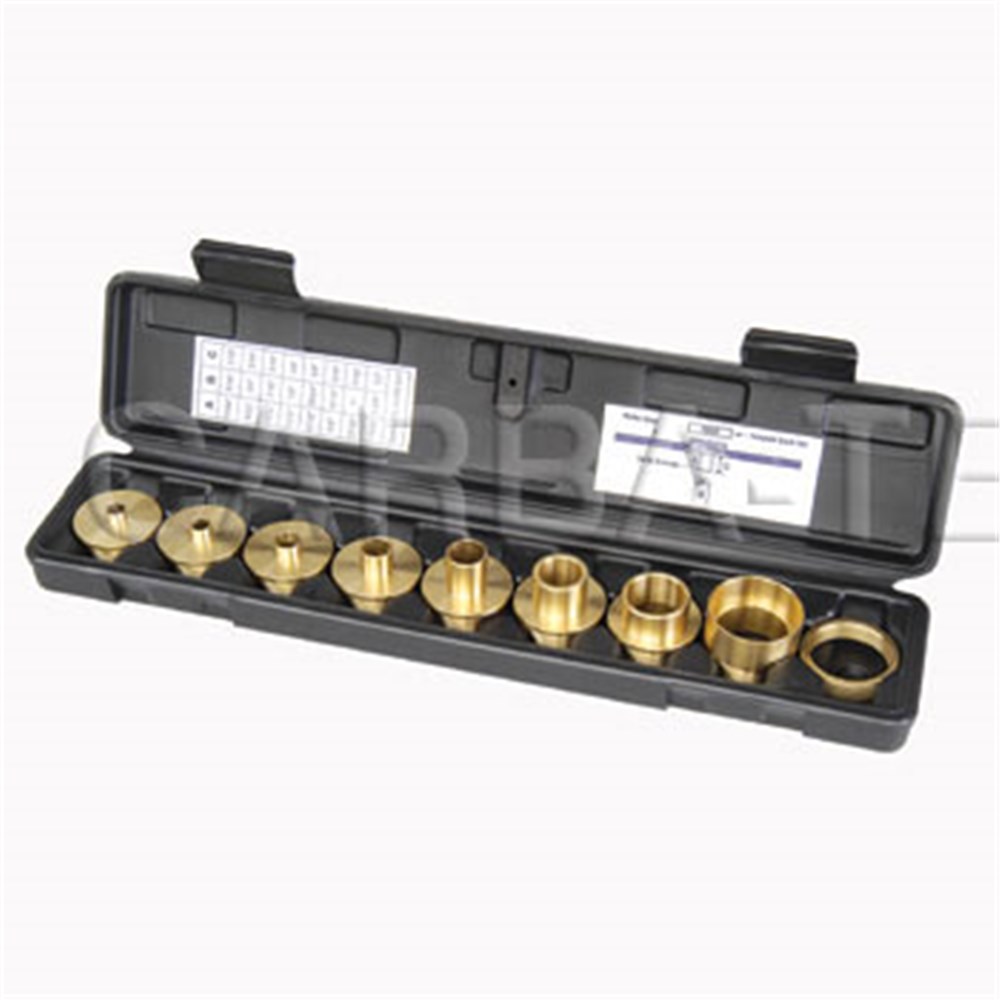
Details about the Bosch set are as follows ... Template Guide Set RA1128. I found a set of 8 template guides set from Bosch that does especially mention that one of the set, the RA1100 interface piece, which allows the template guide adapter to accept Porter-Cable® and similar common threaded template guides 8 pc. Template Guide Set RA1128. I cannot post the direct hyperlink as it gets blocked by the forum. I found it on Amazon if that helps.

The problem is that In the description of the Template Guide Set RA1128 I could not find any mention of the set being suitable for the Bosch GOF 1300 ACE that I bought attached to a Triton Workcentre 2000 Router Table. I then contacted Bosch Australia and they emailed back that the 8 piece Template Guide Set RA1128 was from America, so they could not provide support for the product here in Australia. Yes Bosch Australia was very, very helpful ... NOT!

If someone in the US of A does have a Bosch GOF 1300 ACE can you please let me know if the Template Guide Set RA1128 does fit my old Bosch router?

Otherwise does anyone on the forum have a Hitachi M12V and have managed to track down a router base adapter that accepts the Porter and Cable threaded template guides.

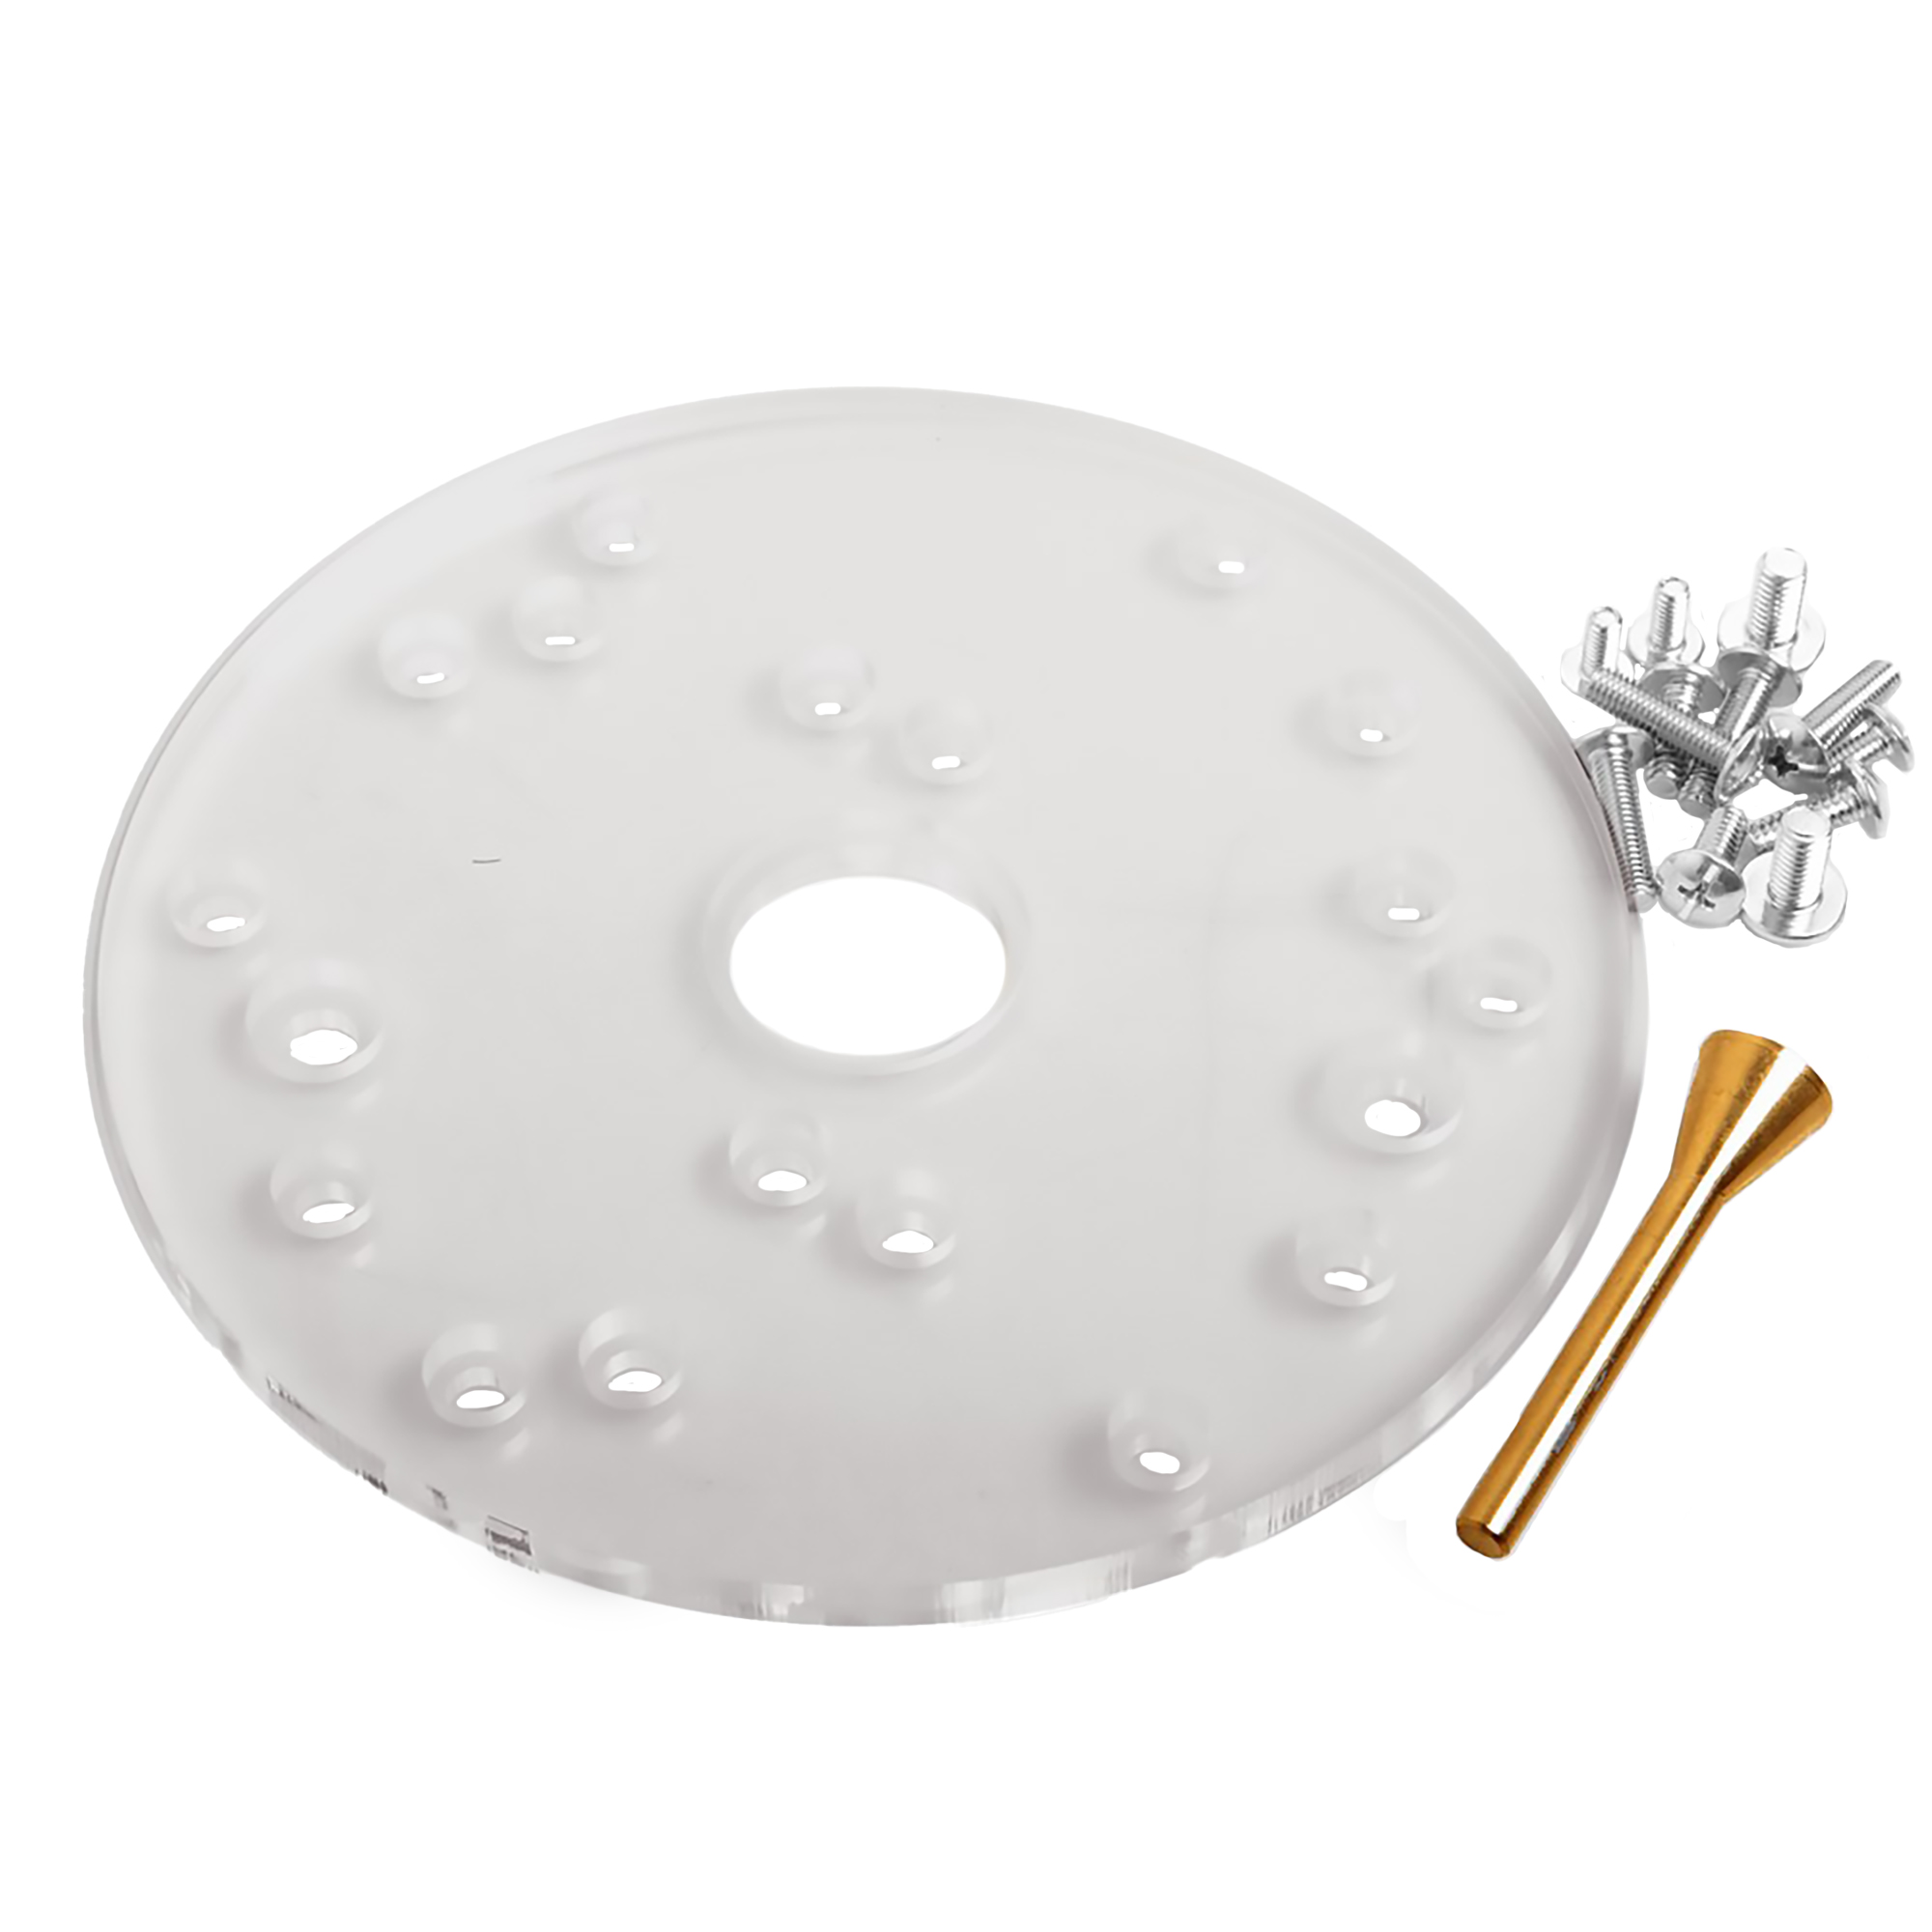
I have made an adapter for the Hitachi made up of two layers of aluminium. The first layer uses the two adapter plate mounting holes to form the bottom of the adapter plate. This arrangement leaves the Porter and Cable template guide sitting 2.6 mm high above the router's base plate. To counter this I have added a second layer of aluminum plate that allows the Porter and Cable template guide to fit flush.

I hope this home-made adapter is only a temporary measure. I would prefer a properly manufactured template guide holder.

I also have to adapt my Ryobi Plus One 18 volt palm router to suit the two Porter and Cable template guides for the 1/4 inch router bits. Of course the Ryobi does not suit the Porter and Cable templates either!

If all else fails ... if you do have a modern brand of router that has a 1/2 inch or 13 mm (12.5 mm) router shank capacity that does fit the Porter and Cable template guide - without any fuss - can you please post the brand, model number of your router and the brand and model or part number of the adapter kit you may have needed? Unless there was a miracle and the Porter and Cable template guide actually fit your router straight away! Then this would be a good bit of knowledge to have.

Yes - I am somewhat exasperated by the experience so far. Aren't hobbies meant to be fun?

Kind regards
Lionel
 
#5 ·
Hello John,

Thank you for your welcome. Yes, that is the product which Bosch say fit their latest round of routers. One of the 8 fits the Porter and Cable template guide. However, I cannot find a mention in their description of whether the set is compatible with the GOF 1300 ACE.

I was hoping that another Router Forum member might have bought the set and found out that it does fit their Bosch GOF 1300 ACE router.

Or alternatively, a forum member have a Hitachi 12V that they have been able to fit a Porter and Cable compatible adapter to. If so which product worked?

Kind regards
Lionel
 
#8 ·
Hi Lionel.
I attach the manuals for this set. (In the linked post)
If you are having difficulty, I would buy a generic Universal router plate and use PC (Porter Cable) style guide bushings.


#9 ·
Hi Lionel,
You have probably thought about this already, given your experiments with sliding dovetails on your other thread, but here goes:
1. Could you post photos of the base of your Bosch, seen from the bottom and if possible from the top side?
2. The manual for your PC jig gives 4 outer diameter sizes (Imperial). Have you checked whether the guides in the Bosch set have metric equivalents, or whether these are available separately?
3. Did you get the router bits with the set? If not, how will you deal with the imperial/metric bit size thing? If you are like us, the shaft diameters are imperial, but bit diameters are metric.
4. If you are really stuck, check whether you can use bearing mounted bits, ie can you find bearings that fit as snugly between the template fingers as the template guides, and whether, if mounted on the bit, they allow the same depth of cut while still firmly in contact with the template fingers (not slipping above or below).
5. James’ idea is the simplest if 2 does not work, as the P-C template guide needs to be centered in the base of the router - some fine adjustment may be necessary. Not sure if this is possible with the Bosch set - I think they are self-centering, but not sure about the precision.
6. The sub-base option would likely be applicable to the Hitachi, I don’t think they ever provided an adaptor for P-C guides. Having said that, there might be equivalent OD original or aftermarket Hitachi template guides - I know Makita had a range.
 
#10 ·


Hey Lionel,
This is my GOF 130, bought 2022. You can see that they have built in the template guide carrier, which is the largest component of the set you referred to. Older routers had a circular rebate with two bolt holes, for mounting guides directly onto the base - those guides may still be available where you are, they were not quite universal, but the main difference between makes was the bolt-hole spacing.

The carrier in the set would be bolted on, the guides themselves are drop-in-and-lock - the strange outline is to lock them and prevent any movement. I have not tested for precision in this machine - it is the only one I have with this system.

I am sure your Hitachi has that circular rebate, and the Bosch adaptor should fit the Hitachi, with a bit of fettling of the bolt-holes.

My router came with one guide, with a weird 17mm OD. Cannot imagine why that was chosen, but I guess it would accommodate a range of bits, even dovetail bits, when following a template. However, I don’t think any dovetail template fingers are spaced at 17 mm, but who knows?
 
#12 ·
View attachment 405288 View attachment 405289 View attachment 405290 View attachment 405291 View attachment 405292

Hey Lionel,
This is my GOF 130, bought 2022. You can see that they have built in the template guide carrier, which is the largest component of the set you referred to. Older routers had a circular rebate with two bolt holes, for mounting guides directly onto the base - those guides may still be available where you are, they were not quite universal, but the main difference between makes was the bolt-hole spacing.

The carrier in the set would be bolted on, the guides themselves are drop-in-and-lock - the strange outline is to lock them and prevent any movement. I have not tested for precision in this machine - it is the only one I have with this system.

I am sure your Hitachi has that circular rebate, and the Bosch adaptor should fit the Hitachi, with a bit of fettling of the bolt-holes.

My router came with one guide, with a weird 17mm OD. Cannot imagine why that was chosen, but I guess it would accommodate a range of bits, even dovetail bits, when following a template. However, I don’t think any dovetail template fingers are spaced at 17 mm, but who knows?
Hey Lionel,

Just sharing a quick update on my GOF 130 that I purchased back in 2022. As you can see, they've integrated the template guide carrier, which seems to be the main component from the set you mentioned. I remember the older versions of these routers; they had that distinctive circular rebate with the dual bolt holes meant for directly attaching guides. While I'm not sure if those guides are still around in your area, I know they were pretty popular, with the primary variation being the distance between the bolt holes.

With the guide set you mentioned, the carrier is meant to be bolted on, and the guides just slot in and lock into place. That unique shape is designed specifically to ensure the guides don't budge once they're locked in. As for accuracy, I haven't done any extensive testing with this machine yet, especially since it's the only one I have with this kind of system.

I have a feeling that your Hitachi router has the same circular rebate I mentioned earlier. And from what I've seen, the Bosch adaptor should be compatible with the Hitachi. There might be some minor adjustments needed for the bolt holes, though.

Interestingly, my router came with a single guide with an unusual 17mm outer diameter. Still scratching my head about why that specific size was chosen, but I think it might be flexible enough to handle various bits, including dovetail bits for template tracking. But a 17mm spacing for dovetail template fingers? Haven't seen that before, but the world's a big place.

Would love to hear your thoughts on this!

Cheers, Ahmad.
 
#17 ·
Hello All,

I have watched a couple of YouTube clips about the Porter and Cable Dovetail jig. One actually used a Porter and Cable router - which everything fitted to perfectly - of course. The other common brand of router was a Dewalt corded router and the Porter and Cable template guide fit to it without any modifications.

The total outlay of the raw material for making my two sets of Porter and Cable Template Guide adapters was about $5.00 Australian dollars for the 2.5 mm aluminum plate and $8.00 for the 3.00 mm plate. They were both off-cuts and the money paid for lots more material than I needed. It is always handy to have some aluminium plate stored away anyway. You never know when you might have to make an adapter plate or space something out.

The Dewalt router was over $800 Australian dollars according to some online checks. As tempting as getting another toy is, I will stick to my two-piece set of aluminium plates. They may not look pretty - however, they do work though!

Kind regards
Lionel
 
#18 ·
Hey Lionel,

That's the beauty of DIY - finding innovative solutions without breaking the bank! It's always satisfying to create something that fits our specific needs. While new tools can be tempting, sometimes the adaptability and creativity we bring to the table can outshine a shiny new purchase. Hats off to you for making it work with the materials at hand. Keep up the DIY spirit!

Best wishes,
Ahmad
 
#19 ·
Hello All,

I was going to do a lot of continuous or sliding dovetail joints for the horizontal dividing shelf in the 1550 mm (61.02 inches or 5.085 feet) pine bookcases I am making. I cut this down to just a pair of joints. This was because I decided that there was too much room for error and inconsistency cutting the tail section of the dovetail joint just using a hand-held router. I was going to use sliding dovetail joints top and bottom of the vertical shelf braces. These will just be done with butt joints with dowels now.

I will either see if my Triton Workcentre 2000 router table can be modified from its standard vertical position to swap it over into a horizontal position. When you are trying to cut the tails of the dividing shelf trying to keep 1550 mm slid across while keeping it square and vertical is pretty difficult. If the Triton table could be made to operate with the router horizontal a fence could be used to control the long piece of timber while it slides across to cut the joint's face.

Either that or start looking at CNC alternatives :0)

Kind regards
Lionel
 
#21 ·
Hello Biagio,

Just a simple pair of bookshelves, Biagio. As requested, please see the diagram below. All the red circles mark where I have already made half-blind dovetails. The green circles show the horizontal dividing shelf where I did unsatisfactorily make a set of sliding dovetails. The yellow circles show where I was going to make sets of more sliding dovetails.

I abandoned the idea of the sliding dovetails in the yellow circles and will just make the vertical dividers have butt joints. One book shelf was made with the unsatisfactory sliding dovetails for its horizontal shelf. The second bookcase I reverted to plain old butt joints with some cleats glued and screwed in.

The main issue is lack of precision and control using a hand-held router to cut the tails on the ends of the horizontal shelf. It might be easier with a smaller router - the Hitachi M12V is a big and heavy router to control.

Kind regards
Lionel
 

Attachments

#22 ·
I take your point. You could consider simple dado joints, which would look similar, but not require work on the ends of boards.
I made a bookshelf with those sliding dovetails about 35 yrs ago, has never moved a millimeter, but damned if I remember how I did it. It often helps if one does not know that something is not feasible.
If you want to persevere, it is no big trick to make a table in which the router is mounted horizontally. There are very fancy table designs around, but I remember one of my compatriots making a very simple one, which worked so well he dedicated a router to it.
I don’t know if he is still on the forum, but search under user Wildwood.
Your big Hitachi might make it a little clumsy, but should still work.
 
#24 ·
Hello Biagio,

One good thing about cutting the tails is that it does not require a guide template. I am going to have a closer look at the Triton Workcentre router table (Accessed 19/08/23 from https://www.tritontools.com/Helpers/GetImage.ashx?type=Product&size=1000&name=330100_ENWNMPRO3). I bought the router table second-hand so it was already assembled and ready to use. It may be possible to take off the whole router top - with the router attached and clamp it to a sturdy workbench so that the router bit operates on the horizontal plane. The main issue would be to construct some form of very rigid slide that would allow the board to smoothly and accurately travel across the router bit. I do have Maxi Sliding Extension Table (Accessed 19/08/23 from, https://www.tritontools.com/Helpers/GetImage.ashx?type=Product&size=1000&name=330075_ENWNMPRO1), so that might help with the ability to smoothly feed the board along while cutting the tail. I circled the sliding frame which is quite rigid and strong.

An alternative could be something like a bed of a metal work lathe with its tool slide and screw-feed. Or something CNC controlled. I am in the very early stages of just bouncing ideas around in my head.

Thank you Biagio for posting your very considered replies and sharing your knowledge with me.

Kind regards
Lionel
 

Attachments

#25 ·
I really recommend you search for Wildwood, he posted in a thread about a simple table he made in a day from Fine WoodWorking 2001. Article by a chap called Ernie Conover, if you have access to FWW. You will see that it could be used in conjunction with your Triton table (hanging off the edge) and maxi extension, with a little ingenuity.

You have reminded me that I have one of those Maxi extensions (but not the Triton table, which I always thought too pressed-metal). Never used, stashed in a loft. A mad purchase for next to nothing in a close-out, at a time when I was determined to make my own table saw, and wanted the sliding table function. Good sense prevailed. Must remember to get rid of it.
 
#26 ·
Hello Biagio,

Thank you for the tip about Ernie Conover's horizontal router table. I found the article and here is a copy of the link to it... accessed 20th August 2023 from, How To Build a Horizontal Router Table - FineWoodworking. Armed with the title I also went onto Youtube and found a number of different DIY versions of horizontal routers. More fodder for the 'little greys cells'. Thank you.

Kind regards
Lionel
 
#27 ·
Remember your board will be riding against a fence, so not as difficult as you are anticipating.
I still cannot remember how I did it, but here is how I would do it, hand-held:
1. You will need a straight board about twice as long as your shelves or dividers are wide. Say a length of 2 x6.
2. You will need an off cut of your shelf/divider, of sufficient length to exceed the distance between the base of your router and the bottom of its parallel edge guide. Divide it in two across its short dimension, to make two blocks.
3. Make the jig by laying your shelf on the 2 x 6 so the edges are aligned, and attach a block from step 2 snugly on either side, also edge-aligned, so you have a T-square.
4. If you now clamp the board in its jig vertically ( I now have a Moxxon vise, but I may have used deck railing in the past, or a B & D Workmate), you have a nice wide horizontal surface for your router’s baseplate to ride on, and a flat surface for your parallel edge guide to bear against.
5. The blocks will prevent tear out at beginning and end of cut.
6. The depth of cut of your router bit will be set the same as the depth of your dovetail groove, perhaps a painter’s tape thickness less.
7. The fiddler bit will be adjusting the position of the parallel edge guide, to give the correct “thickness” of the dovetail.
6. Once you have sneaked up on the adjustment of your parallel edge guide, lock everything in place and you are good to go in production mode - assuming all your boards are equal thickness, otherwise group them by thickness, and make some final tweak for each group. Your Hitachi will make the cut in one pass, flip the board around, and do the other side.

Tables, shmabels.
 
#28 ·
Hello All,

I was going to do a lot of continuous or sliding dovetail joints for the horizontal dividing shelf in the 1550 mm (61.02 inches or 5.085 feet) pine bookcases I am making. I cut this down to just a pair of joints. This was because I decided that there was too much room for error and inconsistency cutting the tail section of the dovetail joint just using a hand-held router. I was going to use sliding dovetail joints top and bottom of the vertical shelf braces. These will just be done with butt joints with dowels now.

I will either see if my Triton Workcentre 2000 router table can be modified from its standard vertical position to swap it over into a horizontal position. When you are trying to cut the tails of the dividing shelf trying to keep 1550 mm slid across while keeping it square and vertical is pretty difficult. If the Triton table could be made to operate with the router horizontal a fence could be used to control the long piece of timber while it slides across to cut the joint's face.

Either that or start goku tu looking at CNC alternatives :0)

Kind regards
Lionel
Hey Lionel, sounds like a challenging but exciting project you got there! I can totally relate to the struggles of trying to keep everything square and precise while routing. I've never tried modifying a Triton Workcentre 2000 myself, but I have heard of people making custom adjustments to their tables to get them to work horizontally. Maybe check out some woodworking forums for tips?

CNC would definitely give you the precision you're looking for but it's quite an investment. If you've got other projects lined up, it could be worth it. Otherwise, dowels are a tried and true method for sure. Looking forward to seeing how your bookcases turn out!
 
#31 ·
I lost track of who's who on this thread, but a lot of the issues raised could be resolved by having a nice size shop built router table with a straight fence. And/or, with an exact fit dado jig. Two pdfs on building a shop built table are attached. Here is a plan for a simple exact fit jig.

Image


With the jig you can use a bit with a bearing. A half inch bit will cut a nice dado. I tend to use mortising bits because they cut such a nice, flat bottom groove. I also have a Dado Wiz, an old device that uses a dedicated straight edge. With it and the jig above, you fit the shelf piece into the slot, then tighten the star knobs of you have a snug fit (not too tight) and clamp the jig on your layout lines. Voila, done. You always want to use a bit smaller than the width of the dado or groove.

You want to make certain that the rails on the side are exactly 90 to the slot. It doesn't show here, but I would make the top rail a little wider and cut out a chunk where the bit can pass without chewing up the rail. It's the inside edge that needs to be 90.
 

Attachments