Harry, Bobj3, Hamlin and the rest of you ski users...
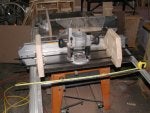
After seeing Harry's post a little while back where he made a nifty clock and did the thicknessing of the stock with his router and ski jig I decided that might be something I'd like to have in my bag of tricks.
So besides the building of the jig part (and there are lots of references to designs here in the forum, so that is no great problem), what are you guys using for a bit when thicknessing material this way?
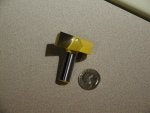
Would this kind of bit be useful?
http://cgi.ebay.com/1-pc-1-2-SH-1-3...emZ130270689376QQihZ003QQcategoryZ50386QQcmdZViewItemQQ_trksidZp1742.m153.l1262
(In case the link does work, it is a 1/2" shank, 1-3/4" diameter bottom cleaning bit).
I don't have one, the largest thing I have with a flat bottom would be a 3/4" straight cutter. But that seems like it could take a long while.
After the first of the year I'd like to get going on some cabinet doors in cherry but I lack a planer. The joining of edges can handle with the table saw and the router with bit and fence. But I'd not too keen on re-sawing a lot of material with the table saw to get from 4/4 down to 3/4. It seems that a sacrificial top of particle board, cleats on all four sides of a rough-cut workpiece and where necessary shims underneath to get one side flat (surface jointing operation) I could get it all done with the router and a ski jig.
Your thoughts? (And I will be saving up for a benchtop planer in the future as well as some good hand planes)
After seeing Harry's post a little while back where he made a nifty clock and did the thicknessing of the stock with his router and ski jig I decided that might be something I'd like to have in my bag of tricks.
So besides the building of the jig part (and there are lots of references to designs here in the forum, so that is no great problem), what are you guys using for a bit when thicknessing material this way?
Would this kind of bit be useful?
http://cgi.ebay.com/1-pc-1-2-SH-1-3...emZ130270689376QQihZ003QQcategoryZ50386QQcmdZViewItemQQ_trksidZp1742.m153.l1262
(In case the link does work, it is a 1/2" shank, 1-3/4" diameter bottom cleaning bit).
I don't have one, the largest thing I have with a flat bottom would be a 3/4" straight cutter. But that seems like it could take a long while.
After the first of the year I'd like to get going on some cabinet doors in cherry but I lack a planer. The joining of edges can handle with the table saw and the router with bit and fence. But I'd not too keen on re-sawing a lot of material with the table saw to get from 4/4 down to 3/4. It seems that a sacrificial top of particle board, cleats on all four sides of a rough-cut workpiece and where necessary shims underneath to get one side flat (surface jointing operation) I could get it all done with the router and a ski jig.
Your thoughts? (And I will be saving up for a benchtop planer in the future as well as some good hand planes)
") and the bit below will work fine
and the bit below will work fine