Router Forums banner

Ryobi RRT1600

1 reading
53K views 59 replies 14 participants last post by  Guv  
#1 ·
Hi,

I have just purchased a Ryobi RRT1600 Plunge Router and am in the process of setting up a workshop for DIY jobs and hopefully, to restore my long lost youth :smile:

Is this model of router suitable for mounting upside down?

If so, is it relatively easy to make bit depth alterations?

I have a gut feeling that I may have purchased the wrong type of router :frown:
 
#2 · (Edited)
Welcome to the forums N/A...
I'm Stick and do I have some reading for you to do...
much of which can not be ignored or treated lightly ESPECIALLY SAFETY...

there are PDF's here on safety, maintenance, methods, jigs, tooling, accessories, aides, set up, and so much more...

PLEASE take the time to read them.. Your health, welfare and safety matter here...

http://www.routerforums.com/general-routing/133402-welcome-forums.html
 
  • Like
Reactions: thomas1389
#3 ·
#8 ·
@Zippity - Welcome aboard. Lots of good folks here willing to lend a hand.

Now, about your router. I didn't look up the manual so I will leave the reading to you. Does it mention a way to disable the plunge action by removing a spring (or springs). Without doing that, using it attached to a router plate insert will be a difficult task because you will be fighting the spring(s) each time you try to make a depth adjustment. I wouldn't even try it.

However, it should make a nice router for hand held operations.

Save up your coins and buy a second router with a fixed base that you can leave mounted under a table. There are a lot of insert plates that allow for just that purpose. I have two routers mounted under a table - a Triton 3 1/4hp and a Bosch 1617. They are attached to Kreg mounting plates. No complaints from me.

Good luck with your shop. We will be glad to help you spend your money! :surprise::grin::grin::grin:
 

Attachments

#9 · (Edited)
@Zippity The Bosch 1617 is highly recommended for table use, in part because its fixed base can be mounted under the table with an above table height adjustment. Here's a picture. Personally, I still use the 1617 freehand and plunge, but put a Triton TRA001 3 1/4 hp in my table. The Triton was made for under table use, and is set up with a crank so you can set height precisely. It also has a safety lock you have to press before you use it. It cranks up very high above the table for easy bit changes. It costs about the same as a lift alone.

If the Ryobi doesn't allow you to convert it to a table model, I'd keep it for freehand use, and seriously consider going for a Triton. You're wise to go for a table mount either way, it's much safer to use a table than freehand, and using larger bits freehand doesn't work well and is pretty risky.

Be sure to download and read the pdfs Stick put up. They cover a lot of territory. Also, you might get a lot from watching videos by Marc Sommerfeld. He sells router related gear, but he started out making cabinets, so his technique is really good and worth learning.

Don't know if you have a commercial table yet, but you might consider making your own. Can be as simple as a chunk of flat ply or as complicated as a fancy cabinet with drawers. Search the Forums for threads on making a router table for details. You'll want to add a mounting plate to your shop made table, Kreg and many other companies make them, often pre-drilled for your router model.

BTW, welcome. As you can tell, there's a ton of experience around here and we love to answer questions. You might also like to read this pdf on the 17 things that really accelerated my learning curve. It also contains suggestions on shop purchases and hopefully will help you avoid mis-spending on tools and accessories.
 

Attachments

#10 ·
Many of the newer plunge routers have above the table adjustment capability, I’m not sure about that one though. You still have to reach under the table to lock them in position. I also recommend removing the springs for table use. You can extend the router to the point that the base comes off but there may be one thing to be careful of. Mine have a brass plug that goes between the lock lever and the plunge tube. Make sure that side is down when you remove the base or it can fall out.
 
#11 · (Edited)
Ryobi RRT1600 exploded parts view

Ryobi RRT1600 exploded parts view document attached

Springs easy to remove.
Cheap router lift available
Template guide 68mm like Markita.
Just need an adapter ring to use Porter Cable type template Guide Bush (us: Guide Bushings)

Good 1st Router - with variable speed and 1/2" collet

It is easy to make a table top lift with ANY plunge router.
In fact if you get a cheap ALU plate AUD$73 it comes with a DIY Tabletop router lift kit for you too.

https://www.ebay.com.au/itm/Aluminu...-With-Ring-Fits-Woodworking/253423179620?hash=item3b0132d764:g:mEoAAOSwSFJagV8K
Plastic insert shown already accepts 1 3/8" type Porter cable Guide Bushings - I know as I have one.
NO NEED OF a TRITON OR BOSCH just to get a tabletop lift.
 

Attachments

#12 ·
As you probably have realised by now, for table mounting the springs must be removed. I've no hands on experience with this very nice router but I would think that removing the fine adjustment knob, it will take many turns, will allow the body to lift off the base with the springs sticking out ready to remove. It is most important to remember that the springs MUST be replaced if you ever want to use it hand held where it should perform perfectly, having reasonable power, variable speed, soft start and a multi-step turret.
 
#14 ·
Hi Harry
"MUST" is too strong a word.

As Philip suggested earlier there is a cheap heavy duty router lift available (AUD35) for plunge routers.
If one use such a lift, IMHO it won't be necessary to remove the springs.

I once remove the springs of my router then decided to put them back even though I only have a screw type lift.
 

Attachments

#13 ·
My plunges have a brass plug that goes between the column lock lever and the plunge tube. If yours has one it can fall out when you remove the base. Make that side is down so it doesn’t happen.
 
#16 · (Edited)
DIY lift

When you buy a AU insert plate (see my earlier post) it comes with a DIY lift kit (see attached).

For many plunge router such as my Hitachi M12V it is very easy implement. Just replace the side threaded rod that holds the base to the router motor with this long bolt provided. You just need to drill a hole on the base plate and a bigger hole on the sub base and the AL insert

The T-allen key provided allows lifting the router from on top of the table. If you know the TPI you can adjust the height by counting the number of turns or quarter turns of the T-allen key. If you think that is too slow, just fix a hex bit to your cordless drill so that you can move your plunge router up and down more quickly depending on the speed of the drill.
THERE is NO NEED to remove the springs then.
Removing the springs may even be bad if you are using spiral bits as the router may creep upwards or vibrate when there are no springs to hold it down.

BUT since the RYOBI RRT1600 has a 4 year replacement warranty, it is best to just buy and use the scissors lift & don't remove the springs to avoid voiding the warranty.
 

Attachments

#18 ·
My router plate is only held in by gravity so using a scissor lift without removing the springs wouldn’t work very well. Fortunately my M12V2 has above table adjustment capability.
 
#19 ·
Some years ago I was busy with a number of projects and happened to be in our local recycling depot when I saw a table top router table which I bought for $3.00! I then went to our local pawn shop, The Cash Converters, and bought a Ryobi router which I modified for above table height adjustment. Here are a few shots taken during the conversion. This conversion idea could probably be used on many different routers.
 

Attachments

#21 ·
Hey Guys,

I'm still here. Have just been knocked down with a dose of the 'flu and was not really interested in getting out of bed and reading the internet :(

Thanks for ALL the great feedback.

I need to sit down and try to absorb it all, before trying to sort out my problem.

Thanks for the comments :)
 
#22 ·
Good to hear from you. I know exactly how you feel. I was hit twice this season with "pollenitis" , as they call it down here in the South. I didn't want to get out of bed, and didn't for several days.

Get well.
 
#23 ·
Did you ever get this sorted?

Sorry to jump in on an old thread, I have a Ryobi 1600W plunge router (Bunnings purchase - like HD for our American friends) I would like to use on a table, but am rather hesitant.
First issue is the no-lock power controls. I'd have to cable-tie the trigger on to use the separate power controls for the table.

Second is I'm not sure about controlling the height - I'm thinking of the scissor-lift as previously pictured, as it's cheap and may be ok. Or a Raizer from Timbecon, if I think it would work. I may email those guys to get their opinion.

Sadly, as much as I love this router, I was a little mis-informed by Bunnings (and I'm not the only one), as they claimed it could go in a table.

It certainly seems like I'd need to have some serious adjustments done to make that so (mostly power controls - and I'm no sparky).

Would be interested to hear how you got on.
 
#25 ·
Just bought a Makita


It's an M3600G single-speed router and I bought it for mounting in the table I've since built.
Not expensive, from Total Tools, and it may be worth a look for yourself.

I love my Ryobi RRT1600W - I have done a bit with it so far. The variable speed I haven't used a lot, but I love the soft-start and it's been good to work with as a hand-held router.
 
#26 ·
Easy to remove

Hello,
sorry to exhume this thread but you said that springs easy to remove on the Ryobi RRT1600...
Can someone explain to me how?
(I admit that despite the plan I do not know what is the process).

Thank you very much for your help
Nicolas
 
#28 ·
Good stuff Nicolas. Sorry nobody got back to you on that. If you have the time and inclination, would you post the steps you took to remove the springs? It may help others who are looking to do a similar job with theirs.
 
#29 ·
Ok :)

At first I tried to remove the hexagonal screws (74) that are at the base of the columns but the base did not disassemble. I guess that the columns had been mounted in force.
I removed the top cover (46) by removing the 6 screws.
I desolidarized the central part (43) by removing the 4 screws (some of them are hidden by the electric wires). Now we can lift and turn a little the central part (including the engine block), enough to access the circlips (56) that hold the columns.

After removing the springs I reassembled all (do not forget to remove the carbon brushes (41) before, otherwise it blocks the reassembly).
Not very difficult, even for me ^^.

(sorry for the mistakes, I'm french and I don't speak english very well so... google translate is my friend and sometimes there is some failures lol).
 

Attachments

#30 ·
Hi, I did not want to make a suggestion, as I have the previous model, which may be completely different. But in a number of routers, I have been able to access the springs by removing the roll pins that secure the base to the guide rods. Less complicated than a complete strip-down.
Part 74 on the diagram.
 
#31 ·
Hi,
as I mentioned at the beginning of my "review", I tried to unlock the base.
On this model they are screws and not roll pins. When I removed the screws, the bottom remained stuck to the columns. Maybe the columns were mounted with a press. I might have been able to separate them with a mallet but I did not dare because I was not sure I could put it back up.

Anyway, my solution is accessible to everyone (even to really beginners like me lol). Only 10 screws and 2 carbon brushes to remove.
 
#32 ·
Pity when they make changes for no useful purpose. I was able to pass a long (actually, welded to be long) Allen head screw into one of the columns, and so converted for through-the-table height adjustment. I don’t say it could be done on your model, just saying.
 
#36 ·
Found the photos.
I had previously done this on a Makita, but wanted it back for handheld use - easy to reverse the modification.
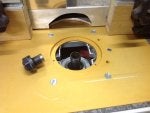
This time, I did it on a Chinese 1900W router. The first photo shows the base of the router - you can see the roll pin inside the column. I cut the pins with a fine junior hacksaw blade and forced them apart. The spring and a follower, were inside one of the columns. The other column, in this particular router (but not the Makita), housed a fine depth adjustment control (red-topped shaft in 4th photo). I used that column for the allen head bolt, as it already had an opening on the top of the case - in your Ryobi, you would have to drill a hole (not if still under warranty!).
The second photo shows the allen head bolt, with a welded-on section of threaded rod, to achieve the needed length. Not ideal, as here acme threaded rods cost the earth, and acme nuts are even worse. I believe that, for a lot of money, one can get aviation bolts in long lengths. You will notice two washers, to provide a relatively low-friction bearing between the bottom of the allen head, and the cut bits of the spring roll (which are tapped back in, without binding the bolt).
The 3rd photo shows the long bolt inserted into the5 column. 5th photo shows a coupling nut screwd onto the top of the long bolt, with the router at full extension. I welded a lug onto the coupling nut, taking advantage of an existing bolt hole, to stop the nut rotating with the bolt.
6th phot shows a cap nut on the bolt - to stop overenthusiastic lowering of the router in the table.
The remaining photos show the router mounted in its plate (with a hole drilled to access the allen head bolt), above table height adjustment with a cordless drill, and the extent to which the router can be raised, once the springs have been removed. This router has a shaft lock, which can be reached under the table without much difficulty. I prefer the router plate screwed down, but if necessary, the table top is hinged to the frame, and is supported by gas struts if I want to raise it.
I put a piece of hex rod into the dial knob of an old radio, for fine adjustment. Because there is some backlash in the thread and bolt, I try to raise just below the needed height with the drill, then sneak up on the correct height with the knob. I can still use the column lock of the router, when it 9is at the correct height.
What I still need to do, is to rotate the router plate by 90 degrees, so that the access hole is at the front, leaving the fence undisturbed. Then I will try to move the router speed control and readout, to the front of the table - maybe.
 

Attachments