Router Forums banner

Safe free hand routing / Building a vacuum bit guard

24K views 27 replies 20 participants last post by  Jimwarren  
#1 · (Edited)
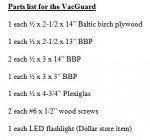
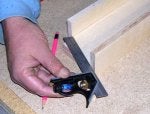
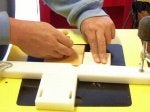
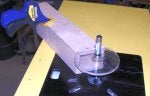
Many years ago Wood Magazine contacted Rick Rosendahl of the Router Workshop for advice on a safe way to rout free hand with a bearing guided bit. Photo 1 shows the results of that conversation: a safety starting pin and a guard over the bit. Photo 2 shows the version of a bit guard used by the Router Workshop. This guard was removed for filming so you could see more details of the set up and process. Since then we have all learned that dust collection doesn't just simplify clean up, it is a very important health consideration. I wanted a simple device that would collect the dust, provide a guard over the bit and act as a starting pin. Photo 3 shows what I came up with, what I call the VacGuard. I used Baltic birch plywood but you can use any 1/2" material you have available. After cutting the materials to size I stacked the 3" pieces on top of each other and placed the 2-1/2" pieces along side. I used a straight edge to mark a line from the inside edge of the short piece to the long piece. This line is a reference for cutting the box at an angle after it is assembled. I set up a 1/2" bit in my table; 1/4" high with 1/4" exposed outside of the fence. I routed all four sides of the 3" square and 3 sides of the long pieces. The next step was to mark center of the 3" square and drill a hole using a 2-1/4" hole saw. I dry fit the pieces then glued them up and added pin nails so I wouldn't have to wait for the glue to dry. You could just clamp this and wait till the glue is set. Then I sawed the box off along my marked line. I used a hole saw to cut the plastic bit guard and then sanded the edges smooth. This could also be done using a band saw. You need to drill and countersink two holes for the #6 x 1/2" screws. I attached the flashlight in the center of the guard with hot melt glue. The hose from a shop vac fits securely in the 2-1/4" hole and a Quick Grip clamp is the perfect way to fasten the VacGuard to the table. The last photo shows the VacGuard set up and ready to use. Simply center the flashlight over the bit and clamp in place. The box edge works as a safety starting pin to get you safely onto the bit. This is a simple project that anyone can and should build.
 

Attachments

#2 ·
#20 ·
Interesting that someone is asking about this, however long ago it was. I was cleaning my basement out recently and found an old outdoor AC unit cover. I was about to toss it but the idea hit me that I might make a simple frame to fit the inside of this and mount it behind my miter saw, sort of a large bag maybe to collect chips flying behind it. I usually have a 2 1/2" hose hooked to it but it still throws chips and dust behind it. I think I'll see if I can angle the bag so it makes the chips build up in the bottom and adapt a hose to this so they're sucked on out once they fall down there. I'd imagine an outdoor barbecue grill cover might also be made to work like this. The AC cover is nice since it's tarp material, already formed into a cube with one side opened up, effectively making a large, tarp like bag. If anyone else wants to try it, you might even be able to get these cheaply on clearance this time of year in some of the big box stores. Walmart maybe? It won't be pretty but it should work.
 
#13 ·
Sondra, I removed the end from a small ShopVac hose and it fits perfectly in my Craftsman miter saw. It does a reasonable job of collecting the dust.
 
#15 · (Edited)
Tom, this is in the parts list as 4-3/4" x 1/4" thick. The exact size is not critical, about 5" diameter. Please share a photo when you are done and tell us how you like the design.
 
#16 ·
Okay Mike... figger a way to install one into my free-hand work table... that's great for a table, but it won't work on my work bench. The piece I'm usually working on sits where you see my purse. :)
 

Attachments

#17 ·
Barb, I always like your work but I'm even more amazed that you produce it in such tight quarters. Wow! My two-car garage is like a football stadium compared to your work space. I'll never complain about too little space again. :haha:
 
#18 ·
LOL Oliver! I'm still giggling!

I'm gonna post a few pics (that I just found) of Beastie. While He's narrow, he is 27'
long, and the work that my husband did in creating all the tables is nothing short of
inspiring to me. While simple, they work well. Also, the way he utilized the space I
have, I feel super lucky. He and my daughter are the organized. I'm the "throw all
over the place and "EEEEK" person lol"
 
#22 ·
Chip, The primary goal of the VacGuard is to guard the bit when working with bearing guided bits. Adding the light and vacuum are useful improvements over most common bit guard designs.
 
#24 ·
Chip, I do not consider having one hose hooked to a router table in any way unsafe. Under the table or behind it doesn't make much difference. Not using dust collection is what would be defined as unsafe.

My Router Workshop table has Oak Park's Vac-u-plate system. This does a great job but is not effective when using bearing guided bits and no fence. In the first photo you can see one of the two ports in the plate. In the second photo you can see how I modified my box joint jigs to allow this port to capture the bulk of the dust. The third photo shows that even when through routing a slot the side port captures most of the dust.

This project suggestion is an inexpensive way for everyone to guard their bit and capture the bulk of the dust; it is an easy and fun little project.
 

Attachments