Well -
- that it would likely be more trouble than it is worth -
- I acknowledged in my first two sentences.
The only reasons I can think of to do it this way -- would be if you wanted to do it on the router table -- and if you just enjoyed tinkering with jigs.
As for why I didn't suggest a rosette cutter --
That's easy -
I don't have one
")
And I do have the scraps needed to make the jig.
I was brainstorming is what
I would do.
And
my first inclination is
always to use what I have on hand before going to buy something.
As for it being 'hairy' for a 1" wheel -- I'm at a loss there -
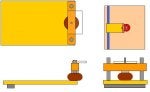
As I sketched out the plans -- I scaled it around a 1" wheel.
See no reason it wouldn't work.
Yes -- if you got much smaller than 1" -- you would need to adapt
And frankly -- I probably wouldn't bother -- just buy 'em.
If by hairy you mean scarey -- I don't see it the problem.
Anyway -- not arguing -- just replying.
Like I said -- I've never actually done this.
Chances are if I ever do -- I may not like it
You never know.
Thanks for the kind words.