Router Forums banner

Steam Bending

5.4K views 26 replies 15 participants last post by  Steven Owen  
#1 ·
Has anyone tried steam bending hardwoods for any of their projects? How difficult was the process of steam bending the wood for your project?

You see kits from Rockler and several other vendors showing people steam bending wood. Some of the videos make steam bending look relatively like a straight forward process. I would think it would really depend on the type of hardwood you’re trying to bend.

Like everything on the internet, you never really know how hard it will be until you try yourself.
 
#3 ·
Steve I have not done any steam bending but I think your right it is a straight forward process. I know white ash is a wood that is a good wood to bend. So I would get some ash and practice bending. In woodworking doing a test and practice is a good habit to have.

 
#4 ·
I've looked at steam bending wood many times, but the gear and time needed is way too much to do just one piece for fun.

I first saw steam bending almost 60 years ago in my own home. My father was a cabinet maker, and he was building a 3 foot long model cabin cruiser for radio control use. He built the boat in miniature exactly the way a real boat was. After the ribs were in place he hand cut 1/4" thick mahogany strips to the shape of the boat, and then took each one to the kitchen, where he hung the tiny plank over a large saucepan of boiling water for a half hour or so. Then took the plank to the boat and used brass pins and cascamite glue to fix it. The next day after it had dried, he then shaped the next plank. Drove my mother crazy with the steamed up kitchen day after day.

Way to fiddly for my low attention span nowadays. I still have the boat, its on top of the cabinet next to me.
 
#5 ·
#6 ·
I have never steamed bent wood. However, using thin walnut boards and a form I made with plywood and nails to hold the shape. Each strip was glued and placed in the form and many clamps were also used. This was for a wagon tongue I made for the granddaughters.

Frank
 
#8 · (Edited)
The process itself really depends on the desired results. Thickness, width and type of wood pretty much narrows down the kind of bending gear you'll need. Laminated vs solid also comes into play. I think that most of the small shops out there can get away with the easily made shopmade or store bought box style benders. Relatively easy to build or affordable, a nice addition to the shop a steam bender opens alot of doors.
I use a shopmade heatgun and tube style bender. IMHO there are advantages and disadvantages to this method. It is a very hands-on process. I can control the diameter of the bends better by changing out the tube. You have constant feedback with regards to where you're at within the process. It is possible to make changes after the wood has settled in. The thinner the wood the quicker the process.. Anything over an 1/8 takes More effort and More time. More than anything else I like the heatgun method because it is so hands on. Disadvantages are (depending on your perspective)�� are very hands-on, thicker stock can be difficult to bend, need to be watchful of burning the wood (especially cherry and maple) and some woods can pretty pretty much just smell bad during the process like oak. Ive got a couple pics in my Chess table 'll thread.
All in all I think most shops would be most pleased with the steam box as opposed to the hear gun. Either way not exceptionally difficult to learn and the opportunities bending offers are pretty cool

Router Forums - View Single Post - Chess Table II
 
#10 ·
there are volumes written her on this subject...
search is your friend.. sortta...
 
#11 ·
I'm also planning to try steam bending. What I can't seem to find any clear guidance on the internet about is whether a flexible steel backing strip in needed to bend the workpiece around a form, in order to ensure the wood fibres are put into compression. Maybe it has to be trial and error to determine whether the thickness and bend radius combination allow the wood to bend nicely around the form or crack just as you're putting the last clamp on, but I would hope there might be some rule of thumb?
 
#12 ·
#13 ·
Thanks for the link, which I hadn't seen. However, my question was about trying to quantify the limits of simple steam bending without the use of a backing strap. The Veritas article implies you should always use one, but perhaps this is no great surprise as they also sell them!
 
#14 ·
Misunderstood then. Actually that is the first reference to using a steel backing that I have ever seen, or heard of. I wouldn't bother with one myself.
 
#15 ·
I recall seeing blocks being cut not only for the inside of a curve, but the outside as well. Clamps force the wood to conform to both sides to the shaped blocks. Clamps, clamps, clamps. I remember a shop tour by Tommy Mack in which he had a number of 4x8 sheets with pegs around which he wrapped steam softened wood to make rocking chair parts. There were a few straight runs which were longer 1x and 2x so you could clamp there. He was steaming thin strips for the greatest flexibility. No Knots, they won't bend. My point is that steam bending seems to be a LOT about designing and setting up the clamping jig, clamps, cawls and working fast.
 
#16 ·
 
#17 ·
Lamination look like a good alterative as well. You’d have to have a very good band saw to create them. I’m not sure many bench top Jig saws would be up to the task.
 
#19 ·
I may try steam bending someday, but I won't be doing it inside my shop. Never would I voluntarily introduce that much moisture into the air inside my shop. I can just see the rust forming on my tools . . .
 
#20 ·
Well I've just tried steam bending for the first time, 2" x 0.5" section quarter sawn oak to a radius of 20" (see photos). I had to bend 14 of these to form new slats for a set of 4 folding garden chairs. I made a steam box using an old wallpaper stripper to generate the steam and it reached a consistent internal temperature of 95 deg C. 25-30 minutes was long enough to make the wood pliable. I didn't bother to use a strap, just bent the wood around a form and held it with clamps for an hour or so until the wood cooled to room temp.

The only problems I had were where there were clearly flaws in the wood, they opened up or split a bit on bending, but I didn't have any complete breakages. I guessed at how much springback there would be - I wanted a final radius of 24" and it seemed to turn out about right. Each piece of bent oak made two slats, and these were then attached to the metal frames using copper rivets. Should look nice when they've weathered. I hope they see me out after the amount of time it took, but it was a lot more fun than most household repairs!!
 

Attachments

#22 ·
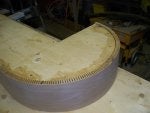
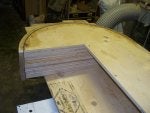
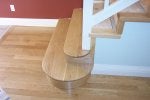
Another alternative is back kerfing if the back of the curve is not visible and the part is wide. This is the bottom step on a staircase I did several years ago. 1" thick white oak 7.5" high riser back cut to just under 1/8th of the face.
 

Attachments

#25 ·
Another alternative is back kerfing if the back of the curve is not visible and the part is wide.
Really nice looking steps.

If the piece is not going to be visible, doesn't even need to be really wide. You would think the way you show is the given way to do it, only makes sense. But I read an article, complete with pictures, where a so-called knowlegable person cut a strip about an inch wide, about every 3 inches, and then proceeded to make the curve with the cuts on the outside, and gaping open. It was eventually covered with upholstery, but even a few seconds of thinking should have told the guy he was doing it horribly wrong. The few times I have done it I have put glue in the kerfs, as it wasn't going to be completly fixed to something. Can't even recall what I was making at the time, its been so long ago.
 
#23 ·
@mimac That is a nice way to go. Back Kerfing. I used this once long ago to make a convincing miniatrue grand piano for a girl who was directing a production of "You're a Good Man Charlie Brown. Made for a really nice curve. Had moving keys too.

I remember watching Mr. Rogers one day with my kid and seeing them steam bend the outside of a Steinway and clamp the inch thick outside wrap to a form. I think they'd steamed the thing for many hours before trying it. They had a crew and a really strong form and clamps and cauls galore. Must have clamped it every 4 inches. I recall they worked really fast. A little research shows they take 12 months to build a single piano. I also found a Model B used piano on sale for a mere $30,000. Of course, you need two. A recent TV program showed a German piano (antique) that had glorious wood inlays for about $300,000.

All this discussion kind of makes you want to try it. Closest I've come was making a piece from strips of pine with a small curve from dry 1/8th thick strips glued together around a small form. The project failed, but it was fun trying.
 
#24 ·
It’s the best part of wood working. With a little ingenuity there’s literally thousands of ways to accomplish a design. There’s always an new way think out-of-the-box to come-up with something really cool.
 
#26 ·
I tried it one time and it was a complete failure. the PVC steam box collapsed, made a plywood one from MDO and steamed for 45 min. ,every piece broke while clamping up on the form. Scratched that off the to do list. From now on will use the back kerf method or the veneer strip method, but preferably not at all. It stinks up the shop is a big messy operation, water and tools don't mix well, total devastator as far as I am concerned.
Herb
 
#27 ·
I think you have to be very fussy about the boards you pick for steaming to look for even the most minor of flaws. Generally steam bending is something I’d do in the driveway vs. the garage or shop.