Router Forums banner

Thickness planer stand

29K views 20 replies 10 participants last post by  jimniven  
#1 ·
This Dewalt 735 sits on the work bench taking up space I could use for something else, so I have decided to build a flip-top stand for it.
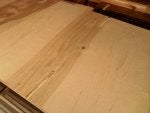
I have some cedar 2x4s that I cut to 3', jointed, thicknessed to 1.25" and ripped to 3.25". I plan on using M&T to put it all together. Finally, I have a project to do.
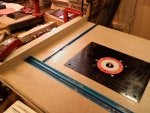
First 2 pics are of the inspiration for the project. Then the wood, and setting up of the tools for the M&Ts.
 

Attachments

#2 ·
Mike that is a good looking table. Saw one of those somewhere but don't remember where. Thought of doing that for my jointer, but mine came with a stand so maybe for my Ridgid oscillating sander I can build one. Yours looks really great.
 
#3 ·
Hey Mike, Thats going to be a nice stand. What locks it in place? I built one from a Shopnotes plan. Put my planer on one side and the miter saw on the other. Sure is a space saver.

Jerry, I have that same ridgid sander. It's one of my favorite tools. But it's always tucked on a shelf in my little garage and hard to get to. I considered putting it on the flip stand. But was afraid the loose parts would fall from under the table while upside down.
 
#4 ·
Mike, that looks like a good design and material selection for a piece of furniture. I would keep it out of sight of the boss or it will get procured for the house.

Good job!
 
#6 ·
Uh, guys, I haven't built it yet. That is just one I found on the net that gave me the ideas for mine. I found it here;
http://www.bt3central.com/showthread.php?t=39913

Today I started doing the mortises and tenons for the side frames. The top and bottom rails are 30" and I cut the stiles 23.5". The M&Ts are .5"wX1.5h"X2.75l". I'm making the sides 30w"X27t". This will give me room to put wheels under it for a total height of 31". That will slide right under my work bench. I can still install the Ridgid sander to the other side of the table and be able to flip it over to whatever machine I want to use.
 

Attachments

#18 ·
#7 ·
The pics Mike shows look a lot like a plan I'd noticed on the web, here:

http://www.woodstore.net/swivtoolcab.html

I have a long workbench in my garage, and to save space I'm planning to stow rolling tool cabinets underneath it. I was considering one like this, but with only a single tool (next in line is a planer), or something like this:

http://www.woodstore.net/besy.html

Since other tasks have slowed my completion of the garage work to a crawl, I have the luxury of more time for thought. :)

I'll be interested in seeing how your project evolves, Mike... thanks for sharing.

Bob
 
#8 · (Edited)
Now it's time to join the outside frames to make the box.
I cut 4 pieces 26" long and made a 7/8" tenon on each end. This gives me room to make a 24" wide table with 1/8" space on each side. The front and back stiles were mortised to accept a vertical edge rail 16" from the top and another horizontal across the bottom where the wheels will be mounted.
 

Attachments

#9 ·
Today I used the router table with a slot cutter to make grooves for the side and front/back panels. 1/4" cutter and panels. I'll be putting a bottom panel in it to hold junk that has no place else to go. :)
 

Attachments

#12 · (Edited)
Here are some pics of Black Lake. 2 feet of ice made for a lot of cranking on the ice auger to get a hole in it. 16 square miles of frozen water. I like it better in the summer. The other pic is the road leading to the house. You can see the lake at the end of it where the house is. Maybe these pics will help cool off those down under.
 

Attachments

#13 · (Edited)
The flip-top

OK, play time is over. I caught one fish, a 4" perch.

I took a piece of 2'x4'x3/4" birch ply and cut 2 22"x24" pieces to double them up.
To build the pivots, I used a 3/8" round nose bit and cut 6" channels, 3/16" deep in both edges of the plys. These will hold 3/8" aluminum rods that will also go through the tops of the case sides, acting as bearings in conjunction with brass 3/8" ID sleeves.

To trim the top edges, I ripped 2" wide pieces of 2x4 stock and cut them to the width of the table. These will be the front and back edges, and the thickness will give good bite for the latch screws.

Using a thin-strip setup, I made some 1/8" strips to trim the sides of the top. Next step, gluing the top and drilling the pivot holes for the rods.
 

Attachments

#15 · (Edited)
All done

I got the top and case sanded and put together. Installed the latches on one end of the table and put the planer on it. The planer is sitting heavy on one end of the table to keep some pressure on the latches so they don't vibrate. Carriage bolts hold it in place.

This is a project I've been wanting to do for quite a while. The shop is small and bench space is at a premium. This will open up a lot of room for assembly.
 

Attachments

#19 ·
HI Mike

Neat, I like it :),, nice job :)


===
I got the top and case sanded and put together. Installed the latches on one end of the table and put the planer on it. The planer is sitting heavy on one end of the table to keep some pressure on the latches so they don't vibrate. Carriage bolts hold it in place.

This is a project I've been wanting to do for quite a while. The shop is small and bench space is at a premium. This will open up a lot of room for assembly.
 
#21 ·
These flip tops are really good. I had a steel stand made for my DeWalt 735 and the top pivots on a 12.5mm rod. 6mm bolts locate the top. This gives me two tops. I have found steel faster than timber frames and leaves more available space for drawers in the base. I also can insert feet that screw down past the castors which hold the stand better than locked castors. I cut a slot in the top of the foot threded rod and using a long screw driver don't have to bend down.