More shop made jig nuts
First post! Haven't had the chance to read much yet either... Got here a while back just looking for router info and tips.
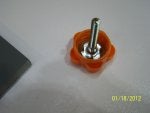
I just made up some wingnuts in the shop last week, and remembered to get a few pics along the way.
These were a little simpler than shown by Bobj3, no counterboring for the T-nuts, or extra roundover on the edges.
The layout was basically a 1-1/8" grid, and all drilling was with 1-1/8" & 1-3/4" holesaws (halfway from each side). The overlapping gave me the flutes on the handle as well as the lower portion of the knob, plus plenty of additional spacers or to make the knobs longer.
After doing the layout, I had trimmed the scrap to the edge of the holes before drilling, to allow clearance for the sawdust from the 1" saw. SAFETY NOTE: Better to keep the scrap oversize, and drill a hole on the edge of each 1" hole for sawdust clearance (helps the holesaw). When I was drilling out the 1-3/4" the waste between the 1" holes was flying off at the completion of each hole. Ended up holding on with pliers for safety. Also, the 1" holes become sawdust clearance for the 1-3/4".
A quick hit with a 1" sanding drum in the flutes of the wingnut. Then loaded everything up on long bolts, chucked it in the drill and sanded everything smooth in just seconds. Bolted a wingnut and spacer together for glueup and alignment, and that went quick too.
The attached PDF is 4 pages, one drawing and 6 pics. I had originally drawn the layout for a 1" holesaw, but my kit didn't have THAT one... But 1-1/8" worked fine.
Also, I had already bought the T-nuts planning on 3/4" scrap, but since I had plenty of 1/2", I had to leave the 9/16" T-nuts proud of the knob till after glueup, but didn't get pics after seating them fully, plus a shot of rattlecan red...
Same process with different spacing would work great for larger or smaller knobs too.
Mike
(now to go make my intro...)


 too small of mass around the center nut the norm but here's some links that you can use to make your own very easy and quick..that will stand up to the test of time.


