Router Forums banner

Work Bench Dog Hole Template

36K views 22 replies 13 participants last post by  Daikusan  
#1 ·
Just piddling around on a dreary evening so I thought I would work on a Template/Jig for drilling dog holes in a work bench.

It is designed for a top that is 36 inches wide with 3/4 inch holes every 4 inches. The two holes at the rear are for dogs to position the jig for the next row.

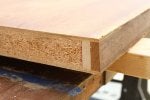
The jig has a 3/4 inch base with another 3/4 inch section glued (or screwed) on top. I will drill the holes for the jig on the drill press so they will be vertical. :grin:

In use, I plan to clamp it to the work table top and drill the first row of holes using a Forstner bit. Then move it to the next position and plug the two rear holes to keep it registered properly. I guess we will see how that turns out! :surprise:

Eventually, I plan to incorporate two of the Kreg Klamp tracks, one along the length of the table and one across the short end also.

I hope to build the jig in the next couple of days.

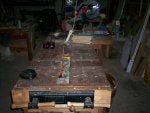
Note: If you haven't seen my work bench, here are a couple of pics. The top is a solid core door with 7/8 inch dog holes and the Kreg tracks along with a home made aluminum plate so another clamp can be used. This table has worked out really well. It is 30 x 48 inches. My plan for the new one is 36 x 60 inches. I don't have room for anything bigger. I do have an extension that folds down when not needed. That has proven helpful.

Unfortunately, the thickness of the top prevented me from using clamps of any kind. And...I mounted a "box" underneath with a pair of drawers in it so it blocked access from underneath. :frown:

That's all about to change this coming year. I have been watching videos of other folks benches and gathering ideas. :grin:
 

Attachments

#2 ·
I'm liking the jig idea with the Forstner bit , as I'm thinking your idea should work well .

Don't know if they make a router bit big enough , but with my Festool track and the adapter connected to my router , I wonder if I could do it that way , as when plunging your likely to have a vertical hole.

I love work benches and always dream about making the ultimate one . The things a guy could implement are endless . Would like to see one that's sturdy , but also has the ability to change height .
Actually I'm getting so excited thinking about it , I may build one before I insulate my garage :D

Will definitely be looking forward to seeing what you create :)
 
#3 ·
like to see one that's sturdy , but also has the ability to change height .
Me, I'd just use an adjustable height chair. Was going to suggest different height platforms, but too easy to walk off and fall. So, I'm thinking the most efficient method would be some type of lift, perhaps one of the smaller car lifts, should be plenty stable enough, I would think anyway.
 
#4 ·
I have a trough down the center of mine Mike, based on one I saw somewhere and I'm not sure I would ever build one without it. It holds my tape measures, pencils and other marking tools, hex screw driver bits, my bench dogs, a little sandpaper, and utility knives. Those are things you want often and handy so you don't have to go look for them but at the same time they aren't on top of the bench.
 
#5 ·
I think a template is a good idea for drilling bench dogs. You hate to have one hole drilled off.

My workbench has a trough on the back side against the wall. Sure is handy for putting stuff in so it does not get knocked off. I wish my workbench could be out from the wall. I sometimes have to pull it out from the wall so long clamps will fit.
 
#6 ·
I made a template for cutting mine. It worked pretty well. There was enough play when using previously cut holes as alignment (like you are planning) that over several rows the holes wandered. When I noticed this, i measured and marked the rest, thus helped me adjust.
I used a standard 3/4" router bit in a plunge base (1/4" shank dewalt). There as a little burning but it was the bit I had.
The router had a template bushing on the base so the holds in the template were sized to this, not the 3/4" dog holes. After drilling the holes in the template, I rounded over the top side.
My table top is Baltic birch and I found the amount of chip out on the back side when the bit went through to be too much. So I used a combination of through-the-dog-hole clamps and a bottle jack to hold a backer board under the hole.
 
#13 ·
I made a template for cutting mine. It worked pretty well. There was enough play when using previously cut holes as alignment (like you are planning) that over several rows the holes wandered. When I noticed this, i measured and marked the rest, thus helped me adjust.
I used a standard 3/4" router bit in a plunge base (1/4" shank dewalt). There as a little burning but it was the bit I had.
The router had a template bushing on the base so the holds in the template were sized to this, not the 3/4" dog holes. After drilling the holes in the template, I rounded over the top side.
My table top is Baltic birch and I found the amount of chip out on the back side when the bit went through to be too much. So I used a combination of through-the-dog-hole clamps and a bottle jack to hold a backer board under the hole.
I see what you mean. I just did a test piece on some scrap. I have some brass bench dogs and the Kreg bench dogs. They are a little loose which would allow the jig to get off just like you said. Looks like I need to go to the store (and take my test piece with me) and find something that will fit better.
 
#7 ·
Since my template holes are not the same as the dog holes I made stepped dowels where the end was 3/4" and the step was the same as my template hole size.
Some of thelse ideas I got from YouTube. The bench design is Ron Paulk. The bottle jack idea was mine :)
 

Attachments

#9 ·
I just drew some light pencil lines on my bench top and drilled 3/4" holes with a forstner bit in a hand-held electric drill. I don't see a need for precision greater than +/- 1/8" when positioning dogs or hold downs etc.

My bench has dog holes down one side, in line with the dog on the bench-end vise, and t-track down the other side and across the end opposite the vise. I wish I had put in more track, because I use track-mounted hold-downs far more often than I use dogs.
 
#10 ·
@Cherryville Chuck

I like the idea of a trough in the center of the bench as I'm always moving things/knocking them on the floor. I was thinking that the depth wouldn't have to be any more than 3/4" to handle pencils, knife, etc. - is that what you have? Also, what is the width of the trough compared to the width of the top? - I've kind of moved away from tops much wider than 30" as "stuff" seems to pile up an arms length away on the back of the bench.
 
#14 ·
I went out and took a picture and measured and it's 2" deep and I would say that's about right for the tapes. I built mine with an L at the end and it's handy for parking a cutoff saw on which keeps it close for fitting small parts to things like cabinets (as in cross members or drawer runners). As someone else mentioned I have dog holes in my end vise so it can be used to clamp with. I keep the dogs in the trough at that end for that reason. At the very bottom of the photo below the vise I have 3 LV Wonder Dogs which are basically a dog with a built in vise. Between all the possibilities I haven't found anything I can't clamp. The bench is laminated 2x s so it's heavy and sturdy. LV sold a cheap French made brad point bit that was the right size for the dog holes and I used a drill press to drill through a block of 4x4 and used that as a drill guide to drill the holes. I just measured the holes with tape and pencil and they are no more than a sixteenth out which has been good enough.

I ran a power cord across the ceiling and put an outlet box on the end and when that isn't enough I add a power bar. Dropping the power from the ceiling keeps the cord out of the way. I remember Harry Sinclair saying he had done the same thing. In my uploads is one or more pictures of the bench showing the 2 large and 1 small framing squares,2 large and small triangle squares, my hook rule, and my center finding rule as well as most of my small clamps. I really do recommend having a spot under for the squares at least. They are absolutely essential to have handy when putting stuff together for checking squareness and they really get in the way if they have to stay on the bench top.
 

Attachments

#20 ·
I will have drawers (trays) underneath so sawdust it will be. I may do like Earl did, and cut a bunch of 3/4 dowels about 1 1/4 inches long and plug the holes just below the surface. Then when I need one, just push them up from below. Or, pop it out if a clamp needs the hole! :surprise::smile:
 
#23 ·
What about a groove a ÂĽ inch below the top edge of the drawer sides and a slot in the back? Slide a piece of MDF in from the back. When the drawer is open you can pick up lost screws/hardware and vac. With the drawer out there should be enough room to slide the MDF back to access the contents.

Retrofit may not be so easy . . .