Router Forums banner

Anyone ever cut a slot in schedule 40 PVC pipe?

32K views 48 replies 18 participants last post by  Nickp  
#1 ·
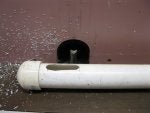
I have a piece of 1-1/2 inch PVC pipe that I need to cut a pair of matching parallel slots about 10 to 11 inches long and 1/2 inch wide in. One 1/2 inch channel per side on opposite sides. I'm wondering if there is a safe way to do this on the router table.

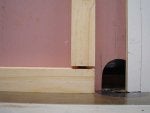
What I'm doing is building a rudder for a small plastic boat using the pipe as the shaft and a plastic cutting board as the rudder itself. Totally waterproof. The board is 1/2 inch thick. I want to "split" one end of the pipe lengthwise about 10 or 11 inches and insert the board between the two halves, and then bolt it in place with predrilled holes drilled in the pipe prior to making the cut.

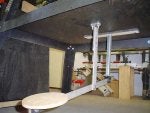
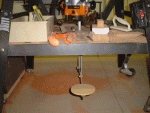
I have had several ideas for making the cut. All involve clamping the pipe into a jig to prevent it from rotating or moving, drill a 1/2 inch hole all the way through the pipe at the end of the proposed slot location, and then push the pipe through:
(a.) the tablesaw four times, cut once, flip and cut again, then move fence 1/2 inch and repeat.
(b.) the router table using a 1/2 inch bit, cut once, flip and cut again, or (and this scares me to death) use a 1/2 inch bit tall enough to span the pipe and cut both slots at once (this one I think I'll skip).
(c.) the bandsaw, use a fence and cut once, move fence 1/2 inch and cut again. The trouble is I have seen my blade drift in straight cuts and haven't yet worked this out. I know I should but just haven't yet. I'd rather go fishing 😁 but I need a boat rudder first. 😂
 
#2 ·
router table and spiral bit...
plunge and then cut..
make sure the pipe is trapped between the fence and a parallel guide board..
be sure to use hold down feather boards..
 
#5 ·
The band saw feels like the safest way. I will try some scrap first and see how it works.

PVC is something I'd like to work with more often. I have cut it for years using a miter saw, and saw videos of it being kerfed on a table saw but also heard warnings of it exploding while doing so. I thought I'd ask some questions before just diving in. The lack of lots of videos and info on using routers and table saws with the stuff has me thinking it's not done much. I did use the router table to round over the edges on the ends of some pipe to make rod racks, and it worked well but that's not the same as cutting a groove.
 
#6 ·
Blades or bits with a hook angle can grab the plastic and it can explode when it happens. There are bits for cutting plastic and they have what the makers describe as "O" flutes. I would also think that a fiberglass bit should work like this one but I haven't tried it on plastic: https://www.amazon.com/Amana-Tool-F...C3XOY/ref=sr_1_1?keywords=fiberglass+router+bit&qid=1554003108&s=gateway&sr=8-1 While I was looking for that link I saw this one about spirals: https://www.amazon.com/Amana-Carbid...TWKAA/ref=sr_1_4?keywords=fiberglass+router+bit&qid=1554003108&s=gateway&sr=8-4 If you use the bandsaw use the finest blade you have with teeth that have the least hook angle.
 
#9 ·
Blades or bits with a hook angle can grab the plastic and it can explode when it happens. There are bits for cutting plastic and they have what the makers describe as "O" flutes.

An "O" flute bit will grab just as much as regular bit.
The main difference is the flutes have more clearance to clear the chips and minimize the chances of the plastic melting.
 
#7 ·
If you switch to schedule 80, it will be thicker and stronger. I'd prefer using a band saw. If you use a router with a spiral bit, Be sure to mark the centerline on both sides so you can make certain your cuts are on opposite sides, not offset. I'd rout extra long slots but not all the way to the end, then I'd go back and cut the end off.

I would also consider doing this with a Japanese saw. You'd need a jig to hold it and prevent rotation.
 
#11 ·
I would run it through a table saw with a dado blade or two saw blades with a spacer in between them. As you said mount it into a frame so that it won't turn. Another way would be to heat the pipe up with a heat gun and cut it with a knife but it might not come out straight. Pipe is cheap so you can try several methods. The router would work as well but it would seem to be the most difficult way to do it because of trying to set it up.
 
#14 ·
Duane...the rudder will be stronger if you make the shaft a bit longer and make stopped slots. This will add some strength to the bottom of the rudder. Make the slots so that you can slide the rudder portion through the stopped slots and screw through the shaft and through the rudder.

If you do it this way you will need to use the router to make the slots ...OR... drill the hole at each end of the slots and use a fine tooth blade on a jig saw at an angle...OR...drill a hole at each end and use a coping saw to make the slices for the slots...

However you decide to make the slots, I would still make them stopped and push the rudder through them for mounting...
 
  • Like
Reactions: Herb Stoops
#15 · (Edited)
This string is the perfect expression of the idea that there are always many ways to accomplish anything. Lots of good thinking going on here. Would love to see a pix of the pipe and later of the boat.

I particularly liked the idea of hot gluing the pipe to a carrier, and using a band saw. Pipe's cheap so you could try it in shedule 40 and 80. I also like the idea of making it a stopped slot, but you could accomplish that by gluing a connector to the split end after cutting, then cutting most of that connector away so you have just a thin ring on one end.

To make sure the sides of the slot stay parallel, I'd cut the first side, then insert some card stock to keep the slot open while you cut the other side. If you want the edges of the slot to be parallel, you won't want to rotate the pipe, so you'd need to hot glue to two pieces, set on each side of the pipe.
 
#18 ·
Interesting situation. I would definitely use Schedule 80. As you already know, you will need a jig or fixture to hold the pipe securely, particularly once you have cut the slot on one side and go to make the slot in the other. If you don't support/secure the open end, the pipe will flex and possibly grab if using a router

I think my approach would be to use a well set up bandsaw to cut the slot undersized and then clean it up with light cuts on the router table. Cleaning it up may not even be necessary if the slot turns out straight and clean enough. PVC is cheap. Try it different ways. After the first cut, when making the second cut, the upper part, which is unsupported, may flex downward into the blade.

You should be able to eliminate the blade drift. I would definitely be using a very sharp blade, which may go a long way toward eliminating the drift. There are multiple sources of info on setting up your bandsaw, but the one I like the best is

Once you have the slot cut using the bandsaw, I would find some way to insert a wooden plug in the open end before making the router cuts (I might find a way to do this for the initial bandsaw cuts also). It may mean putting a few screws through the pipe into the plug, to keep the pipe in place. Also, I think I would put a spacer in the upper slot as you clean up the bottom slot, probably more to help with stabilizing the pipe in the jig so it can be held securely. That would eliminate being able to see the bottom cut from the top, but I think that would be quite difficult while holding the jig/pipe and making the cut, so I regard that as moot.

I am still racking my brain trying to figure out what sort of jig/fixture would hold the pipe securely as you make these cuts. Grabbing it from the outside will work until one or more cuts are made, after which the pipe may collapse and possibly become too loose in your jig. This is where the plug will help. On the notion of putting screws through the pipe into the plug, any holes in the pipe may compromise its integrity during use. I think I would make the pipe/slot longer such that the plug could go into the extra length at the open end and then cut that section of pipe off for your final length after all the slotting it complete.

Thinking that latter point through a bit, I think I would make a plug for the end of the pipe as part of your rudder mounting, also. Without something rigid in the end of the pipe, I think it will flex and/or collapse if you put bolts or whatever to secure the rudder in the pipe. I also think it is at risk of bending/breaking right at the top of the slot if not supported in some way. Water is amazingly powerful in subtle ways. PVC is not very structural. It won't take much lateral pressure on the rudder

Good luck and keep us posted,

Rick
 
  • Like
Reactions: Herb Stoops
#19 ·
There is already a video on youtube where a guy has my same little boat, a Sundolphin Sportsman, and he made a huge rudder from PVC pipe and plexiglas. He didn't cut it like I want to, he simply used a bunch of fittings and glued up a frame on a long arm that's not even straight, it has a 90 degree turn in it. He used zip ties to hold the plexi sheet in the frame, and said it all worked well. I'm making a rudder that's half the size of his. His and mine both are just to control boat rotational drift, not intended to take any real force. These boats are fair weather vessels only, and used only in the same conditions a kayak is used. Calm waters only. That said, I do worry about impact from bumping a log.
 
#22 ·
I like the box idea with the pipe hot glued in place. I might put a wooden plug in side the length of the cut ,or maybe a little longer and cement the end so it doesn't rotate. Then a band saw, router, or table saw could be used. After the slot is cut remove the plug part way and cement a coupling on the end of the pipe to strengthen the end, and the full length plug could stay in too to make it so the pipe never bends .
Just saying,
Herb
 
#23 ·
This is how I would/did do it using a 1.5" reticulation pipe and a 1/2" bit. I centred it from the fence and raised the bit about 1/2", marked the bit centre on the fence and plunged the pipe then raised the bit 'till it penetrated the top. It isn't perfect but it was the first and only attempt, I'm sure that a second attempt holding the pipe firmer would result in a perfect through slot.
 

Attachments

#24 ·
Wow! I appreciate that example. Never expected anyone to try it to see if it would work. Thanks so much!

I woke this morning actually thinking about this. I believe I'm going to make a wooden core for the pipe and look at leaving it permanently inside for strength. I really don't want the pipe to extend passed the bottom of the board purely for aesthetic reasons so I'm going to wrestle with it in my head some more before starting work.
 
#26 · (Edited)
If an open ended slot is OK then a tight fitting wood plug could be tapped in and the pipe slid over the bit in 1/4" cuts until it's through. An end stop clamped to the fence would ensure that each cut ends in the same spot.

Edit:
This could be done on the band-saw but it is unlikely to be as accurate as a 1/2" router bit.

It just occurred to me that you may not have a means of slowly raising the router bit, or, heavens above you might have a fixed base router in the table! Some years ago a late member by the name NIKI posted a simple router lift consisting basically of a few sticks joined with rubber bands and fitted to a B&D portable table, and it worked for him. I took the liberty of using the idea and making a metal more elegant version which works perfectly. Here are a couple of shots .
 

Attachments

#27 ·
Yes, I have a DeWalt DW618 in a fixed base. When unbuckled it has too much side to side movement to try and raise it while cutting.

I think a slight design change is in order. I’m thinking I will make a wood core. Hopefully that’s doable with accuracy to the pipe ID using a 3/4 roundover bit with 1-1/2” square stock and 4 passes, but somehow I will get that done and inserted.

Then instead of cutting all the way through both sides of the pipe I believe I’ll stop short of that, maybe just short of the other side but most or all the way through the wood and leave the pipe in a C shape instead of ( ) as I had originally planned.

I will cap the bottom and cut most of the way down one side of the cap, matching the cut in the pipe, leaving the cap span across the end intact and basically leaving the cap sides in a C shape as well. I’ll get a coupling and grind out the center rib so it slides over the pipe to the middle, at the top end of the cut and I’ll notch it so it also matches the cut but not cut completely through to a full C shape, just a notch on one end. This will reinforce the pipe at the top along with the cap at the bottom, and with the wood core left in place and the pipe made into a C shape where its cut as opposed to two ( ) halves, I believe this will be strong enough. I described all this like I’d add the cap and coupling after I’d already made the cut but in practice I’ll glue them on and then make the cut. I’ll predrill the ends of the groove first and use those holes as a way to enter with the bit and make shallow passes to remove the material until it’s as deep as I need. Then insert my board for the rudder, run bolts through in several places to hold it in, and use some caulking to seal the slot to prevent water from entering.