Router Forums banner

Cutting curves

18K views 39 replies 15 participants last post by  DesertRatTom  
#1 ·
Hello,

I am planning to build two subwoofer "cabinets" for my electrostatic panels. I visited a CNC shop but they specialize in volume so I decided to do it myself.

I tried cutting the curved panels with a jig saw set at 0 [disabled rotation mode] but it turns a little bit no matter how tight I hold the handle. The chaps at the CNC shop recommended that I use a portable router. I had a top of the line Craftsman router but sold it many years ago so I just purchased a new Makita RT0701CX3 1-1/4 HP Compact Router Kit that comes with a straight guide.

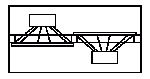
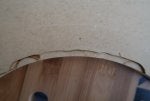
My question is, how do it follow the curves with my new router? I have to make four pieces that have to be identical. Please see drawing. I have also attached photos of a friend's unfinished cabinets without the grille, they were built in a shop in the UK.

Best regards,

Horacio
 

Attachments

#2 ·
I would cut a pattern out of 1/2" mdf or plywood to use with a pattern bit in the router. You could use your jig saw to cut the pattern by cutting about 1/8" outside the line of your drawing and then sanding to the line to make sure you have a smooth edge. Cut your final pieces the same way (leaving the 1/8" excess) and then use the pattern you made to rout them to final size. The bearing on the pattern bit follows the curve of your pattern to give you a smooth, accurate final shape.
 
#3 ·
Hello!

A jig saw can do that, especially if you test various blades to find the right one .
(Or the right Jig saw, not all are the same)
But finish is not so good.If it is not visible, I'd go for that quick way .

The portable router can do it better, except corners.

I would use the cutter I' v got in a standard set of cutters:
Straight bit with a bearing at end of cutter, diameter not critical like 1/2 " is good.

First thing is to make a jig out of some 1/2 or more MDF, that would be exactly the
aperture you want to make.Use a Jig-saw, a file, some putty if necessary.
This shape will be copied by the bearing.( Copied with any errors)


The jig saw be used to clear the way, cut the inside of your fabrication, leaving around 1/8 " or less to be cut.
Apply jig exactly on the lines to be cut.

Secure well.

Set depth so that bearing will contact jig, and that cutter would cut your part.
cut from your part side at set depth , going against the cut that is clockwise inside the hole.

There still will be some work in the corners, that will have radius 1/2 dia of the cutter like 1/4 " for a 1/2" cutter.

IMHO:
Thats a way to do it, there are other, like cutting directly through your material, using a router compass attachment
a standard straight bit and some geometry,
but I would not, it seems difficult and with risks of mistakes.0
Or if material is cheap, maybe Yes.

Regards
Gérard.
 
#4 ·
Just in case you didn't understand what the other guys said. Same thing, just a video. Spotted this the other day, similar to how I do it, except I keep my templates/patterns/masters for use again later, mine are two layers of 1/2" plywood, also I hold the work in place with nails instead of double-sided tape.
Easy peasy.
 
#6 ·
Just in case you didn't understand what the other guys said. Same thing, just a video. Spotted this the other day, similar to how I do it, except I keep my templates/patterns/masters for use again later, mine are two layers of 1/2" plywood, also I hold the work in place with nails instead of double-sided tape.
Easy peasy.
Good video, Theo. That explains it better than my description and should be helpful for Horacio.
 
#7 ·
Welcome to the forum, Horacio! All good advice by these guys who use routers a lot. Where in the US are you located? You might be close to one of us with a CNC.

Curious about your screen name - are you a Ferrari fan, or even better, an owner?

David
 
#8 ·
Horacio check around at the local woodworking stores and see if they can direct you to a hobbyist CNC owner that could cut templates for you or woodworking club that you could contact and see if members have CNC machines. Most will be willing to do it at a reasonable cost then you can use them over and over. if you mess one up the guy would have the file to cut another one quickly.
 
#9 ·
Hello,

Thanks much for the useful tips. A few months ago, I did build a pair of stands for the same loudspeakers that now I am going to use with additional subwoofers. I used a jig saw but I had to sand a lot and both panels are not identical, please see photos. We live in Pinecrest (Miami). David, you are right about the screen name, I had a 456.

Any recommendations regarding a router bit with bearings, straight or spiral?

Horacio
 

Attachments

#11 ·
A spiral will do a smoother job but they are twice the money of a straight bit and there are 3 types of spirals. One is an upcut design. It will leave a smoother edge on the bottom side of what you are routing. Next is a downcut design which leaves the top edge smoother. Third is a compression bit with the bottom spiraling up and the top spiraling down. It's the most expensive. https://www.whitesiderouterbits.com/collections/flush-trim-spiral-bits
 
#12 ·
I did not realize that there are just a few 3/8" shank router bits, Whiteside website shows only 6 with 3/8" shanks and there are no spiral bits, just straight bits. I will have to decide between the Whiteside #1035 straight bit 3/8"SH, 3/8"CD, 1"CL for around $14 and the Amana 45400 2-flute for $16.

Horacio
 
#13 ·
Woah, hang on there a minute Horacio. According to the specs on your router, it uses 1/4 inch shank router bits. Whatever you buy needs to have a 1/4 inch shank. I am not sure where the 3/8 inch came from. Maybe you fat fingered the typing like I do sometimes, or got confused.

Your router is a compact model and may not work with large diameter cutters. Before you order, post a link so the guys can confirm for you. I would hate to see you get something you couldn't use.

Makita 1-1/4 HP Compact Router Kit RT0701CX3 | Acme Tools

Good luck.
Mike
 
#15 ·
I would use a top bearing mount router bit like I have linked to.
Then you only need to make a template of 1/2 of your drawing. I have attached a drawing of your drawing with additional dimensions.

Prepare your template like the one in the video.

Draw your template on your work piece. Then cut away the waste with the jig saw leaving just a little bit for the router to clean up. Attach your template to the top of your work piece with double sided tape and follow the template with the router bearing riding along the template.

And by all means, clamp your work piece if at all possible so it won't move and create an unsafe working condition for you.

Hope this helps.
Mike
 

Attachments

#17 ·
Regarding my jig saw [discontinued Bosch 1584 AVSK] I think that I have been using 0 as the wrong orbit setting. According to the owners manual I should use setting III for soft materials such as wood or plastic [my project uses 3/4" Baltic Birch plywood]. Blade is a Bosch T101AO. Let's see how it goes.

Horacio
 

Attachments

#20 ·
Regarding my jig saw [discontinued Bosch 1584 AVSK] I think that I have been using 0 as the wrong orbit setting. According to the owners manual I should use setting III for soft materials such as wood or plastic [my project uses 3/4" Baltic Birch plywood]. Blade is a Bosch T101AO. Let's see how it goes.
The T101AO is designed for thinner materials and my experience of it is that 18mm (3/4in) is kind of pushing it and that adding high orbit (III) is only going to make for a poorer cut and give you lots of breakages. I'd say better to go for a T244D with zero orbit as that will give a faster cut on even extreme curves, albeit a little ragged at the edges - not that it matters as you are only roughing out and the router cutter will smooth the rest
 
#18 ·
Firstly I don't see what is wrong in making a curve template in 12mm (1/2in) MR-MDF using the router with a straight 2-flute cutter and a home-made trammel guide. A trammel guide is little more than a piece of 12mm MR-MDF with the router screwed to one end and a screw or pin through the other to act as a pivot point. You'd need two pieces. If those two pieces were then fixed onto another piece of 12mm MR-MDF the two straight end cuts could be made on a table saw or mitre saw and the radius edges routed using a top-bearing straight template trim bit in the router. That would give you the template for copy routing - again the top bearing bit would be used for that. In all cases it is highly advisable to hog away the majority of the waste using either a jig saw or a bnd saw to reduce the load on both the router and its' cutter. Personally I'd be leary of using spiral cutters in the RT0700C because they have small collets and I'd be concerned about cutter pull-out/push-in on 18mm (3/4in) deep copy routing passes. I'd also turn the speed down to about 25,000 rpm
 
#21 ·
Thanks Eric, you are right the T101AD was a poor choice. I found a T144D in a drawer, tried it and it worked perfectly. Nevertheless, per your suggestion, I will order a package of T244D.
Photo shows 3/4" plywood template, I will use the Freud top bearing bit that I received today to clean it up.

In '85 had a top of the line Craftsman, I do not remember the model, and made perfect circles using a Craftsman trammel point. There is one for sale on ebay but the distance between the rods that attach to the router base are too wide [5"] for my Makita. Festool sells a simple trammel unit [483922] for $27 but I am not sure it will fit my router. I will need a trammel to cut the drivers' holes [loudspeakers] at 277mm - inner circle. Please see template.

Cheers,
 

Attachments

#22 ·
I found a T144D in a drawer, tried it and it worked perfectly. Nevertheless, per your suggestion, I will order a package of T244D.
If it isn't broke, don't fix it. If the T144D works for you then keep going with it.

In '85 had a top of the line Craftsman, I do not remember the model, and made perfect circles using a Craftsman trammel point. There is one for sale on ebay but the distance between the rods that attach to the router base are too wide [5"] for my Makita. Festool sells a simple trammel unit [483922] for $27 but I am not sure it will fit my router. I will need a trammel to cut the drivers' holes [loudspeakers] at 277mm - inner circle. Please see template.
Looking at the CX3 kit it appears to have the plunge base. That plunge base uses a 8mm fence rods (I have the RT0700 kit over here complete with all 4 bases) which is the same size of fence rod used by Festool (for the OF1010), deWalt (DW613/DW615/DW621/DW622), Trend (T5), etc. So a trammel point such as the Trend BEAM/005 (see attached pic) will work on one of your fence rods or a complete trammel arm and point such as the Trend BEAM/001 or the deWalt DE6905 will work on one of your fence rods. Personally, being a cheapskate, I'd tend to opt for an offcut of thin plywood with the router screwed to one end and a veneer pin or thin screw driven through at an appropriate distance from the cutter to do a "home-baked" trammel. Don't really know about the Festool - the only one I've seen is a sort of guide rail adaptor/trammel head which requires two bars in the router. If that's the one you are referring to it won't work because the fence rod centres aren't compatible with the Makita. Personally I prefer the separate trammel head as it is more flexible - want a longer rod? Just buy a piece of 8mm diameter silver steel rod and cut to length

Edit: Just found the Festool SZ-OF 1000 and that should also work
 

Attachments

#24 ·
Trend Beams are only available in the UK, too bad I like them. I think that I will go with the homemade trammel posted by Mike.

On another note, I used the Makita with the top bearing flush bit for a couple of inches to see how it worked but I burned the material, I used a piece of poor quality Home Depot 3/4" plywood. What am I doing wrong?
 

Attachments

#25 ·
I'd be trying to leave a little less waste than that for the router, however, what speed are you running the router at? Also do you have any dust extraction on and how fast are you feeding the router? I suspect that you may be spinning the cutter too fast and without dust extraction and that your feed speed may be too low
 
#27 ·
I'd try reducing your cutter speed to more like 25,000rpm ("5") and increase the rate at which you feed the router into the work a little to see if that helps. 1/8in waste is fine (sorry, couldn't see how much it was).
 
#29 ·
I think you need to get a bit which is configured for plunging entry. These often have a small piece of pointed carbide brazed in the very bottom of the cutter, For trammel work I'd use a 2-flute straight cutter. A lot of ordinary 2-flute straight cutters are plunge-type cutters these days
 
#30 · (Edited)
Try a couple router dealers online. Read the information provided with bits on the page and see which bit meets your needs.. I do a lot of radius work and generally stick with Amana...
 

Attachments

#31 ·
Jack, congratulations, what a great job you have done. I did purchase a pair of Amana 2-flute straight bit from Toolstoday at a very good price, cheaper than Diablo at the HD, they are fantastic.

Following the advise of everyone here I was able to cut a perfect template with a top bearing flush trim bit and also a perfect hole for the speakers, these are samples just to practice. Now I am ready to start the real work but I am having trouble with the rabbeting bit, please see photos. It seems that I do not know how to handle the router. I used this bit forty years ago when I built my first pair of speakers, it is a Craftsman and it is burned but I used it to practice.
 

Attachments