Router Forums banner

Dirty Little Secrets with Sign Making...

56K views 45 replies 19 participants last post by  Stick486  
#1 · (Edited)
Just for the heck of it, I thought it would be interesting to list our DIRTY LITTLE SECRETS with Sign Making. Here's our list (after 3 years experience):

1. Price...we are lucky to get $20 for a 6"x20" sign around here. It's an economic thing and most people are careful with their spending in our area of the country.

2. The Overarm Pin Router turned out NOT to be the machine for sign making. It was too difficult to get straight lines while holding onto the lumber. Plunging the bit with the foot pedal is great but we can do a better job with a hand held palm router. We will probably use the OPR for hogging out the background instead of trying to do the delicate lettering.

3. Using Marsh spray cans for painting the letters black works great. However, we've gummed up so many sheets of sandpaper trying to get the over-spray off the surface of the sign. We now use Acrylic paint and a brush to detail the black inside each letter cavity. Less sanding.

4. If you are not careful, the black color will bleed when trying to hand rub a poly coat or oil coat into your finished wood sign.

5. Then there are those router bits. Straight, V and round nose all have their place in sign making. However, figuring that out has been a process.

6. Which wood? Around here, people don't have an appreciation for exotic wood and won't pay for it. So...we use Pine. Plain ole crappy #2 pine and cutting around the knots.

7. Templates: We make ours and that has to be figured out too. After deciding on some shape to make into a template, it must be cut and finished before using it as your master template. We have learned much from this process. (Templates for the board shape, not letters.)

8. We can take any shape and font from Adobe Illustrator and print it out then iron it onto wood (we use laser printers). However, can you cut out those shapes and fonts? Some fonts lend themselves to sign making while others are not going to work well. We find ourselves using ARIAL ROUNDED BOLD mostly for inset letters and some fat font for outset lettering. Also, proper spacing between letters is a process that we had to learn the hard way.

9. Make $40k Making Signs? IMHO, that could be done with 3 or 4 employees making signs with a few distributors to sell for you.

Finally...We have made many things in our wood shop that were easier. Even nice wood cabinets were more straight forward and less taxing. IMHO, sign making has details throughout the process that can be challenging. In short, we have been humbled by the entire scenario of making a simple wood sign.
 
#2 ·
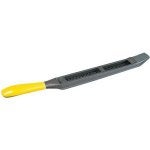
#3 Try using wrought iron flat black spray paint it worls well. Then instead of wasting sandpaper use a Stanley Surform finishing tool with a fine blade to clean off the excess paint.
#5 Use whatever bit that suits you. In my shop the lettering determines the bit I use.
#6 Most signs used outdoors are made oc Cedar.
#7 Templates??? I never use them for signs.

That's just my .02 worth.
 
  • Like
Reactions: kp91
#5 ·
Question

I just got into this sign carving, and opened up a whole can opf worms for me. I made a post in another segiment of this subject, on what I have learned so far & worked for me. But would wonder where in all of the segiments could I ask for a answer into this subject? Seems to be rather segimented, running in all kinds of directions ~~~~Hand Sign carving.
 
#7 ·
I just got into this sign carving, and opened up a whole can opf worms for me. I made a post in another segiment of this subject, on what I have learned so far & worked for me. But would wonder where in all of the segiments could I ask for a answer into this subject? Seems to be rather segimented, running in all kinds of directions ~~~~Hand Sign carving.
Yes, there are two SIGN MAKING sub forums which can be confusing. One is for the CNC Routing bunch. The other is here, under General Routing. We had to figure that out too. The real confusion can come from a GOOGLE SEARCH, which can direct your query to one of the two sign making sub forums. (Does that make sense?)

Maybe the forum administrators could look at confusion and combine the two. However, I can see why they have them separated into two...one for CNC and the other for GENERAL.
 
#8 ·
I use the V and round for inset and sometimes a small straight bit. On the raised lettering I use only straight bits. I also wanted to mention that I use mostly Cedar for my signs.
 
#9 ·
Hi guy's thanks for taking the time for your returns,
I had made a rather lengthy post over somewhere here as to how I arrived ,after destroying several cedar practice boards (GURRRRR), at making inset lettering on to an arch. This system also took in answering several post that some had . with some kind'a of guide & the importance of letter spacing,,,,,,anyway this system that I worked out ,worked great for me.

Ok here is a couple of problems that plague me not, persistently !!!!!
When I am using a down cut 1/8" bit to carve out a inset figure, then in painting the inset there is a tearing of the minute fibers on the very top part at the very edges (both sides) of this figure. That when a paint/ink is applied it naturally also sinks into these minute torn edges. I might say these torn edges run the length of the cut/s. Now trying to sand down using a belt or a random orbit sanders to a level where they disappear does not enhance that signs appearance any, and in fact ruin's it !!!! So has any one had to deal with something similar ????

Have you veterans here found that ink is a better removable coloring that say a latex paint, even givin the paint more that a day to dry. I am ruining sand belts at a very fast pace ? As seen on the web's video's, several show applying a even coat clear across the board including the fancy cut edging.
 
#10 ·
I was not very prescise in making my question.

The sign makers on line, paint there whole board from one end to another. thus also covering the inset letters more concise than trying to paint the inside of the "V" one letter at a time.

I let my paint dry for 24 hours, still I went threw the belt,,,,zoom !!!

Have you had the same problem as in my first paragraph above ??
 
#13 ·
Thanks for your head's up newMexico,

I have tried to answer to my self, just why I am having so much trouble one after the other doing this wood sign carving, for something to look so simple, and yet it seems to elude me as to make what I believe to be an acceptable plank, just can not nail it down,,,,, Ahwwwww well, anyways. Practice, Practice,

It seems that the surge of information on this subject happened about 2006, so I am around 6 years to late but grateful for the superb stored info. Seems like calling out there and hearing this echo. I wonder if all of those guy's & that gal are still amongst us ? Around that time I was building furniture for our home.

Thanks again NM ,be safe and stay alert,,,,,,John
 
#14 ·
Even though, I have made 20-25 signs as Christmas gifts, this year, I consider myself a rookie at sign making. I also was getting frustrated at how many sanding belts I was clogging up with paint. I'd use the cleaning stick, but that didn't take much of the paint off. I read here that some used a thickness planer after painting. Thought about it, but between the fact that I don't have the room for it, I also didn't want to spend 4-5 hundred dollars on something I'd probably only use on signs. So on a last ditch effort, I spent 50 bucks on a Ryobi electric hand planer. (see below)

It's took a little practice. The planer is narrower then my sign boards, so you get a little seam to one side, if you don't hold the planer perfectly flat (and that's hard to do.) and also, if you don't apply more pressure to the rear of the planer, as you reach the end of the board, you get snipe. But with practice, it only takes a little sanding, with a medium grit belt (that remains clean a lot longer...) and then a fine disc on the orbital sander. Problem solved!! I again, began to enjoy making my signs.
 

Attachments

#15 ·
Hi Lee,
Thank you for your reply, I appreciate all of the answers that I can get in order to use what others have spent their time & money in an effort in getting where they are. In this relative new world of sharing instant info, and some times there at sites with pictures. Man what a age to have such access to gain knowledge.
Lee, a little about removing this black coloring from both where it should be & where it should not. I have had a Dewalt planer for some time now from my used in making furniture, and the thought of running it threw the planer did accrue to me. but, Well,,,,,,,,,,let me explain, here is an example.

I recently made a sign gluing two 5 1/2" ceder boards together long side to long side, saying in a 60" arc above, CHARLIE'S, then below, in an opposite 60" arc ends looking up, CARVINGS. Having a space on the seam between the boards, I carved into using Milescraft pattern maker, their square knot with their inscribed half round side on the two long ends of the knot. Now the wood left on the high side between all of the lower wood removed was very, very skimp. So after painting the whole board and letting it dry 24 hours,

THEN after going threw 3 belts I found that as the 1/8" down turn bit did its job on the inscribed knot great, but it also collapsed the upper edges of all of the sides of the wood around the knot. Leaving the paint in bedded in these jagged edges. Taking that board threw the plainer with those blades spining, I thing would have destroyed the figure,,,but also would have solved the problem of my jagged edges,,(joke).

I elected to go ahead and finish the board, it turned out miserable. Proving to me once again, That any mis step along the way to the end, whether my fault of a mishap of just circumstances in this sign making thing. No matter how close to there to the final end, or at the very start,,,,,, that board is scrap, period. but I am hooked trying to make these things, so onward,,,,,,,,,,,
 
#16 ·
I can see your dilemma. And the arched signs sounds challenging in itself!! All the signs I have made, they were with pine, and had knots, but don't remember having issues with them. Thinking about it, I can't see how I didn't. Good luck, and would definitely like to see a picture of that sign when you're finished.
 
#17 ·
Lee,
Did you read on one of the other post on this form on how I tried to share on how I got to the final way of making a fairly decient inscribe lettering on an arc. Using the Milescraft plastic letter patterns, & then in the second step of using their rigid framing ?

how does one transfer a photo from a computer to the post here. I tried but,,,,, (*&^$%#$#@) !!!!
 
#18 ·
Yes I did John. Might even give that a try down the road.

And on the pics, first you must click on "New Reply", not quick reply. Then click on the "Manage attachments". Then click on one of the "Browse" buttons and find the pick you want on your computer. Then click on "upload". You won't see the picture on your post, but the file name will show up above the "Manage Attachments" button. Then type what you want to say, and hit reply. It should show up then. Should!
 
#21 ·
Hey there John, Thank you,
OK !!!! Was I wrong, I have one of these silver metal one hand held ones. Oh, about 4" long or so. Now I think have seen the one you posted at my local hard ware stores here abouts. So I wont have to travel the long distance to the Woodcraft's store, will check. I will invest in your workable idea. Thanks for the heads up, as these clogged up belts are making these signs for friends a bit expensive.

I Had to came up with a kind of jig, of 3/4" Baltic Burch base with four wing nut/s & their old glued on sanding belt clamp culls, along with the below spacers for the clearance of the bigger tipped bit to clear the bushing ends. At the same time to lock the ceder boards down in it's position to allow the Milescraft pattern maker to work. None of which do you want any movement. The system that they showed on Youtube required to buy several clamps & a bigger base that I could not see any other uses for, and a whole lot bigger space to store.
 
#23 ·
I went out and bought that cheese grader that John suggested, (joke) Havent had the chance to copy some patterns as of late, outher things. I have been using 80 that prettly much stays on there. As I only use that belt sander for when I need some searious wood removal, but 40 grit is only a couple of miles away. Right next to Walmart, as that seems to be our by-weekly trip anyways. Gives me the excuse also to drop her off & go next door to have a look-see at their discount rack in the tool dept also. Thanks Harold,,,John
 
#24 ·
I could be totally off in left field here, but is it possible to completely paint the board after making your sign, then coat it with a removable material that would prevent the ink, or paint, from getting onto your painted board and yet not pull off the paint on the board? I was thinking of rubber cement, or something similar, in this instance.
 
#26 ·
Yes I is possible! The sign I attached though not complete was sprayed black before I applied the vinyl to it as my template. As a result I did not have to hand paint the silver on.
Image

The bottom flower the vinyl is removed the top one is not.
 
#25 ·
excellent post..thanks. I bought and tried the milescraft outfit. I gave up....I couldn't even get the clamps to hold the board steady while attempting the routing. A totally frustrating experience and a real let down for me. I still have the kit, and my brother recently asked me to make a sign for him...so I am thinking of trying again. I haven't tried it for over three years now.
 
#27 ·
I have only made 2 signs so far but I made a couple of passes on my 6" jointer set very shallow then sanded the board and the spray ink was no problem like that. I used what I had, I would like a planner but that will have to wait till I see if I continue making signs. :)
 
#29 ·
Sorry newmexico you are not doing well, If I had 3 or 4 good people working for me in my area I could gross 200K+ Do you market over the internet? You may want to increase your prices, twenty bucks seems low.