Router Forums banner

Electrolysis rust removal

17K views 60 replies 24 participants last post by  schnewj  
#1 · (Edited)
There was some interest in another thread on using electrolysis so I thought I'd post how/what I did on my PM jointer rather than hijacking that thread. I am certain you can Google this and find many variations to this process but this worked for me so I'm good with my method, but feel free to chime in and show how you've done this.

A few years ago I picked up a PM 54A jointer found on CL. The jointer had been in a non-climate controlled storage building and subject to humidity so it had what I thought was surface rust. When I got it home I realized the rust was a little more than I had initially realized.

When I brought it home it looked like this (soaked with WD-40 in this photo) -


Kind of heavy in some areas -


Ugly spot there in front of the cutterhead, which doesn't look too good, either -


Here's the cutterhead out of the jointer -


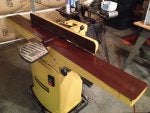
What I have here is a towel wetted with water and baking soda. I don't remember how much but in a 5 gallon pail I think I used about 2 gallons of water and about 1/4 to 1/2 cup of baking soda. I wrung the towel out about 75% and placed a sacrificial sheet metal plate I picked up at Lowe's on top of the towel. Then I hooked my battery charger, one lead to the jointer and one to the metal plate. Then I placed some weight on the metal plate to make sure there was good contact. In this case I used some Honduras Mahogany cutoffs from some columns.


After about 3-4 minutes the amperage gauge goes to about nothing which indicates the towel is now dry and has done all it is going to do. This is after removing the towel and no additional effort applied to the bed other than using the same towel to wipe the bed where the rust was.


Far less rust, looks pretty good -


Here's the cutterhead wrapped in a rag and with bailing wire wrapped tightly to make sure there is good contact. I hooked the leads up, gave it 3-4 minutes, and pulled the rag off.


Here's the cutterhead after Electrolysis and a little buffing with a Scotch-Brite pad -


And here's the finished machine. Looks good, runs good, and not a lot of effort to clean up using this process.


Thanks for reading!
David
 
#4 ·
Positive to the plate, negative to the equipment. I don't remember if I tried it the other way or read somewhere to do it this way but it worked so if I have to do it again sometime I'll probably do it the same way.
 
#3 ·
There was some interest in another thread on using electrolysis so I thought I'd post how/what I did on my PM jointer rather than hijacking that thread.

Thanks for reading!
David
thank you for posting...
 
#6 ·
The results are stunning. Thanks for sharing that. I'd still like to kick the person in the butt hole who let it get that rusted to start with. It should be a crime to let that happen to a fine piece of machinery like that.
 
#13 ·
David, that is really incredible. The weird thing was that I was just learning about electrolysis myself for cleaning cast iron pans and realized that I have a lot of rusted tools that could be done, but I had no idea that you could do it on such a large scale.

My last employer has a large 40 amp dc battery charger that they don't use anymore because they have switch to the newer type of batteries and I'm thinking about calling them up to see if I can buy it from them before they haul to the dump. It might be a little over kill because I watched a lot of videos with small car chargers being used.
 
#14 ·
From large heavy paper weight to usable power tool. This makes it look like it was easier to de-rust it than to let it rust in the first place.

GREAT RESULTS!
 
#19 ·
Thanks, guys! It really is as easy as it looks. Funny thing is I've never done electrolysis where you dip parts in a bucket, which is good because I didn't have a large enough bucket into which I could dip the jointer... :no:

On the topic of a battery charger too large or overkill I would think the 4-5 minutes it takes for the towel to dry out is essential to the process. If your charger is so large that it dries the towel in 1-2 minutes my guess is that you may have to repeat the process a few times, but that is strictly a guess based on using my small 6 amp charger.
 
#20 ·
Really neat and very effective

Wish I had known about this technique before spending a day (back in 2012) with wet-and-dry on the surface of the bandsaw table. Really neat and very effective. Thanks for sharing, David.
 
#21 · (Edited)
I was looking for more info and read that some automatic battery chargers need a jump start to get started. They used a 1.5 volt battery to simulate a battery load to turn on the charger. They put the battery across the wires for only a few seconds.

I saw a drawing this morning of a car battery being used with an automatic battery charger connected to it, but for some reason I can’t find again. I might do that since I have a couple of extra car batteries and I just killed a charger trying to get my truck started after setting 2 months.

I don't know that the car battery will work in this application because there is a chance of a short, but I may give it a try with a parts tank and add a fuse for safety.

I just found this drawing, but its not the one I saw earlier.

Image
 
#25 ·
That's interesting about the automatic chargers, I didn't know that. My little 6 amp charger is about 30 years old and suffices for electrolysis and occasionally charging my lawn mower battery. :)
 
#22 ·
Like everyone else, I'm pretty darned impressed with your results.

Most of my stationery power tools are in a decidedly non climate controlled area. I'll be looking at them very carefully this morning to see how they are faring.

Many thanks indeed for posting this.
 
#30 ·
@difalkner...

this show and tell of yours is so good I added it to the library...
hope ya don't mind..
 
#37 ·
@Stick486
I don't see were it tells which lead of the battery charger hooks to what. He said the below was how he hooked it up.Not sure if it would work the other way

Positive to the plate, negative to the equipment. I don't remember if I tried it the other way or read somewhere to do it this way but it worked so if I have to do it again sometime I'll probably do it the same way.

Can this be added to the PDF you were so kind as to add.
Thanks
Allen
 
#38 ·
Negative lead to the article being de-rusted. The Positive attaches to the sacrificial anode (steel/iron plate, rod, re-bar, whatever).

I don't use a battery inline when I use my system. I attach the battery charger directly to the Copper bar (-) that I hang the item from, and the re-bar (+) I use as the anode. Set it at a low amp rate (10) and let it cook. If you use the trickle charge you can walk away and let it do its thing and come back hours latter.

If anyone is interested in my set-up I will take a photo and post it.
 
#40 ·
@Cherryville Chuck...

post # 32 has a PDF that now has been updated...
can you edit this PDF in it's place...

Thanks...
Stick...

The updated PDF...

.
 

Attachments

#42 ·
@firstmuller

Allen,I will take some photos today. I will, also, provide you with a material list.

A five gallon bucket doesn't quite get the whole body of a #5. I do one side and then rotate it 180°. In addition, I will warn you, that, if left too long the bath will take off the Japanning, also.

Not so much that it dissolves it, but the rust that is underneath it. When the rust goes so does the Japanning.
 
#43 ·

Attachments

#44 ·
+1 on the HTEP. If you are restoring to use...who cares about the Japanning! It is only there to be a rust preventative. The paint does the same thing.

If your restoring the plane for posterity then be a purist and beat yourself to death re-Japanning. The minute you do, the value is destroyed, anyway, and it's a mess to do!

Painting the plane(s) doesn't affect how well the plane works it just keeps it looking nice after all of the hard work you just did to make the plane a usable tool.

In addition to the HTEP I have had good luck, (visually and practically) with Rustoleum (Hard Hat) Gloss Black paint. Not exactly a color match to the Japanning, but when done as Stick described, forms a very hard, durable finish when cured.