Router Forums banner

Finally - skiis

24K views 99 replies 21 participants last post by  stanzee  
#1 · (Edited)
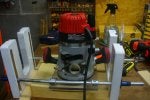
Well, almost. Still got a couple of things to finish up. After much contemplation and a lot more procrastination, I finally got a ski jig put together. Likely much more complicated than need be, but I seem to have an inclination for that.
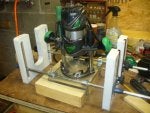
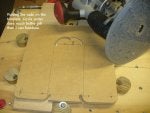
Cheeks are 3/4 MDF + 1/2 Birch plywood. Cheeks ride on 1/8" UHMW runners 1/8" wider than the cheeks. Support rods are 1/2" plated steel rods riding in 1/2" nylon bearings and attached with heavy duty (1/8" thick) conduit clamps. The base plate is 3/8" lexan and drilled for both my routers. I'm still deciding whether to drill it for the Trend.
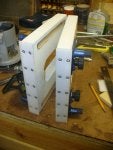
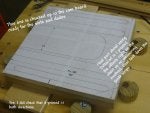
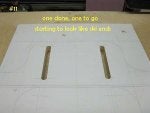
Just doing the pics of the cheek development in this post as they were the most complex. After they were done, the rest was mostly assembly, with a couple of minor excusions with the supports. :)
 

Attachments

#6 ·
Hi Dirk - I'm just getting involved with the things so I haven't got all the in's and out's figured out yet. A couple of other members here have put out some outstanding projects using them. One Member, Harrysin, has put together some tutorials, you may want to search for some of his posts and check his gallery out.
Welcome to the forum:)
 
#8 ·
Hi Bob- yeah, figured you would:),, haven't got a good number. Much more than it should have just in shipping.. :eek:
Plywood and MDF were scrap. t-track was some leftover I had from drill press table build. When I order that stuff I usually just get the package deal from Rockler or Hartville so I usually have plenty laying around. Bearings were about a buck apiece and conduit deals around 50 cents each but about $10 shipping. :ph34r: Lexan off eBay. All told, probably a little better than $50, about half shipping.
Gave me a bunch of interesting problems to work out though. Some still aren't worked out. Setup isn't as easy as I would like it to be. Gonna need some time to figure that out, just got it done enough to dry run it a bit today. Haven't got the bit opening in yet either. Will likely make that about 3 1/4 with a 1/4" ledge for inserts. Still haven't decided whether to include the Trend router on the bolt pattern either. That just showed up Monday.
Still need to put locks on the rod supports too. Those are just 3/8 iron pipe nipples reamed out for the 1/2" rod.
Just waitin on Harry to jump me for more pics:D
 
#13 · (Edited)
Jack, you have done a magnificent job but I really don't think that such precision is necessary. I can't think of a procedure where the router needs to be slid along the rails during routing. You're router has 12mm holes for the rods to go through so why reduce the depth of cut by adding a sub-base? Because the router holes are not super precision, cheap bright mild steel is fine for the rods and mine are still like new after extensive use over the last ten years. One final comment (I hope we can still be friends), there are occasions when the end cheeks need to run against rails, so no protrusion is a must. I really am a firm believer in the forums motto KISS, keep it super simple.
 

Attachments

#16 ·
Hi Harry, you are probably right that I went a bit overboard on the project. I think I took it on as much as a challenge than anything. Notice, there are no protrusions on the inside of the cheeks and well above the workpiece on the outside. Most pictures I have seen any guide rails were clamped on the inside of the cheeks. The conduit clamps are drilled and tapped so the carriage can be locked in place and there are stop collars on the rods to limit lateral side movement.
Like I said, as much of a challenge as anything.:blink:
 
#14 · (Edited)
Hi Dirk

I'm a big fan of the threaded rod, not all threaded rod is sharp, I use B7 Acme rod that is almost as flat as round rod and is very strong (4140 steel DHT) , the same stuff they use for most vise clamps, I also use 3/8-24 thread , that's almost the same as Acme rod because you have 24 threads in one in. and you get it for peanuts..


Note Dirk,,,, I also live in Denver, welcome to forum, my brother in law was a cop in Denver for 30 years, Det. Mike Linville, he has pass on but a great guy and a great cop..

Anyway Welcome to the forum :)

=======
 

Attachments

#19 ·
I've made my board with a matrix of tapped holes and made my skis.

I'm not getting a very smooth movement when I move the skis along and I wondered what you guys interface them with. Are you using slick tape or something on the base of the skis or on the bottom of the sides of the skis where they bear against the matrix board edges?
My skis are painted, as is the workboard the matrix board sits on, although the matrix board itself is plain MDF.

Cheers

Peter
 
#20 ·
Hi Peter - I'm using 1/8" thick UHMW on the bottom of the skis. I cut them 1/16" wider so they actually overlap the ski cheeks a bit. Runs very smooth on the bench but, I confess I haven't tried them with the cam board yet. My plan is to add strips the the inside faces if there is a problem. I'm planning on making another cam board soon anyway as I have a few issues with this one I want to get resolved.
:)
 
#24 ·
Peter, I have always used iron-on edging strip and have no movement problems. If the movement is too slippery, it's likely to cause unwanted errors, a little stiffness gives better control (in my humble opinion of course!)
 
#25 ·
Hi Harry

That's a good tip ,I have also used some laminate stock on one set ,it's very thin and with the hot air gun it will mold right to the bottom of the skis and with some good contact glue it's in place..


=======
 
#34 ·
Matt, please believe me, there is no sag when using 12mm mild steel rods with a Makita 3612C router. Even with thinner rods which some routers require, bearing in mind that the skis are operated from the end cheeks, there just isn't a problem. I'll repeat some shots to clarify measurements that you seem to be unsure of. I really don't see any advantage in using thicker material for the end cheeks, however use whatever you have in stock. Regarding the slots, I left an inch from the top and 3/4" from the bottom. Because I made this project especially for the forum where many members, especially beginners are miffed by metric, I used Imperial measurements.
By the way Matt, I received a complimentary PM from you just before my disagreement with the moderation team. I sent you a long answer but I'm not sure if you actually received it, if not, PM me again.
 

Attachments

#28 ·
Hi Rob and Matthew:

Rather than trying to find stiffer rods, I add additional, temporary support, under the rods next to the router until the depth is set and the router is proceeding nicely. Then, I remove the blocks or have a "helper" remove them. They're nothing fancy, just a scrap block of wood of sufficient size to set the height of the rods and provide median support. I don't use it to set "zero" router depth or depth of cut.

I do use drill rod over other rod types. I find they're smoother and as I slide the router over the rails, they stay smooth. They don't chatter or catch, just glide. I'm trying to find a sliver of UHMW to fit between the router and the rods but not much success yet. I tried cutting a tiny bit off some that I have and that was a stellar failure. Even a sharp knife isn't sufficiently consistent. All I need is a sliver about the thickness of a piece of paper. Suggestions appreciated.
 
#35 ·
Hi Harry

That sounds good - when I mentioned "drill rod" to my wood-work teacher (who also has access to the metal work workshop, where they have engineering lathes...) he looked horrified and said that the bits wouldn't be able to mill 12mm drill rod. So maybe they will be able to do 12mm mild steel - hopefully they do as I'll then go with that option.

Thanks for the extra pic and measurements. How bizarre that anyone who works in imperial, could be miffed by metric. Imperial is the most bizarre measurement system ever!!

I didn't receive the long reply - at least I don't think so. Please resend it.

Matthew
 
#36 ·
Every now and then, when the forum gets gets stale, I raise the subject of metric. I started a new little routing project today using a mixture of Imperial and metric guides and cutters to enable me to achieve desired off-sets. ANY metal shop with a lathe can turn down and thread a mild steel rod Matt. As far as I can ascertain, the problem in the US isn't just difficulty in using metric, it's the fact that suppliers are still reluctant to produce cutters and template guides in metric, not enough woodworkers are insisting on them, once they create a need, they will be produced!
 
#38 · (Edited)
Hi Neil - I assume you are asking about the project originally posted. I used 8-32 because they are just used to retain the t-tracks. 1/4-20 would have been much to large. Probably not needed at all, Spax or #6 wood screws would likely have been adequate. For that matter t-tracks are optional, was just going for a tool-less adjustment.

I think many here missed the point of the project. Many of my shop projects are far more complex than they need be as I view them as I view them as "skill builders". I try to incorporate some different processes or ideas into each just to see if I can accomplish it and shake out problems or oversights. As a result, many are way over budget and even further behind schedule but I have acquired knowledge and skills I otherwise would not have.
My signature is no joke:haha:
 
#41 ·
Concerning Inch vs Metric

I for one prefer the metric system. I've worked for various Japanese companies over the last 15 years and of course that is all we use. When I'm called to work on equipment that is made in USA I cringe trying to figure out what allen wrench I've got to use. Metric is simple. 2, 2.5,3,4,5,6,8,10 mm. That is all you need. Also much easier to read a metric tape measure or scale. I'm with you Harry. Imperial system is junk. There I said it.
 
#53 · (Edited)
No problem Harry. As much teaching as you do here, it was the least I could do. And thankfully I got it right. Would you mind if I combined each tutorial into a PDF and uploaded them? I could put the link to the corresponding thread in the PDF so it would all be in one nice spot. I could also email them to you so you can look at them and upload them if you would like.

Thanks!
 
#54 ·
Hi Darrin

That would be great BUT the PDF would be to big to upload it to the forum..it will stop at 1.2 mb..but Mark is working on that ...some day maybe..

========
 
#58 ·
Thank you for the first lesson.

[QUOTE = darrink; 211761] Эй BJ проверить его.

Гарри, дайте мне знать, если это хорошо. Если вы хотите, чтобы я удалить его я.

Спасибо!
Даррин
Attached Files
File Type: pdf Routing for Beginners - Lesson One.pdf (1.50 MB, 9 views)

[/ QUOTE]

Hello, Darrin!
I apologize for the bad English.
I'm a beginner. With a PC uncertain.

Thank you for the first lesson. Waiting for the continuation!
Sincerely, Sergey.