Router Forums banner

Folding Table Saw Design

10K views 31 replies 14 participants last post by  MT Stringer  
#1 ·
My little DeWalt DWE 7480 weighs 50# and has a 20 x 20 inch footprint. I don't have a stand so I was thinking about building one using 3/4 inch plywood.

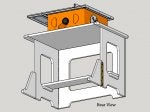
The two sides are attached via piano hinges as is the top.
I am not sure about the placement of the hinge for the top. I'd have to play with it. All of the rotating messes with my head. :frown:

I will probably come up with some sort of latch or anchor point where the top meets the sides.

And I might have to add a leg extension at the bottom of each side to make the whole thing more stable.

NOTE: The saw has holes in the frame (front and rear) so all I would have to do is set up the table, position the saw in place, and drive four screws through the frame into the plywood top. Plug it in and go!

I don't have room in my shop for the DeWalt rolling stand, but I might find room for this contraption when it is collapsed. As you can see in the drawing, I cut out some of the extra plywood that just isn't necessary.

So what do y'all think?

Your thoughts appreciated.
Thanks
Mike
 

Attachments

#2 · (Edited)
Mike I'm thinking if the sides were a 1/2" taller and you dadoed a slot in the bottom sides of the top ,that maybe the sides could interlock into the top ?
Of course the sides would have to be inset 1/2" to the inside so they would lock into the upper slot
 
#4 ·
On the piano hinge on the front, top of your stand, I think for it to fold, either the top has to fold down over the front, or you will need a piece as wide as the thickness of the folded side supports and attach the rest of the top with a piano hinge so the top will fold down, over the two side pieces. Otherwise, a nice design I'd cut a hand grip somewhere toward the top, maybe in the front panel. You could also lighten it up by doing cutouts in the front panel too. Really, only the top needs to be solid.

BTW, I finished up the shop bench extension. You gave me the idea in a picture. I posted the picture here somewhere. It has turned out really well. But I used too light hinges to attach the fold up legs and they bent out of shape. I just finished replacing the hinges with large barn door style hinges. Replaced screws with bolts and used T Nuts under the Masonite top to hold the hinges in place. Really solid! The top folds down using 5 feet of piano hinge.
 
#7 ·
On the piano hinge on the front, top of your stand, I think for it to fold, either the top has to fold down over the front, or you will need a piece as wide as the thickness of the folded side supports and attach the rest of the top with a piano hinge so the top will fold down, over the two side pieces.
I'm with Tom, I don't think your top will fold 270Âş as shown in your drawing. It looks like when you try to close the top (drop it down in front) it will only rotate 180Âş and then the edge will stop against the front vertical panel. I think Tom's on the right track to make it work.
 
#5 ·
Nice design! I'm thinking Ricks Idea, but with a rabbet, would lock it all together and make it more stable.

For me (for my jobsite saw, I choose a framed table top. Overall 3' x 5'. Sits on my adjustable saw horses, that are also part of my kit. Saw goes in one end, but can turn 90, so that I either have out feed support or side support.

I also swap in my router in a plate, my hand planer (to use as a jointer), or my jig saw (inverted/ blade up). Then I have a blank so I can use it as a work bench. Light enoug to load easily in my truck. Stores hanging on a wall at home. (pictures in this thread: http://www.routerforums.com/table-mounted-routing/36085-jobsite-router-table-plus.html)
 
#8 ·
Thanks Mike. I hadn't seen your table until just now. I was actually thinking about something like that last night.

I like the ideas and suggestions that have been posted so far. The good thing is most of the stuff I will be cutting will be on the small size. Anything bigger will be cut with a track saw. Things like filler strips, trim for the front of the bar, or maybe some custom face frame rips.

I do have a pair of saddle bag style sand bags I used to anchor my light stands so they would work nicely.

Lots of ideas. Thanks.
 
#6 · (Edited)
My first instinct is that it needs braces of some kind to keep it from racking. They could be hinged like the top, or cross-pieces slipped into slots from the open side after you set up the legs.

Even more than that, I'd want to add some weight to counteract that 50 pound table saw and whatever material you're cutting. If you're only handling small pieces where there won't be much lateral pressure it's probably just fine, but anything substantial might make the table wander around the shop a little more than you'd like. A bag half full of gravel or sand draped across the gaps in the legs could be dragged against a wall when you fold up the table. I'd probably pick up 20 or so pounds of landscape rocks or gravel from somewhere, carry it upstairs a bit at a time, and put it in a canvas bag. I didn't think of that myself; the workbench books I've looked at talk about putting a sandbag on a lower shelf to stabilize a bench that doesn't have a lot of mass, or making that lower shelf into a box filled with sand; one guy arranged a few flat rocks on his bench's trestles.

Edited to add: Hmm, after reading the responses I'm thinking that maybe I'm overthinking it.
 
#9 ·
Here is version 2.

The top is wider by 1 1/2 inches on either side.
The sides are 3/8 inch taller than the front.
The side will fit into the rabbets in the underside of the top.
Additional support can be rotated into position and locked down or pinned or screwed, or...

That's all for tonight.
Goodnight.
Mike
 

Attachments

#17 · (Edited)
Here is version 2.

The top is wider by 1 1/2 inches on either side.
The sides are 3/8 inch taller than the front.
The side will fit into the rabbets in the underside of the top.
Additional support can be rotated into position and locked down or pinned or screwed, or...
Image

That's all for tonight.
Goodnight.
Mike
I just saw some other things for more suggestions...

In the cutouts in the front and sides. If you take another piece of 3/4" ply, with tabs that would poke through out those cutouts, with a dado on the bottom to lock into those sides and front piece, that would brace the sides further... Then you can place your sandbags or real supplies (where the weight would add up) on that functional shelf. Locking the saw to your stand, and adding weight to the footprint will make your saw more stable and improve the quality of your cuts.

On the hinges on your top... If you extend the hinges up the front, so that the hinge pin is at the top corner as pictured, then your top will be able to fold over completely (to store).

How I lock my saws (table saw, SCMS) into my stands and keep them portable, is that I use carriage bolts, washers and wing nuts. Then use just slip those into holes through your saw and some pre-drilled holes... to lock them into the stands.

If you add two hinges or hasps at the bottom of the top of your table, to lock the two sides/top together. then that would lock it all together and complete making it more stable....

I don't see where your "additional support" feet are going to add any support, unless you drill another hole... Where you would swing them into place (with your hinge pin shown) and lock them into place with a pin (in that locking hole through the support and side) to lock it into place. Otherwise, it would just be loose right? I'm thinking that is what you had in mind with that.

The way you have it drawn up with the overhang off the back... you could also hinge another (short piece) off the back, under the top, that would lock into the back of the sides (with dados), that would keep the backs of the sides from racking. It would also add support to that edge of the top, as a stringer. The hinges would be outside of that piece. When folded up, would then be even with the outside edge of the top. If you add that piece, then mount the hinges that lock it together (instead of attached to the top piece) to this back piece, to lock it to the sides..

Just some thoughts.
 
#13 ·
If you already have folding sawhorses, why not consider some type of mount that spans the sawhorses and lets you drop the saw in place? https://www.google.com/search?q=folding+stand+for+portable+table+saw&biw=1680&bih=958&tbm=isch&imgil=vPV3o-CDPKkWfM%253A%253B0PyykJkn2zohcM%253Bhttp%25253A%25252F%25252Fhideahorsefoldingsawhorses.com%25252F&source=iu&pf=m&fir=vPV3o-CDPKkWfM%253A%252C0PyykJkn2zohcM%252C_&usg=__mU5sgeguRClcClGl09A2Tf1Vloc%3D&ved=0CFgQyjdqFQoTCM636fye4scCFQQ8Pgod44YI8g&ei=ChvsVc6KFIT4-AHjjaKQDw#tbm=isch&tbs=rimg%3ACbz1d6PggzypIjgRXZx0gJeyixbgys1ZRVssQ_1h-z_1kv0mVWRcoZ03Vre186IZ7YtCzK7JcQF5VVpSDJ6T4ntn49FioSCRFdnHSAl7KLEeLF53oYyH54KhIJFuDKzVlFWywRxMKc6FPCM78qEglD-H7P-S_1SZREzdsfCUnZJYyoSCVZFyhnTdWt7EcGWpquFMQCRKhIJXzohnti0LMoRXcXhnf8BmwIqEgnslxAXlVWlIBF4J27X59bDtSoSCcnpPie2fj0WEcytvoHaKvVW&q=folding%20stand%20for%20portable%20table%20saw - some good ideas here. We had a set-up that used joist hangers on the side of the sawhorse top bar to carry the cross pieces (worked the same as these but cheaper Rockler Sawhorse Supports - Workbenches and Tops - Workshop Accessories) and just set the work surface on top of the frame. Rather than the dado across the width, the top may be stiffer if you go with Rick's idea of a "tab" sticking up on the top edge of the sides and a slot in the top that drops over it which may give a more positive lock.
 
#15 ·
Mike...I think if you extend the sides to fit into dado's the hinge cannot be placed properly to allow folding the top over the sides. The hinge will wind up lower than the top of the sides, I think. For stability I would use a slide latch at the front of the sides to lock into a couple of holes in the bottom of the top.

It also seems that the hinge needs to be moved forward if you're planning on folding the top over the sides. The sides will need to fold under a "lip" that the hinge would be attached to. If you tri-fold (sides in front, top to the back) then Angie's hinge arrangement seems to work.
You might get some side to side instability as the non-hinged edges of the sides will flex some without some form of diagonal braces...

...or it could be I haven't had enough coffee yet... :)
 
  • Like
Reactions: MT Stringer
#16 ·
Mike, while you want this to be easily portable you also need a bit of weight to keep it in place. What do you think of half lapping some 2x4" legs/frame for this? That is how the open router table stand from Shopnotes #1 was built.

I would position the saw closest to the front of the table for more tipping resistance and install two cleats between the mounting tabs on the saw to locate it; just drop the saw over these and it won't slide. Instead of screwing the saw in place each time two carriage bolts with nuts recessed into the table top and a hold down bar with a knob on the front mounting tabs of the saw.

Food for thought.
 
#18 ·
Nice redesign. The extensions on the wings would stabilize things further if you sling a weighted bag across each. Even made of ply, that thing is going to be fairly heavy. I figure the top will be something like 39-40 inches, the front 36 inches and the sides about 18 inches each with another foot of extension (which could also be called trip and fall devices). I think the thing would be very stable by just laying a couple of 10-20 lb sandbags into the openings on the wings.

Hum, the thing is you want it to fold neatly... What if you hinge the two wings with a 3/4 inch offset so you can have wider wings, even triangular wings? Glue a 3/4 inch thick piece to one edge and mount the hinges on one side on that. When the thing folds down, the top goes in front, then one leg folds in, then you fold the other side so it rests flat on the first wing.. 4 layers and the wings can be almost as wide as the front. I think piano hinges are the best choice for the wings, but strap hinges will do the job on the top. Finally, I'd cut a hand hold somewhere so you can get a grip near the center of balance.

As you can tell, I like thinking through projects like this.
 
#19 ·
Dang, y'all woke up full of ideas this morning. Thanks for all the suggestions. I will go back and reread everything.

I worry about...
trip hazards
racking
instability

On the other hand, it is only 2 feet tall x 15 inches (sides). The top has to be 20 inches for the saw frame to fit.

I like the idea of...
strap hinges for the top
a lower shelf to lock the sides
maybe attach a triangular piece to each side for additional support to make the unit more stable.

Maybe I should just buy the rolling stand and be done with it! :frown:
 
#20 ·
...Maybe I should just buy the rolling stand and be done with it! :frown:
Image

Image

See my Rigid AC9930 Work_N-Haul IT stand above?

Look at this listing: Ridgid TS2400 Table Saw AC9930 Work Stand w Wheels Owners Manuals | eBay

The minimum bid is listed for less than the stand itself sold for. You could get it, sell the saw for what you paid for it (or almost) and come out sweet.

Other than that, average for a new folding is usually around $200 and up right? You could build for less... and your design will take up less space when stored away.
 
#21 · (Edited)
I modified the drawing some so here is my latest version.

Congrats folks. Your ideas and suggestions actually did the designing. I just drew it up! :)

Here are the changes:
  • I switched the top hinges from piano style to strap style which should allow the top to be rotated until it fits against the front piece.
  • I added two outriggers that attach to the sides with piano hinges. This allows the outrigger to rotate outward and rest against the outside of the side piece.
  • A shelf was added to lock the sides in place and provide additional support. Wooden cleats were added to each end so the shelf can capture the sides. If desired, the openings could be cut so the shelf would end up flush with the opening in the front piece.

This should make a nice portable stand that could be used as a work table or a router table. Just cut the opening for your router plate. If desired, add support for the plate from underneath the top. It won't interfere when the top is folded over for transporting.

Thanks again for everyone's participation. I can see where this could be built with limited tools, but would be handy to have when needed. Final sizes can be changed as needed if you need one taller, wider, etc.

Now for an update. :grin:
I found a deal on a new DeWalt Stand I couldn't pass up.
CPO Tools had it for $154.99 but when I put it in the shopping cart, it showed a $31 discount. Then I applied the Labor Day Sale 20% discount code.

So, with a savings of $47, the final tally was $114.98 ( no sales tax; includes $6.99 shipping).

Now I don't have to buy plywood and hinges. My buddy that drives the brown truck will bring the new stand to me. :grin:

Thanks again for your input. I appreciate it.
Mike
 

Attachments

#23 ·
Mike, can we get the Sketch-up file on that?

I know you are finished with that, but an afterthought alibi. I din't think of it until now: (Just in case someone does build it) One last suggested mod... it needs an opening in the top of the table / under the saw (for the saw dust to drop down. If there was a stringer on each side, then a drawer could catch the sawdust... or like me, I put a TS dust hood there and hook up to my DC.
 
  • Like
Reactions: MT Stringer
#25 ·
If you cut an opening for a router insert plate it could serve both duties. However my saw has a dust shoot that directs the dust out the back side. It is easy to hook up a 2 1/2 inch hose to a shop vac.

I tried to attach the Sketchup file but it is twice the size limit for .skp files. :frown:
 
#26 ·
Good move, I sometimes buy tools and accessories rather than make them because it costs too close to the same amount to make it, and I get my time back. Going to get a circle cutting jig for my Bosch 1617 rather than make one. I know, I know, but we all make choices based on our personal considerations. But the design sure turned out pretty well.
 
#28 ·
If anyone is interested in building a folding table like this, feel free to use the Sketchup file I have attached.

I make no guarantees, so build at your own risk. :grin:

Note: @MAFoElffen and @Cricket - Thank you for increasing the file size limit for Sketchup file uploads. I appreciate it.
Mike
 

Attachments

#29 ·
Mike have you considered something like the Keter work table? Keter 17182239 Folding Work Table - Workbenches - Amazon.com

It has a footprint that would accommodate your saw and it folds up easily for storage. The model I bought has bench dogs and clamping channels so you could secure your saw or a variety of other tools. It supports up to 1000 pounds so it is plenty strong.


Bill