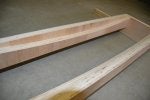
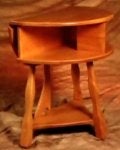
So here is the end result...and jig I used
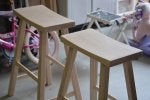
As previously stated, I said that I would post my results. Well, here it is. I am still working on finishing them but here they are glued up and ready to sand and finish. The jig was rather simple. I made this out of 3/4 inch plywood. As you can see in the picture, it is just two curved pieces between two flat pieces. I made this 25 inches long and the stool top is 18 so this gives an extra 3.5 inches on each side for the router to travel. I used a 3/4 inch straight bit on a plunge router.
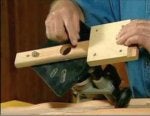
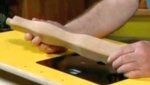
I cut the curved pieces for the jig by attaching the router to a 1x2 at 81 inches. This gave me the radius I needed. I then drilled a hole in the 1x2 and put a bolt through it and a piece of scrap plywood. I clamped the plywood to my bench and then used that as my pivot point. Using a 1/4 inch straight bit, I cut the curves for the jig.
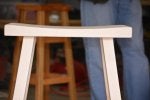
As you can see in the picture, the ends of the jig are just under 1.5 inches too tall to hold the jig above my piece (the seats were 1.5 inches). I originally thought that I could clamp the jig down on top of the piece and this would hold both the jig and the piece in place for the movement. Then, I went to the lumber yard to buy another piece of maple as that did not work so well. I wasn't getting consistent swipes with the router. So, after rethinking it a bit, I added the two long pieces of 1x2 to the ends. Using this, I was able to clamp the jig down on the four corners allowing my piece to slide under it (I had to off set the 1x2 to compensate for the extra 1/16 inch I intentionally left short for the previous clamping idea. I put a 3.5 inch spacer between the piece and the end and then clamped the piece to the 1x2 using a long clamp. This worked pretty good but the piece wanted to lift up so I had to be careful to ensure it was flat on the bench but it worked pretty good. I also took the time to vacuum between clamping with each pass so that I could make sure that the piece remained flat on the table. Using the flat side of the router, I could make a pass and then turn the router around to get another bit taken off. By doing this, I was able to get a little over an inch per clamping. Once I got the process down, it went pretty quick. I would take an 1/8 inch in the first pass and then 1/4 in the second but I suspect I could have taken the full 3/8 inch in one pass but I didn't want to spend another 35 bucks on a new piece so I figured I would just take the extra time.
There were a few ridges in the end but I was able to take them down with a RO sander in a few minutes so it wasn't bad.
Let me know if you have any questions. I should have taken pictures while I was working on it but I had such limited windows of time to work on things that I didn't think of it.


")