Router Forums banner

Home theatre stand build recommendations

9.7K views 48 replies 9 participants last post by  TenGees  
#1 · (Edited)
Guys and gals , looks as though I have to build myself a stereo stand . I'm liking this design that a gentleman makes and sells in the USA.
The only thing I don't like is having huge spaces between levels , so I will dado slots where required to keep the space the same between equipment. Larger spaces at the bottom getting tighter as you get to the top where the audio gears height is less .


I found stair case posts made from Alder at Windsor plywood . There 3-1/3" by 3-1/3" and 5' high . I thought they would make for a good start for providing the four corner posts . $70 a pop though. Oak is over $100 a post as they were thinking Alder would be to soft?
Sure hate to make a mistake as I'm dadoing :(

I want to stain it black , and was wondering how you guys felt about the shelves protruding out from the posts . I was debating to put them flush .

As for shelves , it would cost a small fortune to go with anything solid , so I was going to use 3/4" Baltic Birch plywood for each platform , and have a 2" tall piece of hardwood glued around it to give it a finished look .
The second shelf will have to support an amplifier that weighs 130 pounds , so I was thinking of laminating 2 layers of Baltic Birch for that layer . Otherwise there's really no weight involved .
I was going to do 3/4" a rabbet joint on the hardwood for the outside perimeter of each level , as this way it will support the Baltic birch better .
Was also thinking of using textured black arborite on the platforms and butting the hardwood perimeter up to it , as I'm thinking the BB may be to soft on top ?

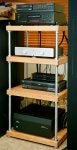
Here's an example of what I would like to mimic the design of .
Image


In the bottom pic I have no idea how he pulled this off, as the levels are sunk into the inside corners .
I guess a guy could start off by dadoing the beginning of the cut , hog out some material with a router , then finish off with a chisel?
It looks more refined to me , but also to many man hours , which I'm short of these days , as I have to get my garage/wood shop insulated for Tom .
Image
 
#2 ·
Hi Rick ,you most likely know this trick already,but here goes anyway.If you use BB ply or
MDF for your shelves,you can fill the edges with wood filler (thinned with metholated spirits), sand when dry before painting black..I mean just the edges. Hope all goes well for you .James jj777746
 
#3 · (Edited)
Yes that's an option I've though about .
I thought a piece of hardwood installed around the perimeter would look a little nicer though , and not really to challenging for a noob like me .

Ideally I'd like to make the individual levels all out of hardwood . A piece of hardwood I seen today that was 2" thick, just what I wanted , and was 7 bucks a linear foot , which would be over the top money wise as each shelf will be approx 24" by 21" by 2" .

So that's why they brought up the Baltic birch plywood idea . The only negative I can see is , if there's a 2" tall piece of hardwood attached to the plywood shelf sides , it could create a pocket underneath to hold heat . Although I hope that wouldn't create an issue
 
#4 ·
Rick,

Looking at the two photos, the construction is completely different between them. In the top photo, the shelves fit into dadoes cut across the face of the corners posts and the shelves fit into these dadoes, projecting out at the end faces. For the second photo, it does indeed look as if the shelves fit into pockets cut into the posts.

You said that you wanted the assembly stained black - did you want "stained black so that the grain still shows" or "stained black so that it looks like a solid part? One way I can see to make the second option would be to make the comer posts as built-up assemblies - joint two strips to make an angle and then glue lengths of square stock into the inside corner, leaving spaces where the shelves would fit. In order to get the same effect as the photo, you would have to go with thick stock, probably 8/4, and then match up the size of the square stock to suit the inside leg of the angle. I think this option would be pretty easy to do as you would make the length of the angle assemblies as needed and then cut the filler blocks as sets of four so that the lengths all match and the shelves sit straight. If you plan ahead, I can see assembly of the unit taking place in layers; glue in the four bottom (floor level) blocks in place, drop in the first shelf, then the next set of blocks, etc., etc. - you would need a bunch of clamps in order to do this though.

If you wanted the grain to show through, it would take careful matching of the pieces - the angled corners could be mitered so that the grain match there is not so critical, but you'd have to be more careful matching the grain of the corner blocks, although the joint would be on the inside face.

For the shelves, if you want the thickness to match the "bulk" of the corner posts, make up your edge banding in the width needed to give the shelf thickness you're looking for, cut rabbets on both edges to suit 1/2" BB plywood, cut top/bottom panels of 1/2" BB plywood to size and then glue up the assembly - you'd have shelves the thickness you're looking for but they would be hollow. For the shelf to hold the amplifier, go with 3/4" BB - and you could sandwich strips between the layers to prevent any sag, kind of a pseudo torsion-box assembly.

I'd have to think on the second option for a while - thinking a template for the router, if used twice on the adjacent edges would give you the square corners. The first cut would give a flat bottom with square corners but a radius to match the cutter in the vertical corners. Flip the post so that the back of the initial pocket is on the bottom and take a second cut - this would only take out the radius in the two corners from the first operation. I think it's doable, but you would have to be real careful about getting the pockets lined up along the length of the posts, but it can be done with the routing template and a series of story sticks locating off the bottom of the corner post. Does that sound like a way to cut those posts?
 
#5 · (Edited)
Thank you for the post Tom . I better kibosh the second idea, to darn hard for a rookie to pull off .
If I did go that route , I was thinking that after seeing what is cut out of a corner post after using a dado , and maybe hogging more material out with a router bit , to build a template and cut the corners of each platform to fit inside accordingly ? Dumb idea I know .

So I'll go back to to the first option as it's acceptable looks wise to me . I also thought with the first option that maybe it would look better if there was a slight radius/contour on the front of the levels . Have them flush at the posts and then the middle would protrude out a bit . Maybe uglier than anything lol.

You have a good point about stain , and I did prefer seeing the grain look . If I painted it , I guess I could fill the gaps and make it look like a solid piece . But preferring the grain look , plus I want to be able to remove the screws from the sides and salvage the individual platforms in case I need to change the heights of the levels by replacing all the side posts . At 100 bucks a pop :(

One other idea I had . Turn the shelf 90 degrees , then your not looking at the dadoed out area . Your pretty much seeing a shelf recessed back a bit .
A guy could cut in deeper so the levels would be closer to the front, or glue a piece on the front to extend it a bit . Tough call, as you'd see the screw holes or plugs , and I don't want to glue the whole assembly together
 
#6 · (Edited)
I do have a 15" planer , but missed the boat and didn't buy a jointer when I had the chance . If I had a jointer , I could make each level out of several glued pieces .
I think BB should be ok though for the platforms though.

Tom , my speakers are gloss black , and so is my present stereo stand (its metal and glass) .
Ideally the steel look would be best case scenario looks wise . I guess if I primed the wood and put filler in spots and sanded enough , I could spray paint with some plastic coat paint to simulate steel?
Or is there a black wood stain that's glossy?
 

Attachments

#7 ·
Rick; Alder isn't "too soft" for furniture construction. Not the hardest, but KD Alder is pretty decent.
Having said that, are there any stair mfg. shops in your area? A lot of them sell parts and pieces to finish carpenters/contractors who do interior stair installations.
I'll bet you could get better material cheaper from them! (Remember the "WP" comment a couple of weeks ago?).
If you have spare time you might want to wander out to the shop; there's some work out there waiting to get done...
 
#8 · (Edited)
Dan , Winsor Plywood is a last option , but the only place you can buy Baltic Birch , and there no custom stair shops here . We're not exactly Vancouver here lol .

I kind of wanted the Alder for the posts if I could . Did notice a lack of grain , but that could be with all staircase posts for all I know . And at this point I'm thinking of trying to make it look glossy black like steel . Did see a French stain that they use on pianos ,but looks very labour intense .
Tough decisions:|


Oh btw , I'm thinking put the kibosh on the shop for a bit as it's really sidetracking my alternate ideas right now :)
 
#10 ·
Alder is soft, very soft, I cant even use it. If you use it for furniture it better be something that you dont mind dents in.


Alder is far softer than any yellow pine or fir and half as hard as Oak, actually less than half as hard as Oak.
 
#11 ·
Thank you , good to know . I will spend the extra cash and buy the oak stair case posts instead . This should hopefully be the last stand I build , so it will justify the cost
 
#14 · (Edited)
Bit of an overstatement, Dovetail. Harder than any (local) Pine we can get up here.
https://en.wikipedia.org/wiki/Janka_hardness_test
And there's LOTS of Pine furniture for sale...check out IKEA stuff.

You just proved it, 590 janka? And I never said not to make furniture using Pine, I said dont use alder.You just posted a chart with over 250 woods with alder being on the very bottom.

The OP was talking Oak, alder cant even be in the same paragraph, oak is literally 3-5 times harder.

The basis for median hardness is a 1290 on the janka(red oakish), anything less starts to allow a finger nail pressure to dent the wood. One you get under 900 the wood is soft. Alder is a 590, most pine we get a 690(100 is a HUGE difference).

There are about 10 woods softer than alder and over 200 harder? Nope not an overstatement at all.

Take a look at this, alder is so low this chart doesn't even go that low, and most janka charts for woodworker don't go any lower becasue anything less that 650 really is too soft adn the lumber yards don't sell it. If you search the net you will find about 1000 charts and maybe 20% will list lower than 650 and those are informational, they list it down to balsa just for effect. The white pines they show on some charts being 350 janka are so rare you cant get them, most white pines are only marginally softer than Yellow pine, with Alder coming in even softer. Alder is just about the softest wood any of us can go out and purchase readily and the next being the pines are much harder(at least 100 janka), but still very soft in the scheme of things..

Alder is soft and Aspen which is very similar, but much whiter is even softer. , both are closed grain with alder looking closer to a light colored American cherry board. I do tend to get the names mixed up but they are both very soft woods, with alder being the better choice
 

Attachments

#13 · (Edited)
Geez Balsa looks like a bad choice . Dan , I don't know if these posts were red Alder if that changes anything.
Looks like a very light tannish colour to me
 
#15 ·
@RainMan 2.0

As far as finishing the part to look like steel - you are talking a lot of work in prep to get the kind of substrate needed to not show any flaws (as Stick would say, VOE here). We built a lot of cabinets back when everybody wanted white kitchens, way more prep than stain and a lacquer finish - way more. FWW had an article way back, and I think it was updated recently, where the author went through his methods of prepping and finishing painted furniture - do a Google search and see if you can dig it up, very interesting (and daunting).

Think about your original plan to stain the wood black and apply finish, that may be the way to go. And I would also consider black laminate, on the tops of the shelves only, to prevent wear on the surfaces. Laminate the top panel and then size the upper rabbet in the shelf edging so that the laminate surface is flush with the top, assemble and then mask the laminate before applying finish to the edges and bottom surfaces.

Don't know that I'd worry about the relative "softness" of alder, there were a couple of kitchen cabinet mfgrs. (Conestoga was one for example) who used to offer alder as an option. It's not as if a stereo stand sees a lot of wear - just make the gap under the bottom shelf high enough to clear your work boots :wink:
 
#16 ·
For years the School Boards out here built pretty much all their B.I. furniture in the schools using D. Fir plywood (660) it lasted for decades.
Rick doesn't have kids or dogs. The furniture he's considering will have audio equipment stacked on it. Other than dusting once in awhile, that's all the punishment it's going to get.
For where Rick's located, and what he wants to spend on it, and what else is available, Alder will do a great job. This isn't an heirloom dining room suite.
Just saying.
 
#17 ·
Great points Tom , I think the way to do this is to keep it simple . Pretty much my original plan . I do actually love the look that stain brings out. I believe black arborite is the best option for on top of the Baltic Birch to , unless I was to glue many pieces of hardwood together to make a solid platform for each level .
I would prefer that , but it's cost prohibitive .

I did see other options for plywood there that had a beautiful grain , (I think oak) but I believe it would be to soft and prone to scratching . Although there shouldn't be any wear and tear under the equipment regardless in theory ?
Getting the amp in may be the only issue.

Now I have to source some heavy duty adjustable feet
 
#18 · (Edited)
Yes D fir and yellow pine and especially heart pine(as some of it is harder than many hard woods) last a long while, indefinitely if kept inside really.


All the woods are long lasting the janka rating has very little to do with longevity, if it did no one would ever use Teak. Heck its soft as can be yet it last on boat deck with care over 50 years.

Janka doesn't make a wood good or bad or less long lasting, but it will dictate how the item wears over time. If you want that worn look on a piece and you know people are going to toss the keys on it, then use a soft wood, but if you want the piece to look like it did the day you made it then use a much harder wood.

And you are absolutely right, Alder will be fine. You can use any wood you like, but going from Oak to Alder I had to comment that Alder is soft. Doesn't mean he shouldn't use it, I dont use it. If it's going to be black I am not sure why he either doesn't use quarter sawn wenge, which will be black with clear finish or just use MDF and paint it black. MDF will last too, but I dont use that either.
 
#21 · (Edited)
@dovetail , the first thing the guy said at Windsor Plywood was his concerns with Alder being to soft , so your concerns are valid .
I don't know much about it , but seeing as I want these dado'd slots to be rock solid , maybe oak would be the better choice .

Amazing how much finished hardwood costs these days though. It's going to be $400-500 for the four corner posts alone.

I'm not liking anything I see for sale , so making a stereo stand is my only option . I've always wanted to build one to , so that's a bonus .
Next I'll have to mimic the look for the flat screens stand
 
#23 ·
Paralysis by analysis. I like the second stand, simple and elegant. I'd build the shelves the way I wanted them using BB. Edge band them with some strips of something hard, come to the final size. I'd use a trim bit to make them flat to the BB. If I wanted thicker or stronger, I'd make a rabbit on the trim so the piece fit onto the BB. Glue these on. The rabbit will give you apparent thickness and act as a truss to increase strength. You could even glue in a piece of ply on the bottom of the shelf to give you a finised underside and a little extra strength. I'd go for a thickness of 1 1/4 to 1 1/2 total. I'd make the rabbited edge smaller if I were to put a second layer in so I could make it fit exactly to the thickness of the second layer. Smooth as a baby's posterior. Hardly any sanding!!

Posts: Probably pine for me at least--it's going to be dent resistant given the opaque black finish I'd go for once assembled. I'd make a sled to hold the posts 45 to the table and use a dado stack or router to cut exact fit notches the shelves will fit into. Then I'd use hand tools (Wicked sharp chisels) to square up the notches to accept the corners of the shelves. I'd want the shelves to go in as far as possible without weakening the post too much and I'd use sand paper tacked to the back of a chisel to fit it exactly to the shelf assigned to it.

Using the table saw jig, I'd use the fence as a stop so each slot was a perfect match on all four posts.

I'd glue and clamp it together making certain it was square as heck. Theoretically you could also add a couple of pegs throught he leg, into the shelf. If you add thickness to the shelf, there'd be room.

If you don't want to do all that chisel work, cut the corners off the shelves and make the slots go from corner to corner on the post. It might also be necessary to peg this too.

I would roundover the edges on everything, and I'd make the top fit parallel with the top of the post. I'd do hardly any sanding, particularly on the BB. I'd use BB for the second layer, with the finished side down.

Finish: Dead black stain, laid on thick until the grain all but disappeared. Lots of layers of glossy poly, lots of drying time. Minwax 1 qt. PolyShades Classic Black Satin Stain and Polyurethane-613950444 - The Home Depot.

This may not be the very best way to do this, but it's how I'd do it. I'd want to experiment with some BB and a little of the post material on that finish before doing anything else. I also agree that this piece isn't going to carry that much weight and won't have much abuse.

It is a design that will translate over to a flatscreen stand pretty easily. The new TVs are really light weight, but by making a thicker top, you could use trussing enclosed between two layers of BB, could bear a lot of weight without sagging. You could put lots of trussing in that chamber, and with a little ingenuity, you could use the space between trusses to get extra cable out of sight.

Finally, I'm not the I word enforcer! It is completely your choice. But I think you'll really enjoy working on a project. Take your time and experiment with the finish.
 
#24 ·
Thanks for the post Tom . I'm going to go with the first stand , as I don't think it's all that much of an eye sore . Maybe a little lol .
The only shelf to consider strength wise will be the second one up ,as the amps 130 pounds .
I was going to use two layers of Baltic Birch for that level . I will buy some hardwood for the perimeter of each shelf . 2" by 2" if I can find anything that size and do the rabbit cut
 
#26 · (Edited)
Alder is most definitely hard enough to make that stand, heck you can make any piece of furniture, even a dining room table table out of alder and it would be gorgeous.

I want to make clear when I said it was soft that was strictly in regards to how it might wear, in the way the wood might be more prone to scratches and dents and only becasue you were talking Oak. Heck the softest pine is strong enough to make that stand or any other piece of furniture, the softer wood may scratch, buts its still going to hold the weight. So alder is a fine wood as a couple of guys here have stated. Janka rating is strictly a hardness test used mostly for flooring comparisons which related to dents in wood, but to say alder is too soft to make your piece or any table really table is simply wrong. The dado's would hold up fine using any wood regardless of how hard the wood is.


I think I came across totally wrong in my previous posts and apologize for that.

And making the stand with ply and solid hardwood edging is a good way to go. IMHO, 3/4" plywood is fine for the shelves if you add a hardwood edge. With the ply shelves in a dado and a hardwood edge there is no way you need to double up the ply for the shelf. Heck you could span 2 maybe even 3 times times that distance and keep a single 3/4" shelf and be fine depending on how you attached the hardwood edge.
 
#27 · (Edited)
Alder is most definitely hard enough to make that stand, heck you can make any piece of furniture, even a dining room table table out of alder and it would be gorgeous.

I want to make clear when I said it was soft that was strictly in regards to how it might wear, in the way the wood might be more prone to scratches and dents and only becasue you were talking Oak. Heck the softest pine is strong enough to make that stand or any other piece of furniture, the softer wood may scratch, buts its still going to hold the weight. So alder is a fine wood as a couple of guys here have stated. Janka rating is strictly a hardness test used mostly for flooring comparisons which related to dents in wood, but to say alder is too soft to make your piece or any table really table is simply wrong. The dado's would hold up fine using any wood regardless of how hard the wood is.


I think I came across totally wrong in my previous posts and apologize for that.
No problem Dovetail , I appreciate your input here . My concern was the guys at Windsor Plywood showed concern , and I thought you verified there concern .
Alder is cheaper by about 30% compared to oak , so it's a tough call what to do .
I sure hope I don't slip up and make a mistake . I did buy a digital measuring system for my table saw fence last year , so I better get my butt in gear and install it
 
#29 ·
Yeah I get "spirited" and look a fool sometimes.


I forget I make stuff that goes in floors and I am sometimes have a narrow view becasue of the niche I am in, it's all I live. I forget to just take a step back and look at the overall projects we are talking about HERE. No one is going to be walking on this thing with a rock in their boot dragging it across the wood, which is something I need think about everyday.
 
#30 · (Edited)
Guys, there's a sawmill a half hour away from me that sells to people off the street.
If I can get some rough lumber at a decent price , I could fire up my 15" GI planer that I've never used .
It doesn't have the high end cutters unfortunately, but I suspect it will work fine . I wish I bought a jointer when they were discounting them out the door , but to late . I do have a Fe$Tool track saw though if that helps .

In reality , I would really like to make solid levels , like a cutting board . Im assuming cutting boards are glued together with no dowels or biscuits?
I do have a dewalt biscuit tool if it's a good idea to connect seperate pieces . I'm not wanting a hundred pieces to build each level , maybe 8 .

I think I'm putting the kibosh on that single 130lb beast of an amp , and going with two 40lb amps , so that should rid me of some strength concerns .

I do have another idea also . If you look at this version , he uses thick threaded rods as the posts .
I don't like that look , but I was thinking that a guy could cut the stair case posts to four evenly sized pieces per layer , and drill a hole threw the center of the wooden post so that the rod could slide threw . Not sure how you accurately drill a hole 15" deep threw the center of a wooden post though?
Then you would only need a nut on the top and bottom shelf to tighten the whole shebang up . Maybe go a little deeper on the top shelf so that the nut can be counter sunk and a plug installed.
A guy could build a cover to hide the nut under the bottom plate to
 

Attachments

#35 ·
I do have another idea also . If you look at this version , he uses thick threaded rods as the posts .
I don't like that look , but I was thinking that a guy could cut the stair case posts to four evenly sized pieces per layer , and drill a hole threw the center of the wooden post so that the rod could slide threw . Not sure how you accurately drill a hole 15" deep threw the center of a wooden post though?
Then you would only need a nut on the top and bottom shelf to tighten the whole shebang up . Maybe go a little deeper on the top shelf so that the nut can be counter sunk and a plug installed.
A guy could build a cover to hide the nut under the bottom plate to
I saw a version of this idea in one of the ww magazines years back - the builder used threaded rods and nuts like your photo but had a tube sleeve over them. You would need a counterbore top and bottom of the shelves, with the tubing length as needed to give the required spacing between the shelves - would work if you go with the thicker shelves. May have to get the nuts turned down from a hex to keep the tube size down, or you can buy round bar with a tapped center hole and cut it in lengths and tighten with a pipe wrench, depending on what size threaded rod you use, Then you could have the painted finish you were looking for, at least on the tubing.