Router Forums banner

How to cut plastic?

10K views 28 replies 14 participants last post by  MT Stringer  
#1 ·
That's the question for the day. I have a big plastic cutting board. I would like to use the CNC to make several boards out of it.

I think it is high density polyethylene. White plastic. I think it is about 1/2 inch thick. I need to go out to the shop and take measurements.

Probotix Asteroid with the Bosch 1617.
I have both 1/8th and 1/4 inch upcut bits so if it is thicker than 1/2 inch, I will use the 1/4 inch bit.

The real questions are how fast/or slow do you cut. At the lowest router speed?

I hate to ruin the board if it melts, but if it does, I will be OK. Learning experience.

All advice and suggestions appreciated.
Thanks in advance.
Mike
 
#3 ·
Thanks for the link. As much as I watch You Tube videos, I haven't tried to find any help there. :(

Actually, I have used my machine in over a year. I have had several medical issues and that has brought me to a complete stop. But, I am in a lot better health now and the energy has returned. Step one will be to fire it up and re home everything.

I had to search Router Forums to find my post asking how to set up different coordinate systems. I found it, and all is well. Several projects are waiting in the wings.

Thanks again.
 
#5 ·
18 x 23 3/4 x 1/2 inch...and it is not flat! <a href="http://www.routerforums.com/images/smilies/frown.gif" border="0" alt="" title="Frown" >:)</a>
1/2" is probably a little thick but I wonder if you can clamp it down and maybe use a heat gun to help it lay flat on it's own? Post some pictures when you get started on it and I'm glad to hear you're feeling better!! Joe.
 
#6 ·
Really glad you're feeling better now Mike. I had a similar experience and am only now getting back to decent health myself. My experience with cutting plastic is pretty limited, but I know the bit/blade quickly gets covered in plastic scraps, and if I go fast enough, it semi melts, but rarely sticks to the blade or bit.
 
#7 ·
I know Toolstoday and Precise bits have bits for plastic. Regular bits will leave tear out on acrylic, but the "for plastic" bits leave a smooth edge.
 
  • Like
Reactions: MT Stringer
#11 ·
:laugh2:
They are "O" (oh) flute, not zero flute.
I try and learn something new every day and this is early enough I can go back to bed!! :grin:

Thanks, Gerry. I guess it's mistakenly referred to often because when you do a search for either O flute or 0 flute you get basically the same results.

David
 
#15 ·
#13 ·
I milled a small piece of Delrin which is kind of similar to HDPE. I used a 1/4" O flute upcut and climb cutting. I went 10,000 RPM and 30 IPM but also cut at .0625" because I wasn't sure how it would react. I could have done .125" pretty easy. I was afraid of melting.
 
#16 ·
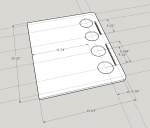
Thanks Harry. I think I will make one out of scrap plywood to see how it looks in place. It will sit on the shelf of a Blackstone 36 inch griddle. My thinking is to countersink and glue some magnets underneath so it will stay put. The outer edge will hang over the shelf by 2 1/2 inches, thus providing a larger work area and a place to set my drink! :)

Since there are two shelves, I may have to abandon the idea of cutting up the plastic cutting board for now, and go with solid wood. I know there is heat involved, so I have a plan to shield it also. That will come later. One project at a time.

Edit: The two slots are for scrapers or spatulas to fit in.
 

Attachments

#17 ·
Hi Mike, I cut a lot of HDPE. I Have had great success using the 3/16" "O" flute.
With 1/2" material my cut speed is 85 ipm at 14000 rpm. When cutting the liquid groove I just use a 2 flute carbide tipped 3/4"diameter core box bit. Never had any trouble with getting a good finish.
I usually dress all cut edges with a 1/16" radius round over bit. The untreated edges are like a razor blade.
 
#18 ·
#24 ·
For now, I have given up on the plastic cutting board idea. My first design was carved using mdf, and painted with high temperature paint. Today I am carving a second one for the other shelf. I like my design. I guess time will tell if moisture gets to the mdf. I painted all sides and edges to seal it as best as I can.
 

Attachments

#25 · (Edited)
... I like my design. I guess time will tell if moisture gets to the mdf. I painted all sides and edges to seal it as best as I can.

Hmm... I just picked up some Penetrating Epoxy to help seal a door on our shed
that has been seeing some water damage. Well, not damaged but you can see its
about to start to create problems. Some videos suggested to use Pene Epoxy if it
isnt too far gone, aka rotted.


I wonder how MDF would work w/ Pene epoxy? Have to dilute Parts A/B w/ Acetone
im reading. It's already soupy like unlike the build 50 epoxy. Couple of coats
and good sanding I guess.


Anyone use it? and for L/MDF?

I got some of this stuff
https://www.jamestowndistributors.com/userportal/show_product.do?pid=97636
 
#26 ·
I use regular laminating epoxy to seal MDF.
You can route profiles into the MDF, seal with epoxy, and then, after it's cured, run them again, removing a very small amount of material, and you get cuts as smooth as glass, with no fuzziness. This also works with CNC Carved MDF.

Rough cut about .01" oversize, cover in epoxy, and recut to actual size when cured.
 
#29 ·
And now for an update. My plans changes somewhat. After some measuring, I finalized the project to cut three boards out of the piece of plastic. I used an 1/8th inch upcut bit and ran it at 70 ipm. I made .10 inch passes, and it was chips-a-hoy! No melting, and I got smooth cut. I am really pleased with the results.

The board wasn't exactly flat so the first toolpath was to drill some holes in the waste area of the handles. That kept them in place and helped flatten the board. The next two tool paths were the handle cutout and the board cutout. All went well. I don't have a picture of the final three boards because I have already put them in storage for use as needed. I think one of the small ones may be going to my niece when she gets here later. The small ones are perfect for making sammiches, etc. The larger one is out in the BBQ Cart.

Thanks to everyone that contributed to this thread. I appreciate it.

Note: The original board has some character marks from years of fishing and BBQing.
 

Attachments