Router Forums banner

Miters - Router or tablesaw

17K views 34 replies 10 participants last post by  harrysin  
#1 ·
I make boxes and I just watched this video
and it made me think whether I could or should be making my miters on the router table using a 45 deg chamfer bit or V groove bit. At the moment I use my table saw with a digital cube to set the angle of the blade. My miters are good and the boxes end up reasonably square but not perfect.

A lot of people use lock miters on the router table but I'm not sure I want to go down that path. Seems a little tricky.

What do others think?
 
#2 ·
I think you saw a commercial.
 
#4 ·
Harry (fellow Aussie) any tips on doing this.

I have a 45 deg V groove bit and a 45 chamfer bit with a bearing. Both capable of miters on 3/4" stock. I think either should work. Do tou have a prefernce? How do you hold your pieces? Flat or vertical? Do you use a hold down jig or push block? Do you have a backing piece to prevent tear out? As mitering removes a complete edge how have you manged the outfeed fence to cater for this?

I'm really keen to try this

EDIT .... Sorry you middle picture does answer a few questions?

PS Theo, I know this was a commercial but I like the concept. I also know he mitered MDF which doesn't have the tear out factor as badly as "normal" timber
I'll have a go at making this and report back but I will use a backing (sacrificial) board.
 
#8 · (Edited)
John, the important thing with this method where narrow pieces (like for boxes) is to have a zero clearance opening in the fence and use a decent size pusher block with 80 grit paper glued to the face to prevent slippage. If the fence and bit are set accurately so that NOTHING is removed from the "point" at the top so the piece at the output of the bit remains the same as the input. The pusher ensures that there is no break-out. I have several 45° bits of different sizes, some with and some without bearings as can be seen in the two pairs of photos. and it doesn't matter which type is used so long as it can be set-up correctly. The beauty of routing a mitre is that the 45° is always accurate, no error can be made compared to a table or even a mitre saw. I have always routed the mitres flat, when I first tried this method it seemed the obvious way, and it worked, so it has never occurred to me to try vertical!
 
#6 ·
I do a lot of mitering of boards that are 3/8" to 1/2" thick. I use the tablesaw with a Woodworker II blade that is tilted. Does a pretty good job. I didn't see a stop block on the router table to get all the boards the same length. I have a shop made micro adjuster on the miter gauge the helps in taking off the just the right amount of wood. To prevent tear out I have a backer board attached to the miter gauge. Once I got the gauge set accurate about a year ago I haven't had to change it. Malcolm / Kentucky USA
 
#7 ·
I've had a chance to noodle on the concept of using the router to cut the miters. Whereas I use the TS to cut them and my concern in my previous reply was cutting to length...now I got the concept that you cut them to the correct length prior to using the router. I would also do a pre-miter to cut away a lot of the waste. I may give this a try. Malcolm / Kentucky USA
 
#9 ·
I tried that in the past with good results. At that time, I had only a low powered 1/4" shank router, and a crummy cheap bit. So I didn't develop that as a go-to for those type of cuts. But I'm glad you reminded me of this idea, and wee where I can use it with an upcoming project. Thanks.
 
#10 ·
Nice method for box making. I make picture frames so the router won't work, so I use a Grizzly miter trimmer to get exact 45s. Cut near to length, then trim one end (about 1/32 of an inch), then but the other end against a stop block to match length and trim the other end. Important not to make the length more than about 1/16th inch long because the trim should be very thin to produce the best result. But for Boxes, pre cutting length sound like a good way to go.

The only thing is that mitered corners are quite weak, so you'd need splines, biscuits or some other method of reinforcing the corners, not just glue.
 
#12 ·
For what it's worth:

-- First, I 'nevva' cut 45 degree miters on a router table. Believe that a well tuned table saw with the proper and sharp blade, miter gauge with stop to ensure repetitive lengths, or a sled for small pieces, is better.

-- Depending upon the stock species and thickness, the larger 3 HP routers probably will work better than smaller/light duty machines. Use only a 1/2" shank bit, not sure if there are 1/4" bits to cut 45 degree miters.

-- As others posted, when/if using a router table, utilize a backer on end grain to prevent blow out and a jig for repetitive cuts to the same lengths.

-- All the digital Little Black Boxes have a +/- tolerance built in, which could show up when closing the miters up.

-- Little Black Boxes need a battery which will need replacement. A replacement may not be on hand when needed, and/ or the replacement battery also is dead, or the replacement size may not be readily/commonly available when needed.

-- I cut my miters on the table saw. On my ol' Uni-saw, I set the 45 degree stop to about 48 degrees. Set it with my Starrett square or another known, accurate 45 degree gauge. I ran the blade to the stop, then backed it off until there was no light visible between the square/gauge and the blade. Did this because I once had a Little Black Box, which I tossed. I titled the blade until the readout said 45 degrees. Put my square to it, then my 45 degree gauge and saw light. Measured the angle with a protractor and sliding bevel and it 47 degrees.

-- Unless you drop or otherwise abuse an accurate square or other known gauge, they will remain true.

 
#13 · (Edited)
Ray, I've always used my tablesaw with a wixey digital cube and my results have been good but I've been curious about doing them on my router given that the bits are already a perfect 45. I do have a 3 1/4 HP router.

OK just tried it and the results were brilliant. Did it flat as harry suggested but used a wide push piece held down by my Grrripper jig. I used a steel ruler on top of the work piece and slid it over the top of the V bit so it just clears. That way I had some edge against the fence on the outfeed side. I also put some painters tape across the two pieces, probably overkill, to keep them together as much as possible. Ray the pieces are cut to length on the table saw first.

I'll post a pic when I'm not busy.
 
#14 ·
Harry thanks to your post and some experimenting I'm a convert.

Admittedly this was only 1/2" plywood and not 3/4" Oak and it was an unused bit, it was so easy and extremely accurate. I ended up gluing the box together and it was bang on square using a digital protractor. I found this much easier than setting the saw blade to 45 then back to 90. Also all the dust went straight through to the DC. There was none in the cabinet. My morning project was to make a vertical sled but no need as horizontally works just as good. I'm glad I tried it first
 

Attachments

#15 ·
John if you ever plan on trying a lock mitre joint which is stronger than just the mitred joint then one side has to go across in the vertical position so don't throw the plans away yet. I'm pretty sure Harry has either a tutorial or some photos uploaded on how to use that bit too.
 
#17 ·
I can't find a tutorial on the lock mitre but these few shots may help The pdf showing how I made a mitred box with splines might also be of interest.
 

Attachments

#16 ·
John, if after the cut there is a small gap on the out-feed side, then the fence hasn't been set-up accurately. The edge of the cutter should line up with the top edge of the wood without actually removing the tip. I line it up by looking along the fence then do a test cut on a same thickness scrap. Just before posting this I noticed that you had snook in your illustrated post which is excellent. Whilst I'm a great fan of the GRR-GRIPPER system, it does't of course prevent breakout, that is why I make and use sacrificial pusher blocks.
 

Attachments

#19 · (Edited)
Just before posting this I noticed that you had snook in your illustrated post which is excellent. Whilst I'm a great fan of the GRR-GRIPPER system, it does't of course prevent breakout, that is why I make and use sacrificial pusher blocks.
I used the GRRRipper as well as a sacrificial piece semi connected by blue tape. In fact I used microjigs push block as well with both of these overlapping both pieces. You'll see that sacrificial piece with bue tape on the right of the photo above. There was no gap in the outfeed fence. I tried a scrap first so my method of getting the bit to the right height worked well. More of a fluke than anything.

BTW What's a snook?

Charles, I don't like the look off lock miters so no plans at this stage.
 
#18 ·
Re-reading the above post I may have given the impression that I only use home made pushers which is far from the truth, as you can see in these shots, the GRR-Ripper is a tool that every woodworker should have and use in order to keep safe, this of course is in my usual humble opinion!
 

Attachments

#20 ·
Another thought. Instead of push blocks what about a coping sled? They look really easy to make, especially the Rockler one. ( Rockler Rail Coping Sled | Rockler Woodworking and Hardware ) BTW I'd never buy one. You can still use sacrificial pieces and with the use of toggle clamps you can hold everything together tighter. Would they make it easier to make my miters? Are they a waste of time Harry? Why aren't they more popular like crosscut sleds for table saws? Am I missing something here?
 
#21 ·
John, this forum used to have the saying KISS, keep it super simple. Why buy or go to the trouble of making jigs if there is a simple, accurate and repeatable method that doesn't require them. A good example is the super simple method of cutting splines as shown in the pdf.
The word "snook" to me has always meant to me "he crept in or he slipped in or he snook in, however, I looked it up in a dictionary and it showed a different meaning!
I hope that I haven't given the impression that I don't make and use jigs and templates because I certainly do, there are routing projects that can't be made without them.
 

Attachments

#22 ·
I really like the simplicity of splines. For boxes, cut the 45 on the ends with the router, the tilt the table saw with full kerf blade to meet the 5 cut at a 90 angle. The fence sets the distance from the end cut to the spline location and the whole thing is going to line up very well. Almost enough to make me start making boxes. Of course, you could glue the thing up without long splines and cut a few into the corners for decoration. Either way, you're going to have strong, good looking corners. Nice string. Lots to learn, including how nice those half inch ply boxes looked. I always like seeing finished edges on Baltic Birch.
 
#23 · (Edited)
I take your point about KISS. I got carried away and made 3 crosscut sleds. Normal, bevel and panel. I only use one of them so I do understand what you're saying. One jig I made (see below) called a kerf maker on youtube. It took me half an hour to make and it is one of my most used jigs. I can't believe that something so simple can deliver such accuracy. No need for a dado stack in my workshop.

Anyway, I did find that if I wasn't careful the piece started to drift away from the fence as well as the sacrificial piece and when you're doing many cuts its easy to loose concentration. I did google "coping sleds" and I liked that some of them had high and low contacts with the fence. Now that I'm sold on making boxes this way and I have a few to do in the coming weeks I might make one similar to the rockler and try it out. I estimate with a few scraps that this will take me less than an hour. It might also become one of my most used jigs. I'll post a pic when finished and tried out.
 

Attachments

#25 ·
I'll try and explain it. The sliding piece on the top when joined with the smaller piece is exactly one saw kerf (blade width) smaller than the bottom piece.

What you do is place the piece that is going into a dado into the gap between the sliding piece and the smaller piece and tighten the knob. The right side of the jig will have a gap that is the exact distance you move the fence. You cut the shoulders of the dado first then nibble away the middle. Snug fit every time. Confused!!!! :frown:
OK this video explains it better.

 
#27 ·
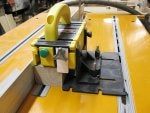
Oops! Misunderstanding. Here it is. Took no time to make and works well. Working piece and backboard are held by the toggle clamp and the other sliding bit. I could have made it to work vertically as well, as in lock miters, but can't see myself doing that in the near future. Does it work better than just using a push block? Not really but it does hold the pieces tighter together and it is easier to keep the pieces hard up against the fence. Should you make one? Probably not.
 

Attachments

#28 ·
That makes far more sense John. It looks to me like it's made for quite wide pieces rather than about 50mm (2") which is typical for small boxes. It's the narrow pieces that can be tricky, hence my use of a zero clearance fence opening and a decent size pusher block with 80 grit paper which holds the work-piece steady as it passes over the bit.
By the way, I'm sure that like me, once you master the set-up of a lock mitre bit, you will use it a lot. there are at least three sizes of lock mitre bits.
 

Attachments