Router Forums banner

Mortising Stair Stringers - Dovetail bit

1 reading
20K views 12 replies 6 participants last post by  Cherryville Chuck  
#1 ·
I've got a Bosch 2HP 1617 EVS router with the Plunge Router option and the Bosch router table.

Just bought 2 new bits, both 1/2" shanked bits. One straight bit to clean up the treads before installing new bullnoses (biscuits and inside the mortised stringers) and a dovetail bit with a 7 degree taper.

I'm a rookie with the router, so I tend to be very conservative when it comes to over-engineering - Safety and Precision.

I've been using Patrick Spielman's Router Handbook as a guide on the Router's potential. When he gets to dovetail bits on long cuts, he recommends 'plowing out' the extra material with a straight bit first, which makes sense to me, to not overstress the dovetail bit.

The housed stringers on my two stairs will have laminated furniture grade 3/4" plywood for treads and 3/4" birch ply risers (I got a deal on the plywood, a couple years ago, and stored it in the house - (flat as glass now.) I'll use 1-1/2" X 1" thick oak to do the nosings with a medium dark stain and the treads in clear urethane. A runner will cover the center (24") of the 42" wide treads.

The dovetail bit is 5/8" diameter and has a 7/8" depth of cut (7 degree taper). I just want to cut into the stringers by 1/2" to set the treads and risers in. This will affect the template's edge, unless I make it from 1/2" Plywood at least, leaving only 1/8" for the collet to ride on. I've never seen a commercial template except in pictures, and the one I saw from England's Trend website looks like its 1/4" thick phenolic plastic (harder than plywood anyway).

The question on the template is should I use 5/8" plywood for the template, leaving 1/4" for the collet to follow, or make another template for the Straight bit to plow the big mortises first?

The second question is about the wedges. I'm making the wedges out of oak, on the tablesaw. The faces will be square. Logic tells me that with a 7 degree tenon to fill with glue, that it won't be an optimum bond to the stringer. Am I wrong? If so, how would I make only one side of these narrow wedges with a 6 or 7-degree face?

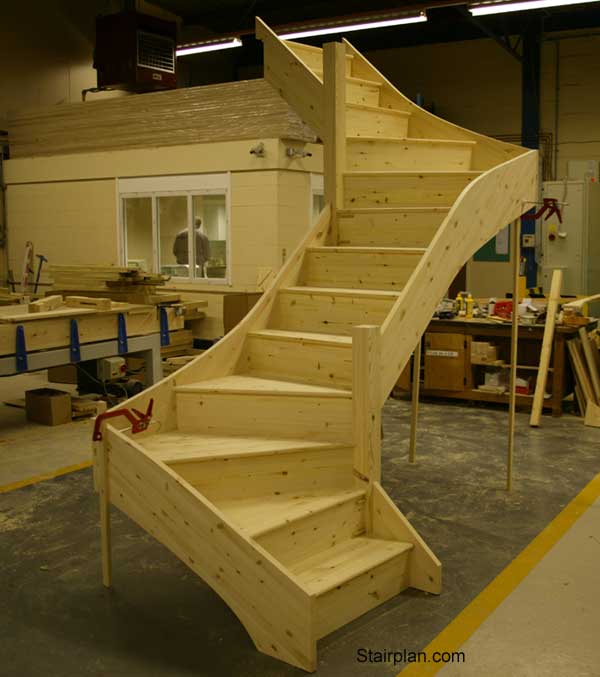
I may be making a mountain out of a molehill, but the Up Stairs have a 4 -step winder at the top, also house on the outside turn. I have to do a winder at the top, to clear the 45 degree pitch (12:12) on the roof and get the legal headroom. Easy enough with a 42 inch tread. But that also means that the 4 kite treads will need some solid support on the outside turn, in those mortises. And the wedges for those is just over 22" long. Am I worried for nothing about refacing the underside of the wedges to 7 degrees?:confused:
 
#2 ·
Norm, I am no expert at stair building but it strikes me that you might be better off using the full width of the plywood in a dado instead of dovetailing it. All the load will be focused on the two edges and it seems like you would be better off not reducing the thickness of the plywood. I am sure one of our experienced contractors will weigh in on this. Please take some photos of the build and post them; members love to see examples of how jobs are completed.
 
#3 ·
Thanks for the comment. I didn't intend to taper the treads or risers for the mortise, just the stringers. If I could post the link to the TrenddotCOdotUK website, I could show you how their 'staircase routerbit' cuts the mortise. The tread and riser ends remain flat. Its basically the same bit as I bought.

Bosch offer a 7/8" diameter Staircase bit also, with 7-degree angle, but my risers would be flapping in the Prairie wind.:no:

Yeah, I'm looking forward to some expert input, for sure. As it is, especially for the top end winder steps, I'm relying on the ONLY resource I've found on the methodology, from an 1905 book, titled, "A manual of carpentry and joinery" that I found on another site called "evenfallstudios.com/woodworks_library/".

Excellent reference on all things wood! Even describes how these masters cut their mortises with tenon saws, by hand, after 'boring' the nosing profile in the stringers. Routers were pedal-powered and strictly floor-based! We've come a long way, eh?:)

I look at the studs and techniques used in my old house, and am amazed that this wood is over 100 years off the tree, which probably took 100 years to grow big enough to harvest (all Douglas Fir and REAL 2 X lumber! Even the old 'square peg' iron nails are still good! Amazing when I think that we often get 60 MPH and higher winds!

Right now, I've got my drawings in Punch Software's Architect series format. I hope to start cutting and prepping the treads on Monday, and the stringers shortly after.

My plan is to build the winder section separately and mounted on its own four posts, connected to the two side walls for the main stringers and the end wall, shared with the kitchen. The new pantry is below these stairs and above the new basement stairs. The outer stringer will be mortised and tenoned into the winder's outer stringer, all 2 X 12 fir.

Most modern stairbuilders make the straight stair winders at the bottom of the staircase, using almost box-like frames below each kite tread. That book I mentioned, does add intermediate tread bracing, but only below the tread to allow 90 degree bracing back to the staircase headers at the main staircase and at the top of the flight. Much lighter, although a bit more technical.

But I'm open to ideas.:)
 
#7 ·
I didn't intend to taper the treads or risers for the mortise, just the stringers. If I could post the link to the TrenddotCOdotUK website, I could show you how their 'staircase routerbit' cuts the mortise. The tread and riser ends remain flat. Its basically the same bit as I bought.
Hi Norman

You'd be right not to. The stringer is routed with a very shallow dovetail bit for two reasons; first lt to provide the glue with somewhere to go to - on something as long a a stair the hydraulic pressure from trapped glue would lead to some difficulties in cramping up, and secondly the dovetail edge to the housings allows for greater compression of the joints, in other words it is possible to cramp the components more tightly and thus minimise the tendency for a multi-component piece such a stair to creak as timber stresses change because of either load or environmental changes (air temperature, humidity, etc). The wedges themselves are normally worked on a saw and are square edged, not dovetailed. I wouldn't be too worried about routing the housing in one pass, either. That's normal practice using an 1800/2000 watt plunge router here in the UK.

BTW can you see this link to the Trend UK web site knowledge base, and was it the one you were referring to? If not PM me and I'll try to link to the appropriate page

Personally I'm not so sure about using 3/4in plywood for the treads. I feel that it's a bit too thin and may well flex in service. I'd prefer to make the tread complete with nosing as a singe component, that way you also get more material to groove on the underside of the tread where the riser fits into the underside of the tread. I'd normally be looking for 25 to 32mm (1in to 1-1/4in) thick material for the tread. Conversely the riser needs only to be 1/4in thick, although my own preference is to use 1/2in stock. Going any thicker just adds to the weight of the whole and makes final installation that much harder.

The technique for building stairs with kite winders is as you surmised to build the kite winder sections as separate components. These can't be worked with a standard jig as they need to be set-out separately with each tread being different. The outer stringer is made-up from two or more pieces of timber glued together to get the required height. You can see an example of this on the Stairplan web site:

Image


Note the stub newels used in this form of construction. When I've installed these (and I've only done a couple or so with kite winders at the bottom) the lower kite winder stair is positioned using temporary setting sticks (CLS/3 x 2in softwood or whatever), levelled and fixed into the floor and wall (through the stringer beneath the treads) then the upper straight section is lifted into position atop temporary setting sticks, attached to the kite winder, fixed at the top into the trimmer joist and once again fixed into the wall through the stringer. Once all the glue has gone off the temporary sticks can be removed and newels, etc fitted as required. I don't see a stair with a winder at the top being much different.

Regards

Phil
 
  • Like
Reactions: Rogerdodge
#4 ·
Well Mike, you stirred up my brain cells! Thanks! My wedge-making jig is similar to this one:

Shim Cutting Jig | THISisCarpentry

Where he describes the height and location of the miter guide rail on the jig (3rd picture). All I have to do is make a thicker guide rail for the angle cut (2 small jigs actually) One to recut the remaining angled face on the oak stock board at 7 degrees back to 90 degrees. A bit more work and wasted sawdust, but I'll come out with all my fingers intact.:)

I don't plan on touching the plywood treads. The wedge itself will push the tread up into the angled (routered) upper edge, acting as a grip. All glued in and wedged, the treads won't move in my lifetime.

Kind of under pressure, with real cold weather coming over the next few weeks. The insulators need above freezing upstairs to use their cellulose blowers. The rest of it is batts.

Thanks for making me go the extra mile! :)
 
#5 · (Edited)
Hi

I'm no expert but I use the band saw to make the wedges quick and easy without the need for a jig, just pitch the fence to the angle you want to use and buzz them off by the tons.. :)
But I do use the table saw with the table saw sled from time to time also, I just pop in one of the wedges on the back side of the sled and it's set to buss them off at the right angle.

I guess I should say how I cut them out, I start with some 1 1/2" wide stock that I ripped on the table,then cop saw them into the parts I want to use then set the band fence up and push them by the blade and then a get a pair at one pass that just drops off the end of the table into a cardboard box when I done I'm set with the wedges in the box..the norm is 50 pair or so..about a 10 min. job... :)


===
 

Attachments

#10 ·
Remember that song, "Torn between two forum posts (aka lovers :lol:)? I saw Phil's and your links, and went to see the links first. Holy smokes, the talent around here! I knew I came to the right place!:dance3:

Thanks for keeping me in mind. Truly appreciated.:)