Router Forums banner

My home made router milling machine

42K views 49 replies 29 participants last post by  giman  
#1 ·
I have been reading the forum for a while now seeing what everyone is building, It just amazes me. Anyway I thought I would share with you my creation I have been working of for a couple years. This is the third one I built, improving it each time and I am already planing the next one.

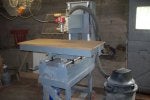
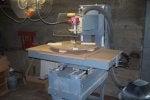
It is basically a milling router. I have 20" of forward and reverse, 30" of lateral movement and and 10" of up and down movement, All controlled by hand cranks. Because a router can cut pretty fast the forward and lateral cranks will move the table 1.25" with one turn. The up and down movement is slower though.

It also has a rotating table attachment and the overarm head can rotate to angle the router.

It is a ball to use and the things you can do with it are just incredible. I am just getting to the point where I am getting a real feel for what it can do.

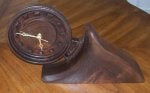
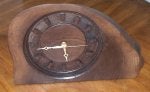
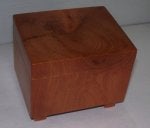
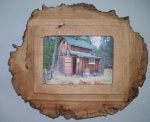
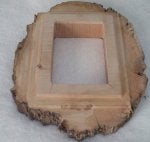
There are pictures included of a couple clocks I recently milled out of some slabs of black walnut I had. It was effortless and quick. The one clock that is has the block on the right was milled from one piece there is nothing cut or glued on. I have also included a picture of a piece of 4x4 that I was just messing around with to see some of the possibilities.
 

Attachments

#2 ·
Welcome to the community Mark.... glad to have ya join...

You obviously got some skills going on there!!! Built it, then use it....you have to spend sleepless nights just thinking up the possibilities. very cool stuff!!!

can't wait to read more...
 
#3 ·
Hello Mark, VERY cool! Keep the posts with photos coming, I am interested in seeing what else you create.
 
#4 ·
Welcome to the forum Mark, interesting mill and amazing results from it. My guess is that a great deal of left and right hand coordination in required to operate the X Y table, quite apart from the table height!
 
#5 ·
Twoskies57, Yes I did spend a lot of sleepless nights figuring this thing out and am still loose a wink or two over it.

harrysin, At first it was a little confusing to operate the cranks and at times made a few oops turning them the wrong way. But they are set up to turn in the direction you think would move the table.

Jack,
It works really great for surface planning odd shapes or end grains that you cant run through a planner.

Here are a few other things I created with it.
The first is a simple box that was milled out of a piece of cut off drift wood.
The second and third are a couple cedar slabs someone sent me to make a clock and a picture frame for their log cabin.
The one is a piece of oak milled into a picture frame.
And the last piece is just a piece of tree root surface milled as an experiment.
 

Attachments

#9 ·
You've actually given me an idea Mark, I have a drill press converted to a mill/drill, with X Y table and micro down feed. I'm thinking that if I make a short housing for my Aluminium ended Makita trim router with a #2MT spindle that could go into the quill in place of the chuck, then, providing that the weight of the router allows it to stay put, I could see how much my coordination has suffered in the last 25 years since I made this four way tool post with a one piece tapered ball handle made using the top and cross slides. It's definitely on my "to do" list
 

Attachments

#11 ·
hello Mark: Welcome to RF. Great piece of equipment, and very tallented ONE of a kind
artifacts.
 
#14 ·
Thanks for the thumbs up everyone.
To answer some of your posts and questions,
Dave,
It is really not that hard to use. I basically draw reference marks on my work and cut to the lines. If you ever used an etch a sketch before it kind of the same thing.

Sante,
Yes, it is mostly wood, Plywood frame with MDF work surfaces. The slide rails are 1 1/4" tubing with 1" thick nylon bushings I made. This works but is not the ultimate setup yet for me.

Harrysin,
I thought I might get some people thinking about how to make one. I like your idea and I think you will have fun with it until you find it's limitations then you will be ready to build one from scratch.
To be honest that's how my idea started, I had a much smaller version of a cross slide table that I experimented with.
Like I mentioned before a router can cut fast and you will get tired trying to turn the cranks on a cross slide table.
In fact the first one I made I used threaded rod to move the tables and one turn would only give me an inch of movement, I really worked up a sweat trying to move the table as fast as the router could cut on bigger projects.
I racked my brain trying to come up with a faster movement and although it seems unconventional I came up with something that works. It's hard to explain so I will try to get you a picture of it tomorrow.

If anyone is interested I will make a short video of it in action tomorrow.
 
#16 ·
I vote for a video!!
Love to see it working.
 
#17 ·
Yes I video would be awesome. A couple of questions. What is motor and pulley that is mounted up in the ceiling to the left of your machine? And is the cord leaving the router the power cord? I only ask because a friend looking over my shoulder here wanted to know if it was an air driven router?? Great setup up. I love it, i bet its a blast to use.
 
#20 ·
I posted some videos on youtube. They are not great but you will get the point. There are a total of 9 videos. I basically took a piece of black walnut and turned it into a bowl with little feet on the bottom. I am not trying to compete with a lathe but this is just a possibility to show an example. I had trouble with my battery so some of it is fast forwarded.
Any way go to search and put in (wood router mill carving video 1) then go to wood router mill carving video 2 and so on until you see all 9. They may not be all loaded yet it takes a while.
 
#23 ·
OK I finally got a chance to load some video but I ended up using photobucket instead of youtube. Anyway I can build just about anything but I am video challenged. They are a little boring and they jump forward now and then because I didn't know that my battery was going dead and because I had a fan running it is hard to hear me.

The first video I mounted a rough cut round piece of black walnut to my rotating table with hot glue. I hot glue a piece of 1/4" luan to the table then hot glue my piece to the luan. Then when I am done I just pry it off and the veneer from the luan peels off where the glue is. Then I just use a sharp knife or chisel to cut the glue off my piece and my table.

To see them go to Pictures by routermill - Photobucket
 
#24 · (Edited)
Hi Mark........ I can tell you are having a blast with your machine. Curious to the size and length of the bits you were using and where you got them from.

I ran something similar to it 33 years ago. It was used to make printing plates for greeting cards. The material being cut was magnesium that had been etched with acid leaving the image(s) to be printed slightly higher than the rest. With a sharp bit we would go in and shave the material not to be printed and clean it up with a chisel/engraver......... I believe on that machine that the height was partilally controlled by foot and the X and Y were by a handle on the front and a handle on the left........ Brass was also used for printing plates and the high detail work was all done by hand with a chisle/engraver
 
#27 ·
Ted,
Thank you. I think of things every day that I want to try with it.
I did put a lot of work into it and it's still not perfect. It's biggest downfall is, it is mostly made of wood and although my moving parts are metal and nylon they are connected to wood and when it is humid things swell up just enough to make things inconsistent from one day to the next causing slight movement problems on my table. So this winter I am gathering everything together to make the real one out of steel.

As far as getting used to using it, it just takes some practice. You get a few opps I went the wrong way with the turn of the handle when you first start. But it's like driving, or running a back hoe, once you do it enough it's like second nature.