Router Forums banner

Routed Fingerhold - Best Practice?

11K views 9 replies 8 participants last post by  Herb Stoops  
#1 · (Edited)
I make cutting boards - a lot of them - for sale at local craft fairs. I route finger holds on the edge of most of the boards, and I have a problem.

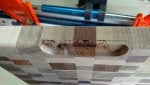
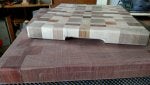
Many of the boards I make are end grain, and when I route across those end grain boards with my router, I get tear-out. I've had boards with a great deal of tear-out that runs 1/4" deep, so I've been looking for a solution.

Here's my current sequence. Is it the best practice, or is there a better way? Oh wise ones, please help!

1. set up the router table with a bowl bit & end stops to define the length of the finger hold
2. mark the board to indicate the length of the routing
3. use a steel rule and utility knife to score the wood fibers across the length of the planned finger hold
4. nibble away at the routing, going no deeper than 1/16" per pass

Please advise how you would do it. I'm open to all suggestions, but I like the finger holds as designed. I get many positive comments from people that like them.
 
#3 ·
#4 ·
Looking at the pictures...it seems the right side is clean and worse on the left side...that would indicate good entry and proper direction (right to left).

Are you dropping the board onto the bit and then moving to the stop...?

I would try putting bit at full height and adjusting depth by moving the fence...

Are you sure the bit is good and sharp...?

Have you tried an aux fence so that you have zero clearance at full bit height and depth (act like a backer)...?
 
#5 ·
Is there a reason for the thin lip, which looks awfully fragile? Could you make it in two set ups? Like make shallow cut the height of the lip, then set the fence back and make the finger hole cutout?

You could clamp some stop blocks to your table so that the fence could be slid back to the correct amount without a lot of set up measuring if you had many to do at a time. Good looking board,all the work you put into them,you surely don't want to take the chance to have them tear out at the last minute.

Another thought, make the board a tad long and make your cut , then trim it off on the table saw. Or another way attach a sacrificial piece to the end and make your router cut, cutting out the thin end, then remove the piece.

Herb
 
#6 ·
The end grain boards will chip no matter.
You need to change the design parameters, essentially location.
And use a templet and a plunger.
You do way above average on the RT. Notwithstanding, you'll have more control with a hand router. If you can make an acrylic templet you can actually see what you're doing.
On the RT, you're guessing at what's happening.
 
#7 ·
Henry I do something similar to what you do, but I clamp wide pieces of 3/4" plywood to the router table
(as a guide) make full height but shallow passes using a 3/4" straight bit and do not get tear out. I recently bought a
Freud Hand rail bit #99-444 and make a cut all the away across the board. That way they can use either
side. What I tell them is always use one side and keep the other side for show.
 
#9 ·
I agree with Joe (tacomamactech),

I would cut smaller finger holds between the top and bottom edge like in the link that he attached. I would also not use a router table. I would use a bit with a full rounded end. Stand the cutting board up on end in a vice, and then use a router edge guide for positioning a plunge router on the center line off the cutting board edge while riding the edge guide along the board's face or bottom surface. You would then be making circular cuts into the edge of the cutting board and avoiding the top and bottom edges, so there should be no tear-out. Position stops to keep the router from going too far in either direction, and don't hold the router at either end position very long or you may get burning. It's kind of like making a shallow mortise with the router, but using a round nosed bit.

Charley