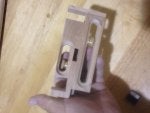
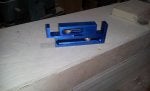
I came across the kerf maker jig concept recently and decided to make one and try it out. Basically, the jig helps you set your table saw so you can make tight-fitting joints, grooves, and dadoes using the kerf on your table saw.
The jig helps you set the two edges of the cut and then use multiple passes of the saw blade's kerf to whittle out the rest. I used it to cut dadoes for 1/4" mdf dividers in a drawer for the sewing center I'm building for my wife. The system worked very well and made tight fitting slots.
Here's a video of a high-end version that shows you how to use it: KM-1 Kerfmaker - Bridge City Tool Works
And here's another that shows you how to make one: https://www.youtube.com/watch?v=iL5lrmrbgKc
I made mine out of some scrap 3/4 oak and made it so I can make up to a 2.25" wide cut. Between my success with the drawer dividers and a tight fitting lap joint I made while testing, I'm convinced this jig ticks all the important boxes:
◻ Easily shop-built
◻ Inexpensive
◻ Takes minimal space
◻ Simple to use
◻ Accurate
◻ Works well