Router Forums banner

Sommerfeld Table

11K views 31 replies 17 participants last post by  Goblu  
#1 ·
Does anyone have any experience with the Sommerfeld aluminum router top? Thinking about it...

Appreciate the comments.
 
#3 ·
Marc builds quality products and gives excellent support for them. That being said I prefer tables with a Formica surface on Baltic birch plywood like the Router Workshop table.
 
#4 ·
I have taken a community college class for the past year and the shop they hold it in has a sommerfeld table setup on the cabinet shown in the ad. I have used the table and love it. It is so easy to set. I like it so much that I have one I just got and intend on using this fall semester to put it together and build the cabinet shown in the advertisement. Hope this helps.

Gene
Willcox, AZ
 
#5 ·
Hello guys and gals

Been a member of the fourm for some time thought I introduce myself. I am Erwin been a wood worker 12-15 years, still learning. Going to take wood working into retirement with me.

Have the Marc Sommerfeld router table and enjoy it, big, stable will support any router.
I have called to order parts, supplies and ask question, Marc and staff always a big help.

I enjoy the form and seeing the members great projects.
 
#6 ·
Been a member of the fourm for some time thought I introduce myself. I am Erwin been a wood worker 12-15 years, still learning. Going to take wood working into retirement with me.

Have the Marc Sommerfeld router table and enjoy it, big, stable will support any router.
I have called to order parts, supplies and ask question, Marc and staff always a big help.

I enjoy the form and seeing the members great projects.
Thanks for the introduction, Erwin.

Welcome to the forum.:happy:
 
#9 ·
Welcome Ragin Cajun, and Erwin... I have not used the table You are refering to but do like aluminum inserts and aluminum will not rust
 
#14 ·
UPS just left....

UPS just left and they dropped off my Sommerfeld router table top. I opened the boxes to look at the components and I must say that I am quite surprised at the thickness of the top. I was not expecting as much mass in the sections. The fence is a beast!! I am looking forward to putting it together.
 
#15 ·
UPS just left and they dropped off my Sommerfeld router table top.
Looking forward to your report. I need to figure out where to put a full-sized table, in my already chocked-full of tools and cramped on space shop. However, Marc's table is on my 'want' list after watching a couple of his videos and seeing how easy it is to setup.

One question for you, what router is going in it? I have the Milwaukee 5625 3-1/2 HP, which is what he is now selling, but it doesn't seem to me that it would work as well as the Triton he uses in his videos (and use to sell).

-Wayne
 
#17 ·
I seem to remember, from Mike (Detroit), that Marc slightly 'crowns' his tables. I'm out of my depth here, so I'll leave this to the Forum. As an aside, my understanding is that Norm Abrams did the same thing.
My recommendation is to keep the Bosch - that is, not spend the money initially for the higher HP, as I've been using 2.25hp for ages, and have yet to want for power. I try to take two passes on really deep cuts for both safety reasons and concerns of placing too much stress on the wood being worked.
 
#18 ·
Getting there guys. Put the table top together and I am in the process of building a temporary base until I can build the cabinet for it. I will probably go with the cabinet that Marc has designed for the table. I can say at this point that the quality seems really good and the table from what I can tell is very flat.
 
#19 ·
The crown that Mike is talking about is a feature of the Rousseau mounting plate. It is the only plate made this way and a patented difference. The slight crown ensures that the wood always passes the bit at the same height. This works great unless you are trying to use an aftermarket jig with it. Norm used a Rousseau plate in the first NYW router table for about 10 years. The first table I built included a Rousseau plate and I was very happy with it. All other mounting plates should be flat and either level with the table surface or a few thousandths higher for the same reasons.
 
#22 ·
Hi Glen

I to wanted a insert to hold the PC guides for me in the table so I used a PC sub base plate, very easy to rework one...and the cost is peanuts the norm.


===
 

Attachments

#23 ·
Sommerfeld table and cabinet...

Hi, new to the forum and have been using a homemade Pat Warner style table with a Rousseau plate and DW625 router for years. Just curious what brand and length of drawer guides he uses on his drawers in the advertised cabinet? I see the plastic/magnetic dust shoot (steel inserts in the fence for magnet to attract to? or does he have aluminum magnets ;-)) and am wondering if he has in his plans provisions for dust colllection in the door/cavity under the router bit? Would it be possible to mount a verticle plate to the back or front of the Sommerfeld router fence for horizontal routing? I'm just full of questions! :)
 
#25 ·
Sommerfeld Router Table system

I recently purchased the entire Mark Sommerfeld router system and love it. I even drove 5 hours to pick it up at his warehouse because I wanted to see it before I bought it. My explanation on why I love it is a bit long but it may be useful to others who are considering it.

I am a reasonably experienced woodworker. I have made many cabinets, lots of raised panel doors and many other items over the years. After building a complete set of kitchen cabinets, I decided I needed to find a better routing solution for cabinet joinery and for routing the complex joints for raised panel door and drawer fronts (rail, stile, panel). I found it in Mark’s system.

Mark rethought the requirements for cabinet joinery and panel door creation from the ground up. The magic, to me, is in the height-matched bit sets. Once the first bit in a set is configured (which is easy with the Easy Set jig) you are done with router height changes. You simply swap bits from a set back and forth as needed and everything aligns perfectly (assuming you have flat boards of equal thickness). I purposely did not route all pieces for a given bit to force multiple bit changes just to see if they always self-aligned – they did and do.

To make the height-match bit set work, you need a way to change the bits without having to raise the router height to access the collet to loosen/tighten. Mark’s system addresses this issue with the Triton router (I bought the 3-1/4 hp unit) and angled wrench. Bits are easy and fast to change. No need for a lift.

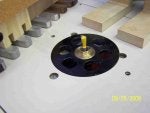
Because the Triton router was designed for under-table mounting it has great coarse and fine height adjustment controls. The Triton can be bolted directly to the table so there is no need for expensive router plates (which must be leveled with each use). This is the best router I have ever owned or used.

The final piece to the puzzle is Mark’s fence. It is long, heavy and stable. The interchangeable bit plates allow you to make cut-outs for particular bits so your boards are in almost constant contact with the fence during routing operations -- more than any fence I have ever used. And the plates are easy and fast to swap as you change bits. The fence pivots on one end so aligning the fence to each bit is easier and faster other fences I have used. Just watch one of Mark’s videos and you will see how it works.

My first project was Mark’s router table cabinet. I made some modifications to his plans to meet my needs and I made the cabinet in, I estimate, 1/3 the time of my previous router system and methods. The joints were tight and accurate and the raised panel rail, stile and panel joints were as good as any I have ever made. I really did not have to think much about all the joints I needed – his bit sets just work.

If you don’t already have a routing system I highly recommend you look at this one. I don’t think it is any more expensive that other solutions, especially since you don’t need a lift, router-mounting plates, or even multiple routers. I am hooked on this system. From what I have been using for years, this is a better design. It is purpose built for making cabinets and raised panel doors and drawer fronts.
 
#26 ·
Hello, I'm new to the forum. I'm considering the Sommerfeld Tools complete setup as well. My specific projects are kitchen island, closet system with drawers, and other built ins. Raised door panels will be used for all of the listed projects.

My specific questions are for ed from eagan since his post seems to be the most recent on Sommerfeld's setup, but feel free to chime in. I have spent many hours viewing Marc's step by step videos on youtube. On his first video, when attaching the router to the table, he had to remove a bit of the aluminum of the Triton router.

1.) Did you have to trim the aluminum on the TRA001 to accommodate above height bit changes using an offset wrench?

It seems that when changing bits, Marc would open the cabinet door, and hold a button at the same time loosening the collet above the table using an offset wrench. I'm assuming the older model had a collet lock button?

2.) How can you remove bits from above the table without changing the height of the router? It seems the new TRA001 needs to be plunged to max depth to engage the collet lock which defeats the entire purpose of matched height bits.

Look forward to your replies.
 
#28 ·
Sommerfeld Router Table system


Hi Rod --
1. Yes, I had to trim the aluminum and part of the plastic shroud. It was a bit scary but only tool a minute. You must trim these router pieces to the size of the table opening so that the offset wrench will be able to fit under Mark's large raised panel bits. Being able to fit the offset wrench under any of Mark's matched bits is what allows you to change bits (from a set) without changing the height of the router - which is part of the magic of this system.

Mark is pressing a collet lock button when he opens the door. When using the TRA001 mounted under the table you do not use the plunge feature. In fact, in one of Mark's videos he shows you how to remove the plunge spring.

2. I answered this above. When using the TRA001 mounted under the table you do not use plunge mode.

I have now made about 50 panel doors (another 32 on the way) using Mark's panel door bits and several cabinet boxes with his tongue and groove set. They work great, just like on all of his videos. I have some friends who own a log furniture business and they recently switched to Mark's system. They now make their cabinet boxes and panel doors on Mark's system. They even started making their drawers using his tongue and groove bit set. They love the entire system for all of the reasons I state in my original post.
 
#27 ·
Hello and welcome Rod to the forum.
Yes you have to lock the bit, but with a offset wrench you can remove the bit from the top with moving it, the reason he trim the aluminum, the wrench will not go under the larger router bits use in rail and stile manufacturing. ( really not a big problem to worry about)
 
#30 ·
Hi,
I have an older Sommerfeld phenolic table using 4.5" inserts and have destroyed two of them. I'm just looking for replacements. Having talked to Sommerfeld employees, and after ordering the current ones(which are too small), I made some from some plastic stock scrap. Works OK but sure would like to find replacements.
thanks,
Qball
 
#31 ·
My opinion in 2 points :
• The best table is the one you make
• The simpler, the better.
The simplest table, which I call "the 15 munutes table", is a bit of MDF with three holes in it : a big one for the bit, two small ones to hold the router. Just clamped on the bench. It may be improved, but it's quite effective to begin.