Router Forums banner

Table Sled Runners - The hunt continues...

43K views 290 replies 32 participants last post by  bryansong  
#1 · (Edited)
Okay.
As many of you know, I am totally clueless and new to woodworking.
I am planning to build a Crosscut Sled for my Kobalt Contractors table saw.
Crosscut saws are almost as unique as fingerprints, there are so many variations out there.

Runners are my major speed bump.
I just can't justify spending $50 for Incra steel runners.
But beyond "use hardwood," everything gets iffy and cloudy.

I saw a YT video, where someone used a piece of cocobolo wood flooring they got from a hardwood flooring dumpster (possible wood source?), and that got me thinking...
could I use a length of hardwood flooring to make my runners???
Here is the list of what my nearest floor shop offers:
http://columber.net/hws2s.html

It's 3/4 thickness, 2 1/4"-5" widths, sold by the square foot...
Which wood would be best to get?
Is Purple heart worth the expense?
The price beats the $8-$10/sq. ft price from the Orange Box store...
And the selection of hardwoods is better. Like I need more confusion of choice...

~M
 
#2 ·
Oak, ash, hickory, walnut, maple if it's straight. Whatever is cheap. Mine are made from white birch because it is what grows locally and I have lots. They've proven to be very durable. Drill and countersink screw holes to mount them and if they ever wear out you can replace them. The fit isn't as critical as you may think as long as the runners aren't sloppy in the miter slots, especially if you go with the sled that straddles the blade.
 
#3 · (Edited)
Moz, you,re making the runners to complicated. If you don't have any hardwood to make the runners just romp over to HD or Lowes and buy a piece of 3/4 oak, maple or even poplar long enough to make them. The first sled may not be your last. Do you have 3/4 plywood for the base? Good straight 2x4 for the fences? Relax, think it through and sketch out a simple little drawing of what you're going to make.
 
#5 ·
Moz
I have to agree with others here - you're overthinking this. If you don't have any hardwood scrap lying around, just pick up a piece of 3/4" - doesn't have to fit the slot perfectly, but should not be sloppy. It won't be your last sled. You have to remember that you're not building fine furniture, it's a shop jig

Here's an analogy: some guys spend so much time designing the "perfect" workbench a la Christopher Shwarz, that they never get one built. Nice to have but not necessary. I put my workbench together over a weekend out of dimensional lumber and mdf. Attached a vise to it and works fine.
 
#6 ·
...made mine out of 1x3 leftover...wasn't even straight...used the mounting screws and a square to straighten them out. I have about 8 screws holding each runner on.

Couple of pennies underneath each runner, put tape on one side, slip it into the track...drop the sled on it, square it up using the edges of the saw and slide it off one end just enough to get a screw through each runner and into the sled. Do the same for all 4 corners. Then turn the whole magilla over and, using a square, screw in the runners. Peel the tape off, wax the bajeezies out of the whole thing and then put your fences on per your desired method. Be careful how much you tighten the screws if they are tapered...it will expand the runner and then you're back to zero. Counter sink the runners with a brad point bit and use flat head screws. Your choice on whether you glue them down or not.

The last one I made for the 4100 I used maple...wanted to treat it good... :)
 
#8 · (Edited)
#12 ·
I think Mike first turned me on to the 5 cuts vid, and it is what convinced me that even if my crosscut sled is fairly sad in construction, I stand a decent chance of at least making it accurate enough for government purposes...

Good to know Oak is sufficient and purpleheart may be overkill...
From a post by one of the Moderators over at Woodtalk.com:
Use hard maple or purpleheart or bubinga or any other very hard hardwood. Mahogany is too soft, too. Pine is way too soft.
And that from a thread, "Making first crosscut sled..."

I had never heard of purplewood in my life, until I watched a guy cut his runners for a crosscut sled, and discuss how purpleheart was the hardest wood he could find for them...That video is probably where my poor little mind started to unravel, as he waxed poetic about how the purpleheart wouldn't warp or wear down as quickly...

FWIW, I am finding it hard to locate good old Johnson's Paste Wax. I bought a can of the Boeing anti-rust spray ($10 a can, I'mma be protecting things I have let go to hell for decades! Might even rust protect the cats.) and all I can find are super duper god-knows-what waxes screaming they have carnauba was in them...Too much selection of crap in the world sometimes...

~M
 
#15 ·
you have 5 Lowes in town...
four of which are super stores..
open early..
close late..
prowl them...

the store on Constitution and Powers is a dump and leaves a lot to be desired..

you have several guilds (2?) and WW clubs (3?)..
also there is Colorado Woodworkers on Filmore...
they are a club...
Woodcrafters has classes....

visit..
get on the mailing list...
pick a class...
go to school...
 
#16 · (Edited)
I just buy a length of the straightest hardwood I can find at HD and rip it slightly thinner than the total depth of the miter slot. Sand to fit if necessary, but a 3/4 piece will likely fit nicely. I use the penny trick.

I don't use screws to attach the runners, and prefer to apply glue, then line up the ply base with the fence (better make sure the fence is precisely aligned first), then drop the ply base onto the runners. I do bring the fence over so I can line the ply base up with the fence. The blade will cut parallel to the miter slots regardless of whether or not the base is perfectly lined up.

The last step is adding the sled's fence, the 2x4. Use a carpenter square to align perpendicular to the saw blade. Make sure one leg of the square is lined up with the body of the saw, not touching the tips. You can hang the bottom of the sled slightly over the front of the table saw. I apply glue then to the bottom of the sled fence, then if you have a pin nailer, once you align the bottom to the square, pin the sled fence on one end from below. Double check the alignment and then pin the other end from below while holding the board so it stays aligned. By the way, before I do this, apply lots of paste wax to the saw's table so the glue won't stick. Make sure it is wax and doesn't contain silicon or othe lubricants. If you use a pin nailer to hold the alignment, you don't need to use a screw because the glue joint will be plenty strong.

You will also have to put a front fence on your sled to hold it together after the blade cuts through. The alignment of the front fence is really not critical, unless you are a perfectionist.

I agree that its a good idea to apply paste wax to runners. Some people like to dress up their jigs with some light finish or even wax.

The most important thing about runners is making sure they fit the miter slots without any side to side movement. That will cause you problems. But it is all for naught if you don't make sure the sled fence is exactly perpendicular to the blade. Take your time setting that fence just right.

Much easier to do all this than to describe it. I know others like to use countersunk screws on the runners but I like my glue and pinner method just as well. Use the penny trick mentioned above to lift the runners slightly above the table surface. They need not touch the bottom of the miter slot. Many people will glue a 3-4 inch chunk of hardwood to the back, center of the sled fence to safely bury the blade so the whirling appendage remover is not exposed when it passes through the fence.

And, of course if you screw it up, make a new one. It will probably come out perfect the second time because you'll know what not to do from the first try. I predict that once you start using jigs, you'll be making a lot of jigs with runners, so learning to handle this process right pays off for many years.
 
#17 ·
Moz; not sure if it's been mentioned here yet, but be extremely wary that any thing you use in the way of waxes and aerosols especially, don't contain any Silicone. If it transfers to your project it'll likely ruin the finish.
Carnauba is excellent; it's the hardest wearing wax. The problem is like everything, just because it says it contains Carnauba, how much do they actually use in their formulation? More is better.
As has been mentioned, stay away from automotive waxes...SILICONE CITY!!!
Paste Wax-Blue Label - Mohawk Finishing
 
#18 ·
That is exactly why I turned around and left the store empty handed.
I had read here to be wary and avoid silicone.
Johnson's Paste Wax has always been mentioned as the old standard that is still as good as it ever was...So that is what I will use.

Once I find it...So appreciative of the Hardware Store directional. TY!
~M
 
#22 ·
I had rendered some beeswax from a honey harvest back in September, and Ozer was helping me, by dumping the "wash water," containing all the impurities from boiling the honeycomb out in a corner of the yard, since it's organic.

I had just finished a second boil, and strained out the big pieces of gunk,and asked him to help me dump it. I turned to the sink to wash out a bowl i was using, and heard the back door open and shut. The gunk water was in a pan next to me, and I couldn't figure out what was going on. He comes back in, and hands me my previously full of wax pot, now totally empty...Since it was melted, he didn't really look at it, and assumed that was the pot I wanted dumped...
He felt awful, but I just laughed and told him not to worry. It was going to make a candle, so I just laughed and said we burned it up really quick, and saved me the cost of wicking...

Rendering beeswax is a true PITA, because cleanup is a bear. I have to use metal or heavy glass for everything, because the only way to clean up the residue is to warm it in the oven until I can polish it off with paper towels...no washing it off...

THANK YOU for that recipe. I'd use coconut oil because it has a low melting point.
I won't be seeing any wax now until next year. When I relocate The Wild Bunch to their new hive I'll be building this Winter, I will need any and all old comb for swarm traps and to help orient the girls to their new digs.
But, to wax my tablesaw, I may pick up just a couple ozs at the health food store and whip up a batch of butter.

~M
 
#24 ·
It hasn't arrived yet...
And that is only for the bottom coat. Everything I've been reading says you should then wax OVER the Boeshield, preferably with good old Johnson's Paste wax.

Why? I have no clue, but "They say" (Ozer always chimes in, "whoever THEY are...") your sleds and everything glide better if you wax over the Boeshield. So wax I plan to do...
~M
 
#27 ·
what for...
 
#26 ·
I was just thinking of checking Amazon. Ozer will probably be ordering stuff in the next day or so, I'll add a can to his Wish List. Thx!!!
~M
 
#28 ·
FWIW...overthinking is an overstated concept... What you are doing is finding information sufficient enough to make your own informed decision. That more paths show up along the way does not mean the result is any closer or further. We all go through the same predicament and not just in this solitary hobby...every time we run into something new...fishing, hiking, reading, new store in town, new product, new job...it doesn't matter. Wait till you slowly run your fingers over the cut you just made feeling for the tiniest little imperfection when everybody around you says "good enough" and you think to yourself "not yet"...(don't forget that internal smirk) :)

It's all about the journey anyway...all the things you have picked up along the way to making a sled that had nothing to do with "sled"... (BTW...I keep a notebook)

Besides...you sound like you're having fun at it...isn't that the objective...???
 
#29 ·
Moz...........I think you'll be fine just using some 3/4" oak. I don't know if you have widely varying humidity where you live, but if so, you can put a couple of set screws in the side of each runner that you can adjust for when the humidity is low and the wood has contracted a little. Adjust them out to take up any sloppiness in low humidity, and back in for higher levels at other times of the year. Its easier if you install the set screws before attaching the runners to the sled.
 
#30 ·
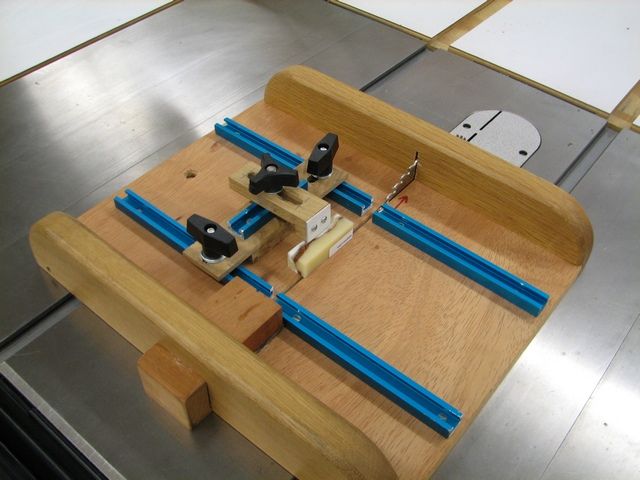
Guys and gals , when I googled table saw sled I found this version quite interesting .
I can see building a few differant versions of sleds now . This could save a finger when working with that small stuff

 
  • Like
Reactions: Moz
#31 ·
Parafin works for slicking up the runners too. Parafin is also good on drawers that don't have the metal slides and have the old fashioned hardwood runner on top of hardwood runner. On old antiques where the runners have worn over time and the drawers are starting drag on the stile I glue strips of counter top laminate to the runners which raises the drawer back up and makes them slide easier. A rub of parafin on the laminate strips and the drawers slide almost as good as with the metal slides.
 
  • Like
Reactions: Moz
#34 ·
On old antiques where the runners have worn over time and the drawers are starting drag on the stile I glue strips of counter top laminate to the runners which raises the drawer back up and makes them slide easier. A rub of parafin on the laminate strips and the drawers slide almost as good as with the metal slides.
Chuck, you get the smoochie of the day for that tip. :x

I live in the house I grew up in, an early 50's tract house, and the kitchen drawers are as you describe. a couple of them have drag, one has a horrid propensity to jump the track if you don't pull the drawer out exactly so.

I like your solution.
At the very least, you have reminded me that I DO now have the tools to fix the problem. But you have also gifted me with a fix that will improve my repairs. Love it! Thank you!!!

~M
 
#32 ·
Before getting too involved with this project, the first determine that both of your miter gauge slots are parallel! If they are not parallel, the runners will bind.

Also determine the miter gauge slot and blade are parallel.

I have seen a few contractor type saw where the slots were not milled parallel. This summer there was a thread here 'bout this:

www.routerforums.com/tools-woodworking/71361-table-saw-adjustment-any-ideas.html