Years back I'd made a nice little pine piggy bank, for my grand-dau. It was passed along to my 3yo grandson a bit back, and that's the first I'd seen it in years. Turned out my then dau-in-law had put a half dollar in it, and to get it out hacked the devil out of the coin slot - making it large enough for the grandson to get some of his very small toy cars in it. Really irked me, because I'd made the inside so it was very easy to shake the coins out - the the dau-in-law was too impatient to wait. Well, when I saw it, I volunteered to make another, but my son said he would prefer a monster truck bank. OK, no prob. Found a picture of Gravedigger, and modeled it, loosely, on that.
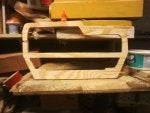
You'd think a bank would be simple, right? Not so much. I made masters, so I could rout the pieces out (used 3/4" plywood) to have them all accurate. A total of 8-9 masters, I lost count. A 'lot' of lessons learned on this.
Don't use 3/4" plywood on the next bank, use 1/2".
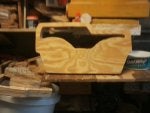
Don't make curves on the inside of the bank, you can't cut them really smooth, and the interior is not neat. No one will ever see it, but I know. Next time it's straight lines, and a straightedge tacked down so I can rout straight lines.
The original plan was four bolts to hold a plate in the bottom, to hold the coins in. The final result was two bolts, and the next one will have just one.
Do not glue up without using a glue jig. I got it glued up neatly, motly, but with my mods along the way it made a few pieces stick in, or out, so it needed more smoothing than it should have. The 3/4" stuff is tougher than oak, I couldn't find my sander, had to use a different one, and didn't have any course sandpaper. So sanded until I got tired, it's smooth, but not totally level. Good enough.
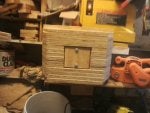
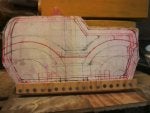
Dropped it off today, and he loved it. If you call it a bank, he will immediately correct you and tell you it is a 'monster truck'. My son wanted strong enough so the grandson could sit on it. Well, all the sides are 3/4", and you could probably park a car on it without breaking it. I left it plain, so if he wants to decorate it later, he can. If I make another, the next one will be a little higher on the tires, and possibly 9" wide, so it is a bit more to scale. Don't know what it weighes, but it's heavy, and I'm sure it will hold more than three gallons of coins. It's 15 1/4" long, 10 1/2" tall, and 12" wide. Here's a picture of Gravedigger, and a couple of the bank. Oh yeah, and a copy of the 'detailed' plan - bad picture. Not bad for a half sheet of plywood.
The next project will be a piggy bank, 16 1/2" long, 9 3/4" tall, probably 12" wide again, and should hold about 4+ gallons I figure, and this one will only need three masters.
You'd think a bank would be simple, right? Not so much. I made masters, so I could rout the pieces out (used 3/4" plywood) to have them all accurate. A total of 8-9 masters, I lost count. A 'lot' of lessons learned on this.
Don't use 3/4" plywood on the next bank, use 1/2".
Don't make curves on the inside of the bank, you can't cut them really smooth, and the interior is not neat. No one will ever see it, but I know. Next time it's straight lines, and a straightedge tacked down so I can rout straight lines.
The original plan was four bolts to hold a plate in the bottom, to hold the coins in. The final result was two bolts, and the next one will have just one.
Do not glue up without using a glue jig. I got it glued up neatly, motly, but with my mods along the way it made a few pieces stick in, or out, so it needed more smoothing than it should have. The 3/4" stuff is tougher than oak, I couldn't find my sander, had to use a different one, and didn't have any course sandpaper. So sanded until I got tired, it's smooth, but not totally level. Good enough.
Dropped it off today, and he loved it. If you call it a bank, he will immediately correct you and tell you it is a 'monster truck'. My son wanted strong enough so the grandson could sit on it. Well, all the sides are 3/4", and you could probably park a car on it without breaking it. I left it plain, so if he wants to decorate it later, he can. If I make another, the next one will be a little higher on the tires, and possibly 9" wide, so it is a bit more to scale. Don't know what it weighes, but it's heavy, and I'm sure it will hold more than three gallons of coins. It's 15 1/4" long, 10 1/2" tall, and 12" wide. Here's a picture of Gravedigger, and a couple of the bank. Oh yeah, and a copy of the 'detailed' plan - bad picture. Not bad for a half sheet of plywood.
The next project will be a piggy bank, 16 1/2" long, 9 3/4" tall, probably 12" wide again, and should hold about 4+ gallons I figure, and this one will only need three masters.